Changing the administrator email on Windows 11 is a simple process that offers greater control and privacy. By switching from a Microsoft account to a local account, you can ensure all data is stored locally and not linked to online services.
This guide will show you how to change the administrator email on Windows 11. You’ll also learn how to switch from a Microsoft account to a local account, add a new email address, and update the existing Microsoft account email address in Windows 11. Additionally, we have included how you can add multiple local accounts, Microsoft accounts, and school or work accounts to your Windows 11 PC in just a few simple steps.
Further, if you need basic file sharing on your local network, a local account works fine. But a Microsoft account offers some benefits for remote access or more complex permission setups.
Let’s jump in! and first find out how to change the email address associated with your Microsoft account.
Change the Administrator Email on Windows 11
Changing the email address associated with your Microsoft account is an easy process. This change will update the email address linked to your account across all Microsoft services, including Windows, Office, Xbox, OneDrive, Live, and Outlook.
Here’s how you can change the email address associated with your Microsoft account:
- Open the Settings menu by pressing “Win + I
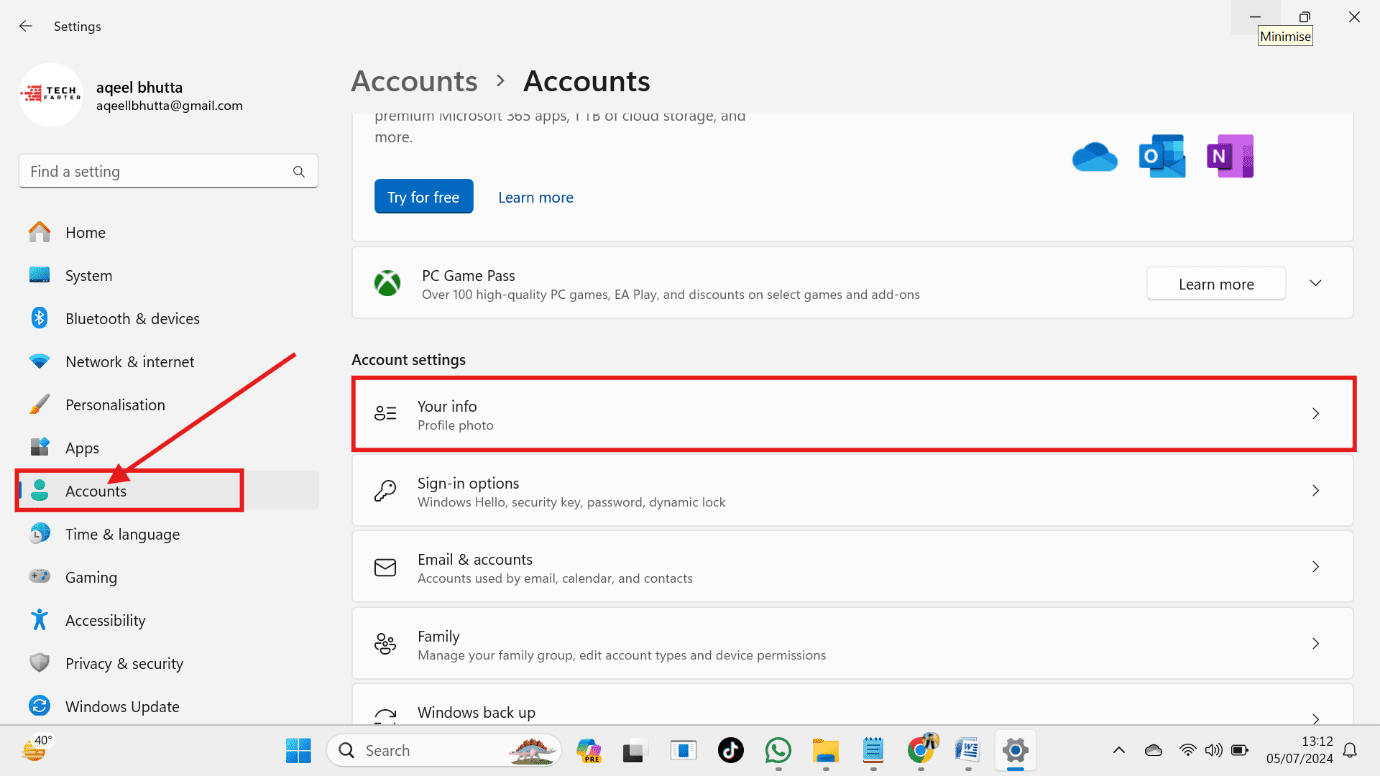
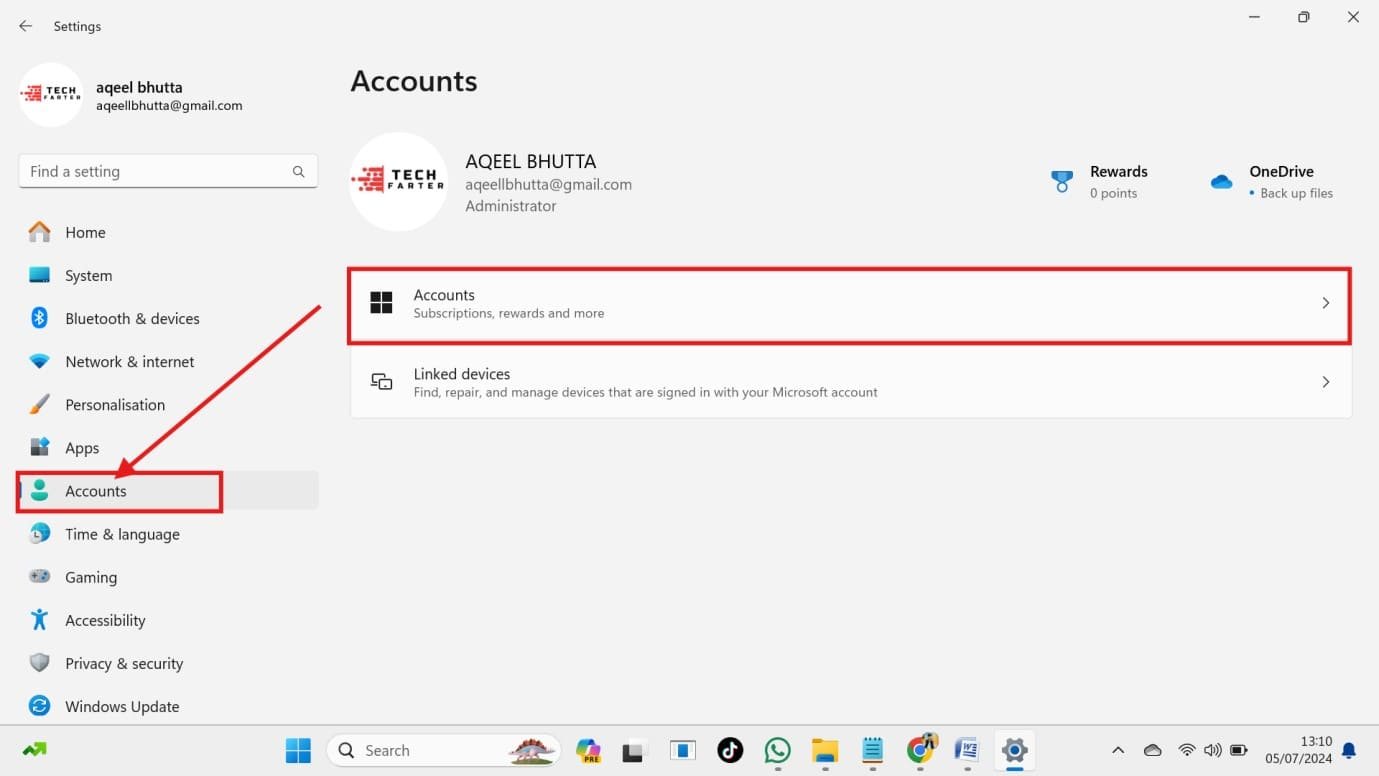
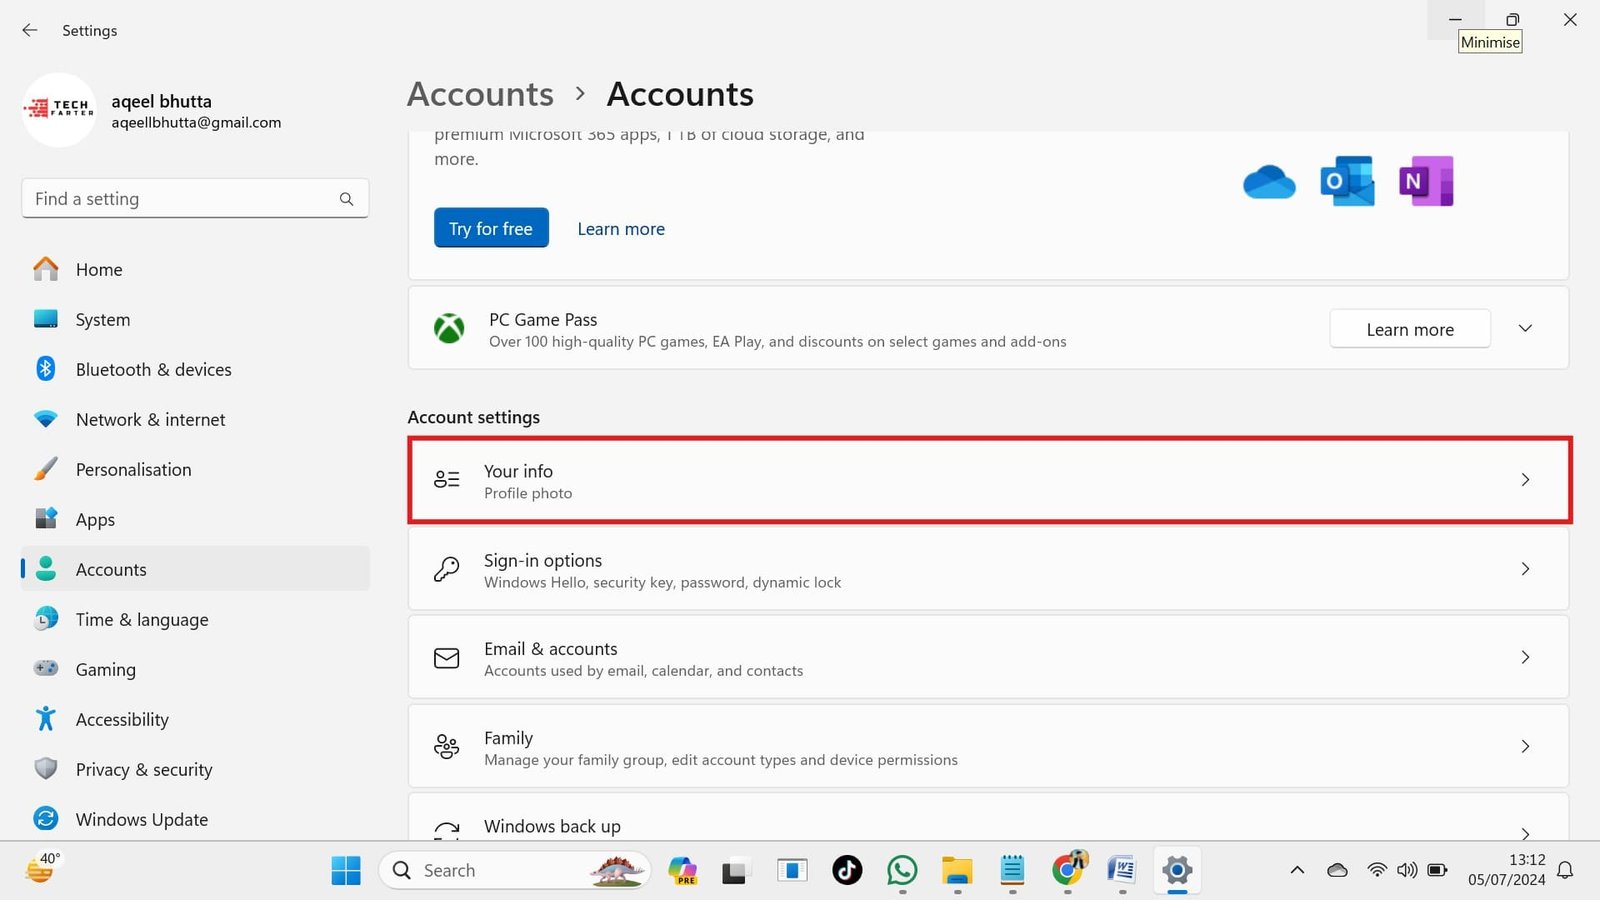
- Navigate to Accounts > Your info.

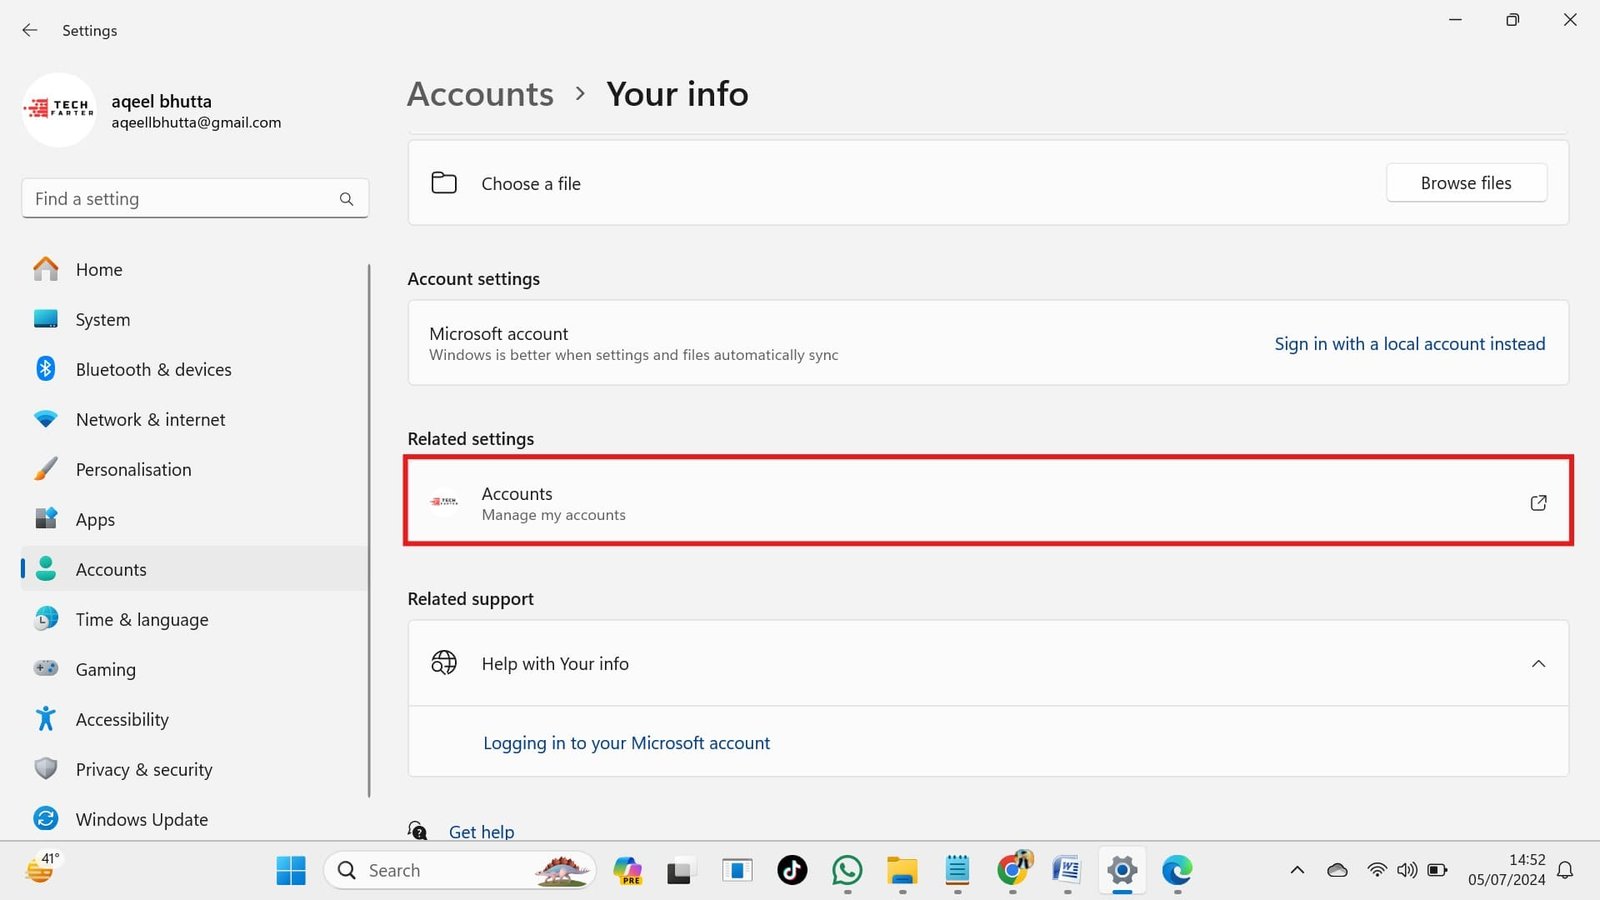
- Under “Related settings,” click on “Accounts: Manage my accounts.”

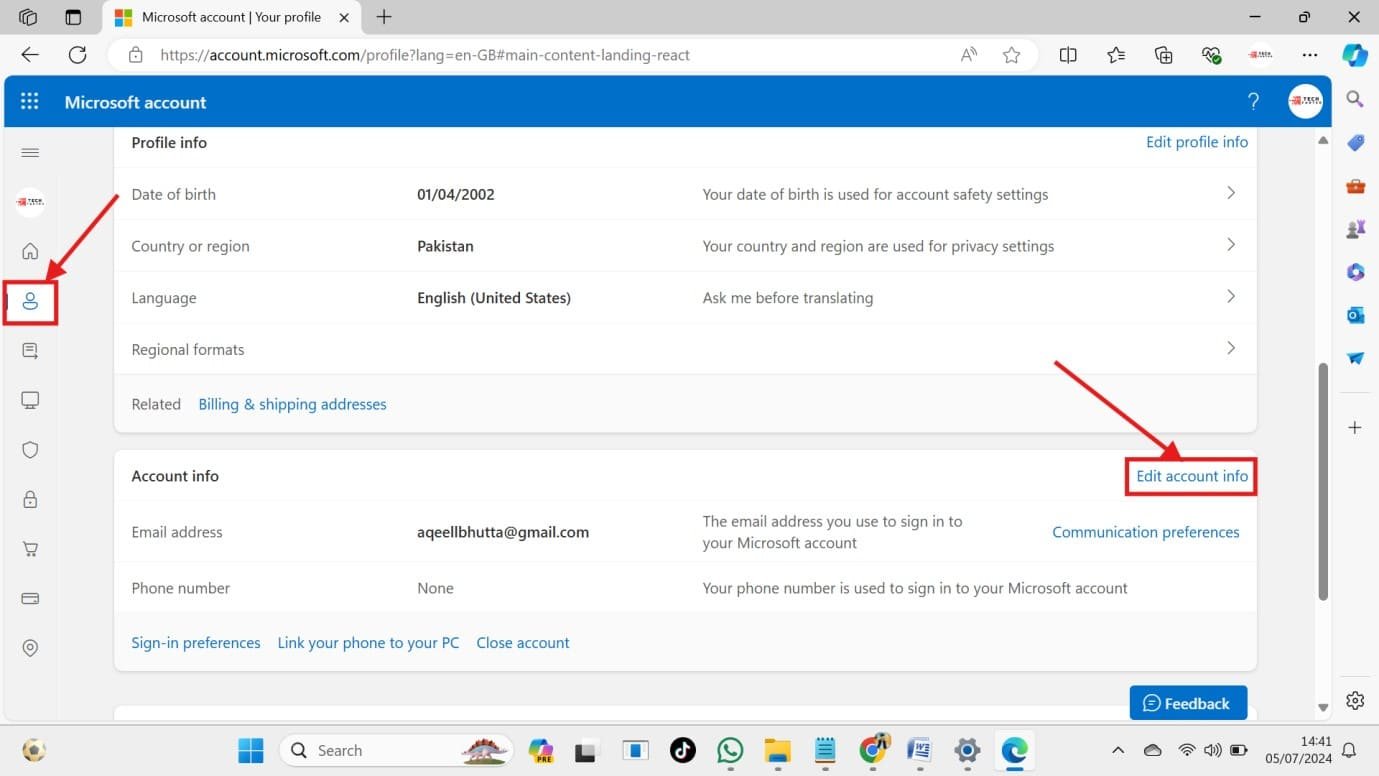
- Sign in to your Microsoft account (if prompted in a new web browser window).
- Click the “Your info” tab, then select “Edit account info.”

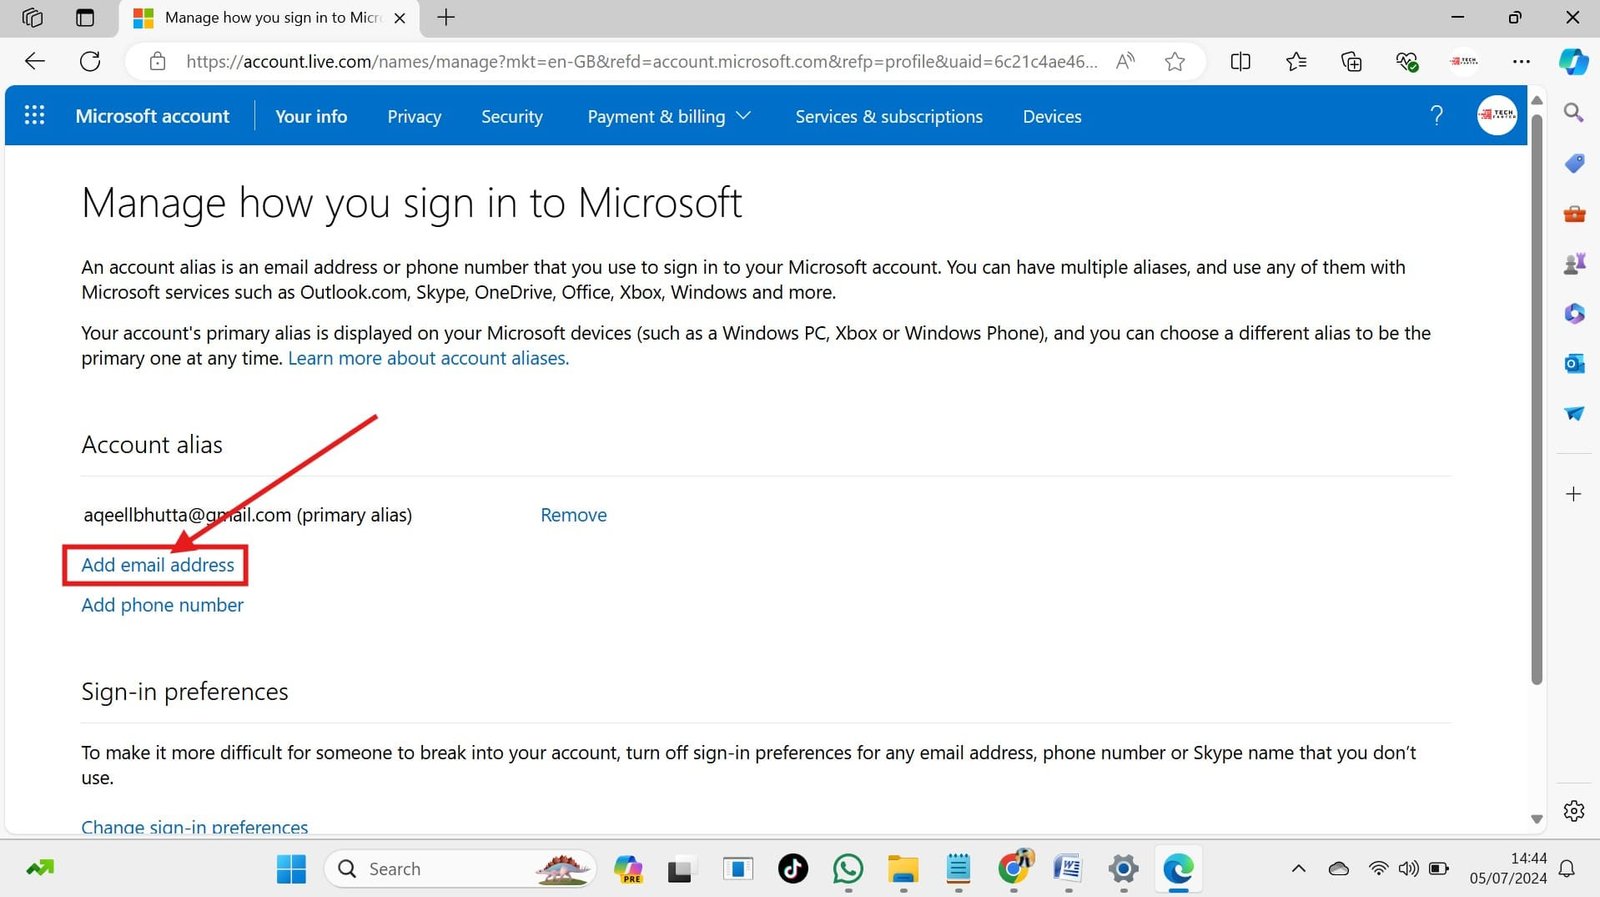
- Click “Add email address.”

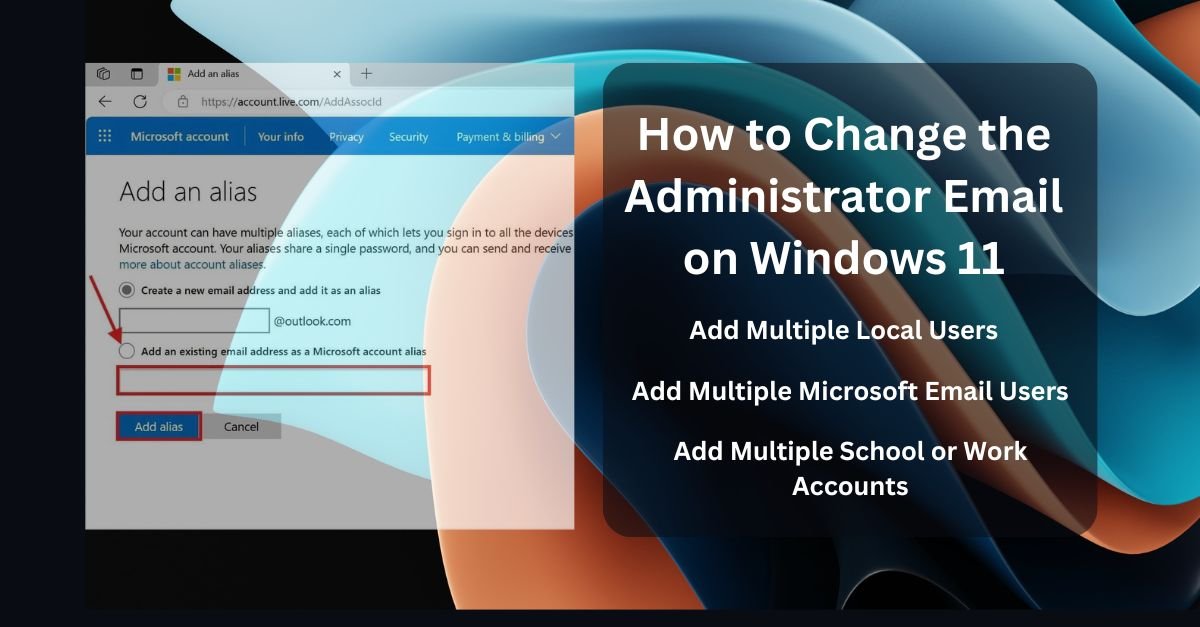
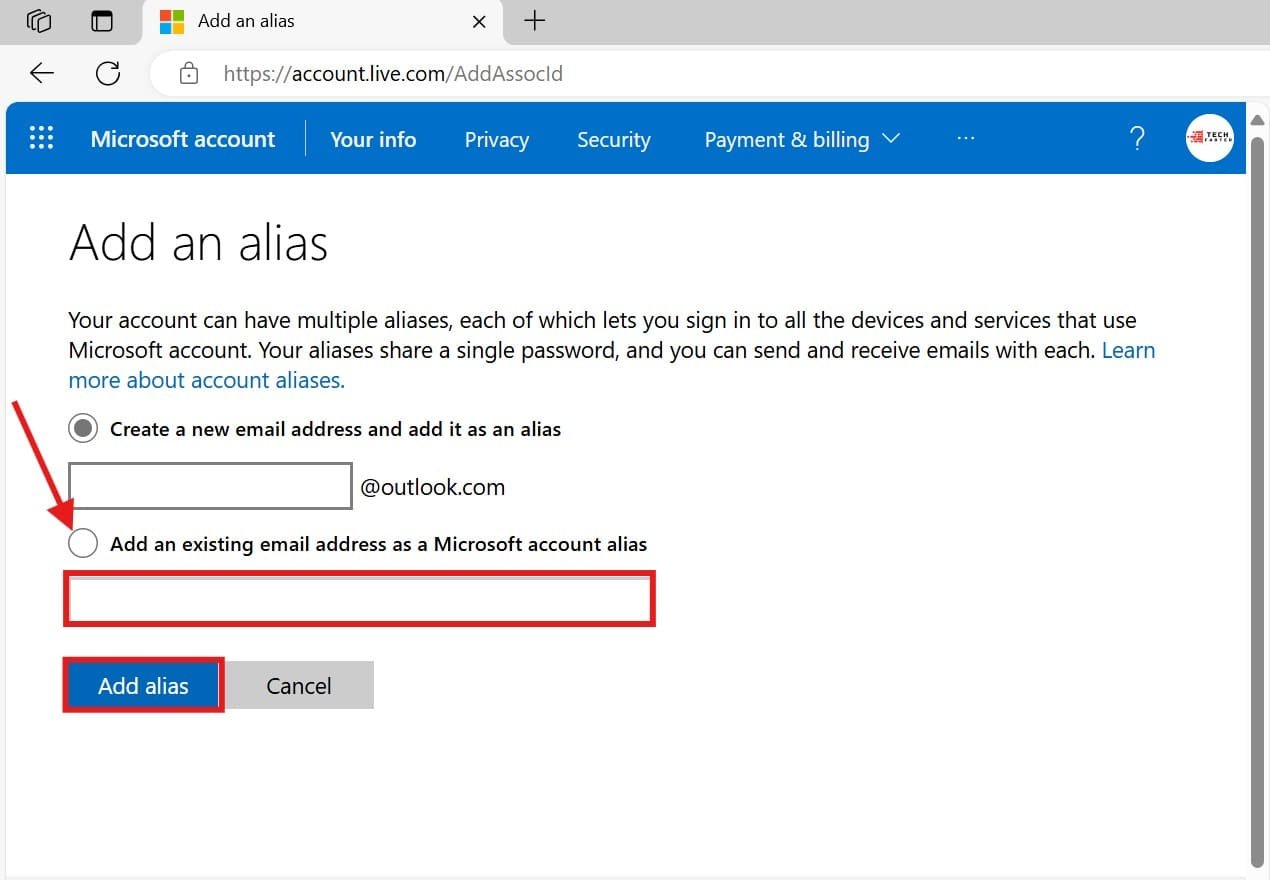
- Enter the new email address and select “Add alias.”

You can now manage your email aliases, including setting a new primary address and deleting old ones if needed. That’s how simple it is to change the administrator email on Windows 11.
Now, let’s learn the safest way to switch an administrator to a local account:
Changing the Administrator to a Local Account
Changing the administrator account to a local account is like setting up Windows 11 without a Microsoft account. It provides greater control over your Windows PC and improves privacy. Local accounts give you more control over your privacy because your information stays on your device, not online.
Want to convert an administrator to a local account in Windows 11? Let’s switch from a Microsoft Admin account to a local account in a few easy steps!
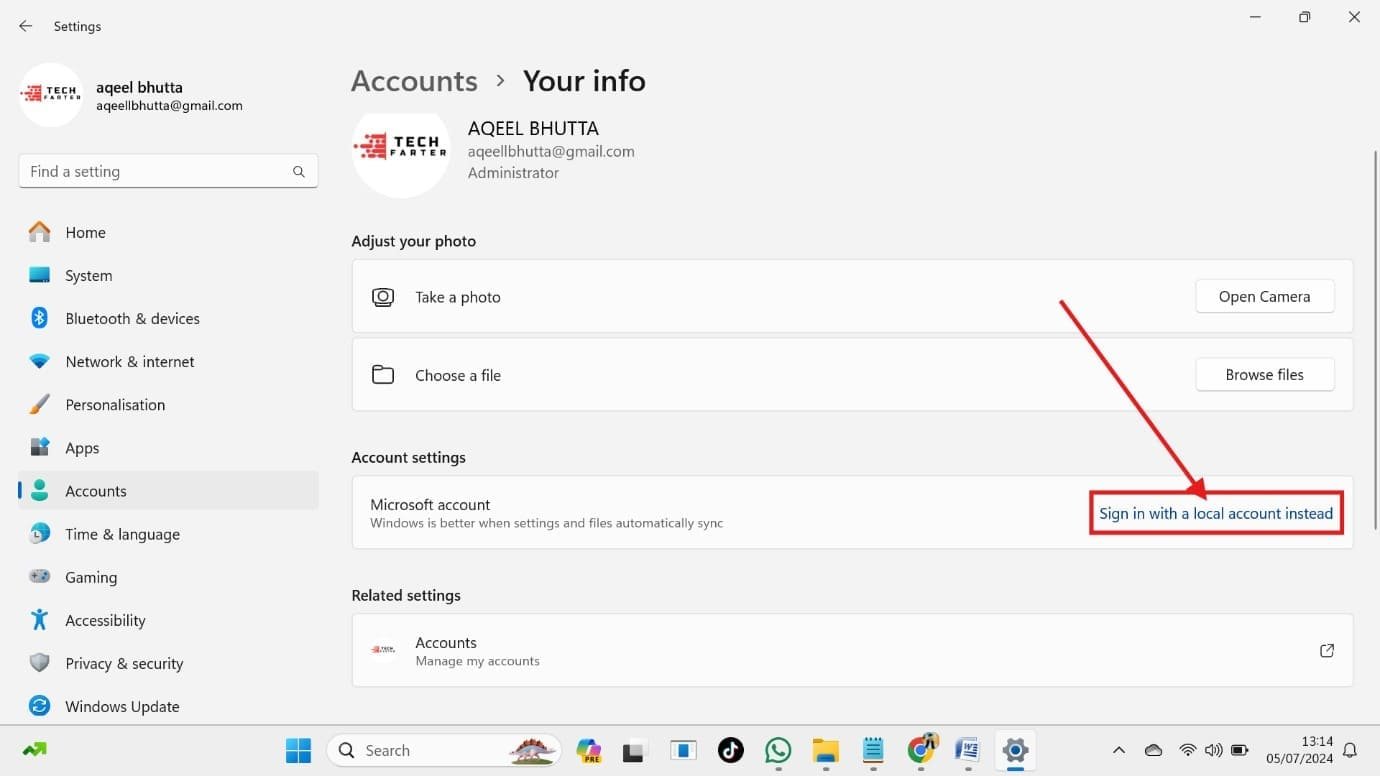
- Open Settings from the Start Menu or press “Windows Key + I.”
- Go to Accounts and select “Accounts.”.

- Click on “Your info.

- Click “Sign in with a local account instead.”.

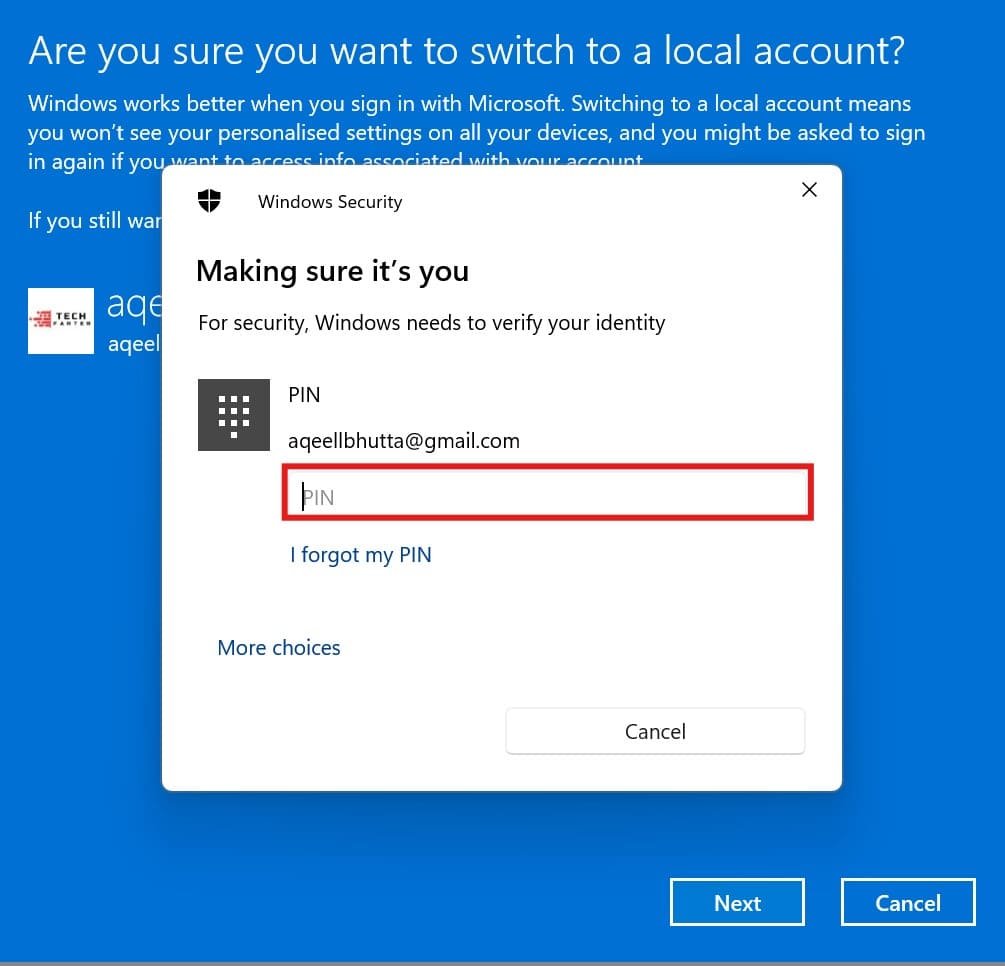
- Confirm the switch and enter your PIN or password.

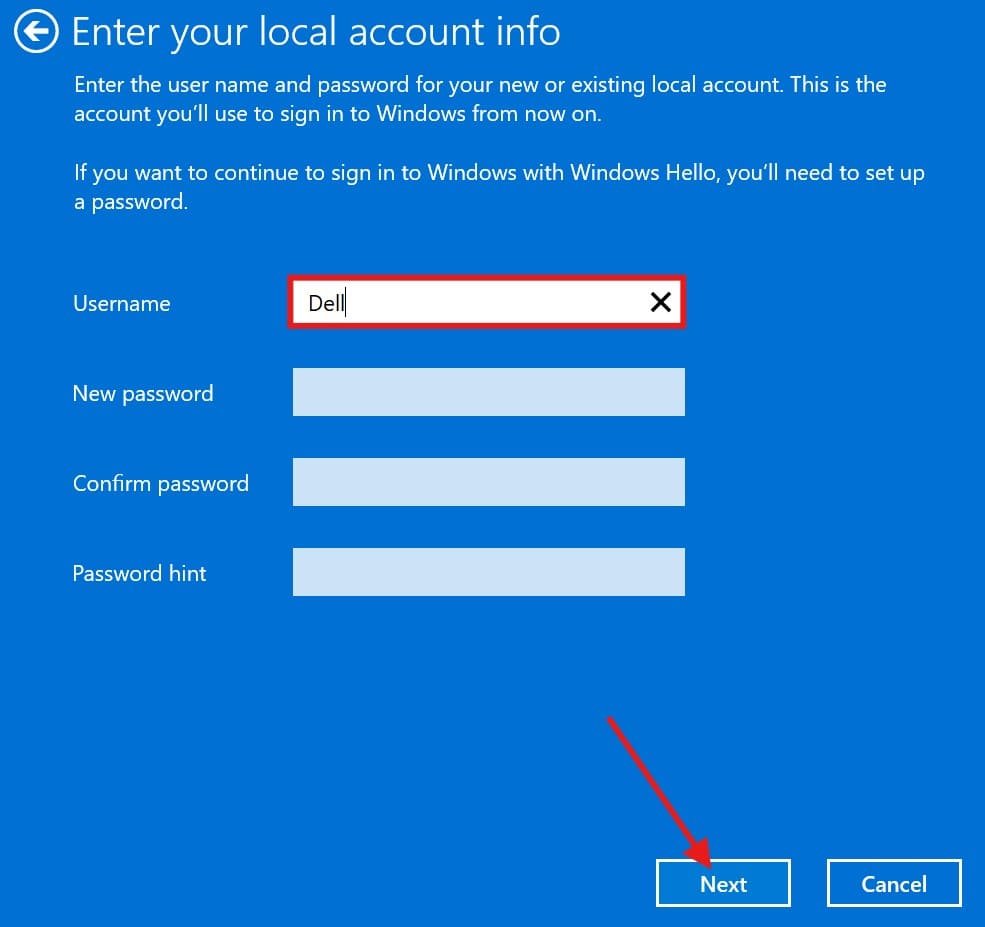
- Create a new local account by choosing a username and password, then click “Next.”.

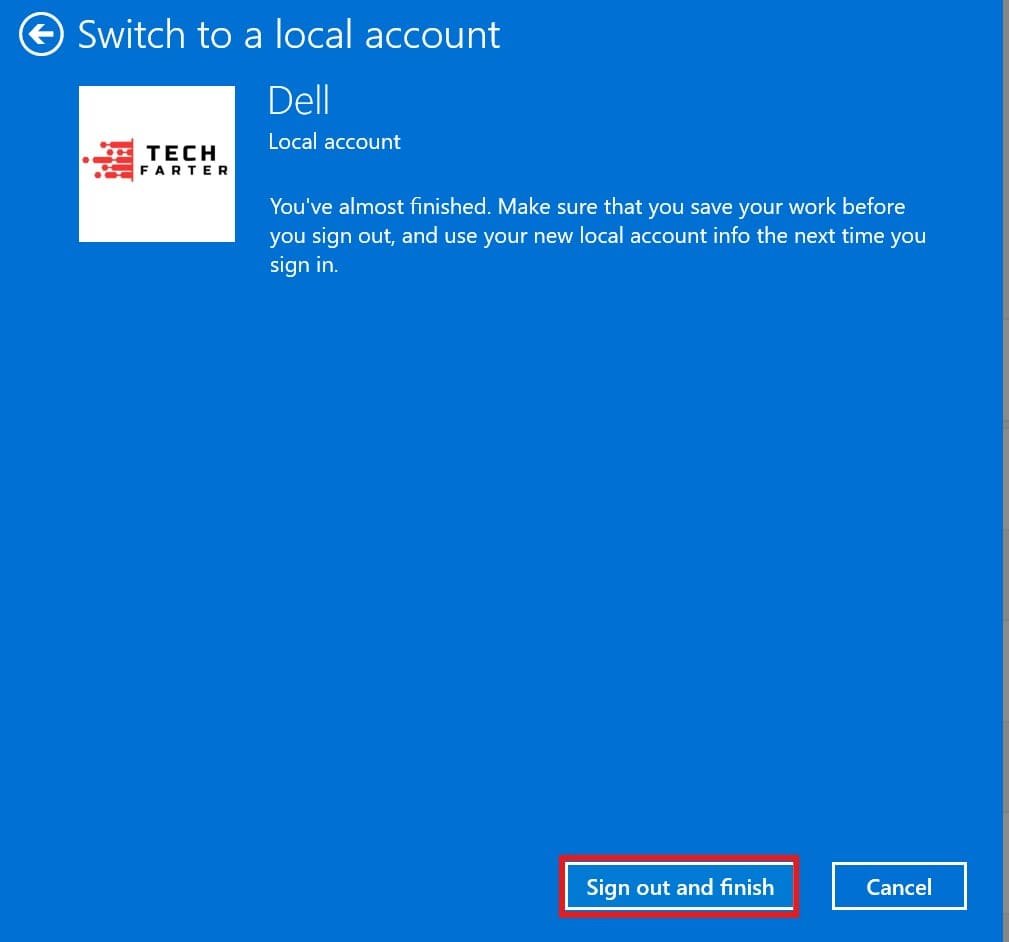
- Click “Sign out and finish” to complete the process. Note that your computer may restart before allowing you to sign back in with the new account.

That’s it; you have successfully changed the Administrator account into a local account.
Adding Multiple Local Accounts in Windows 11 Sign-in Option (with or without Email)
You can add multiple local accounts with and without email in Windows 11. Now the administrator account has been set to be local, and you are logged in. By doing this, your PC will be registered with the new local account.
Here’s how you can link additional accounts to the Windows 11 login option:
Adding Multiple Local Accounts with Microsoft Email in Windows 11 Using Control Panel
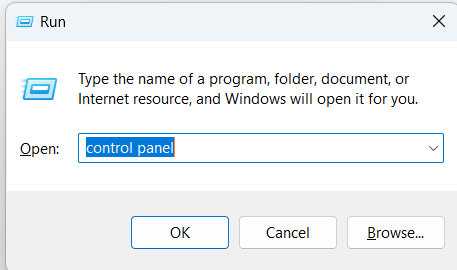
- Press “Windows Key + R” and open the “Run” box.
- Now, type control and press enter. The Control Panel will open.

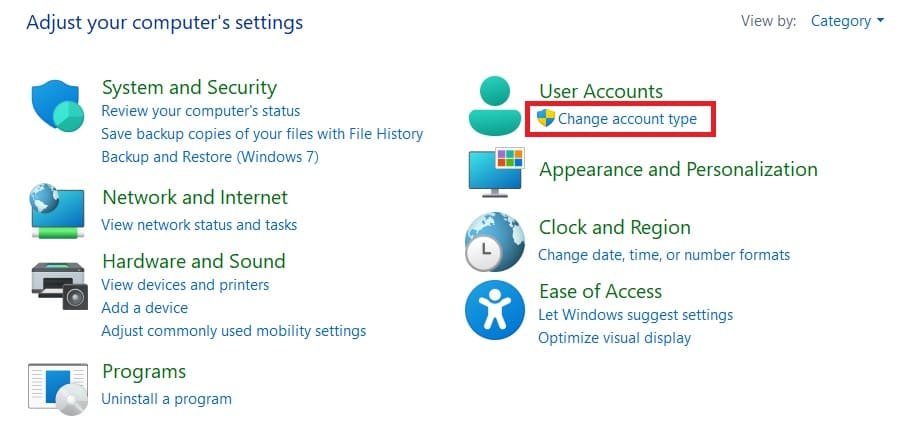
- Click “Change account type” under the “User Accounts” option.

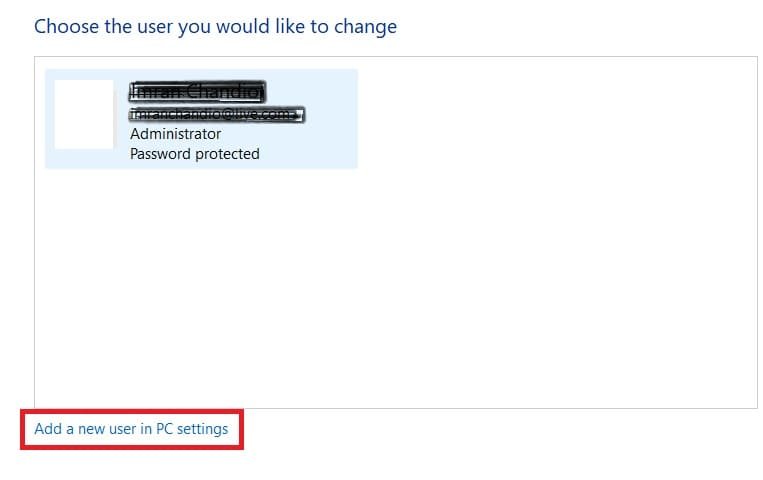
- Click “Add a new user in PC Settings.”

- Click “Add account” in front of Add other user.

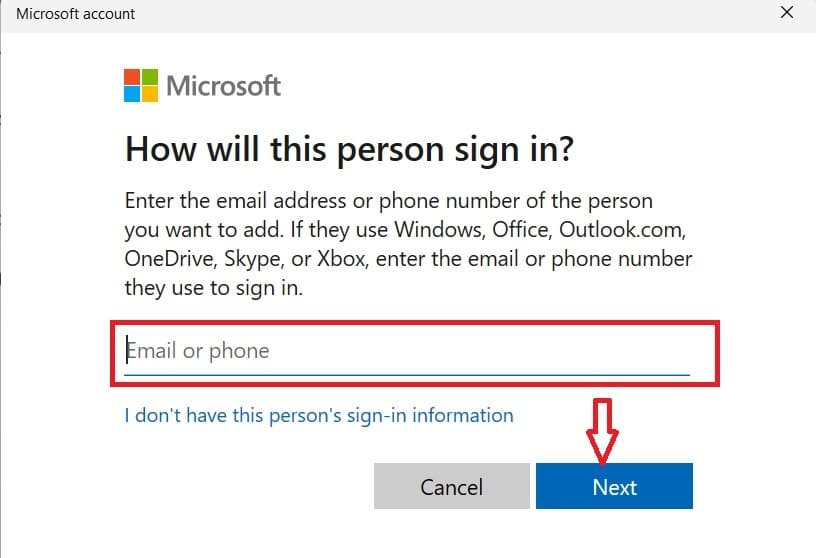
- Enter the Microsoft email address of the person you want to add to your Windows 11 PC.

Now follow the onscreen procedure and link multiple email accounts to your Windows 11 operating system.
Adding Multiple Local Accounts without Email in Windows 11 Using Control Panel
- Repeat steps 1 to 6 from the above section (named Adding Multiple Local Accounts with Microsoft Email in Windows 11 Using Control Panel)
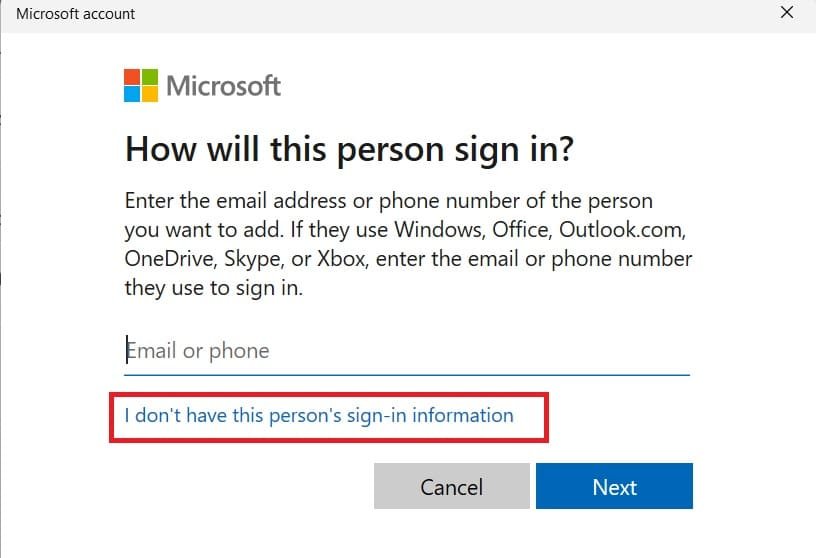
- In case you don’t want to add any Microsoft email account to your PC, you can add a local account. For this, click “I don’t have this person’s sign-in information.”

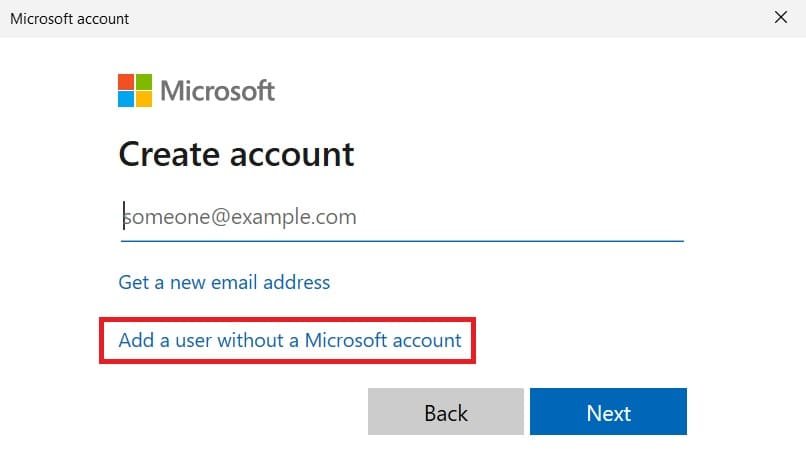
- You’ll see two options there:
- Get a new email address
- Add a user without a Microsoft account
- Click on “Add a user without a Microsoft account.”

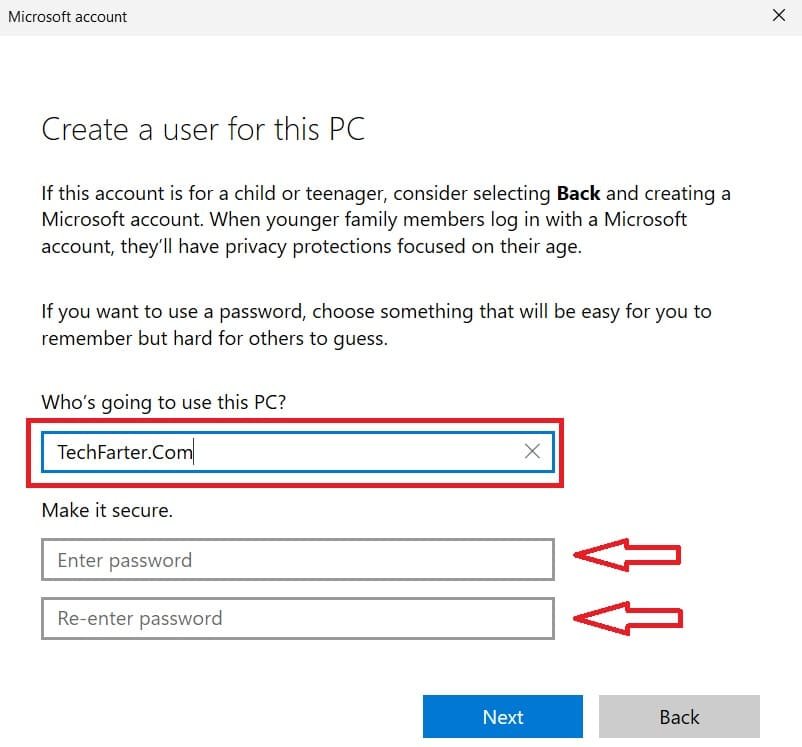
- Enter your username and password and reenter the password to make your new account secure.

That’s it; you can add as many local accounts to your Windows 11 PC with this quick and easy process.
Adding a Microsoft Account or a Work or School Account to Windows 11
Adding a Microsoft account and a school or work account to Windows 11 offers a range of benefits, including access to exclusive features, enhanced security, and seamless integration with other Microsoft services.
A school or work account on Windows 11 can help you stay organized and keep your important data safe.
With these accounts, you can keep your personal and professional school files, documents, and applications separate so that you can find what you need.
The school/work account may also have extra security features to protect sensitive information.
Additionally, your employer or school can easily manage the settings and software on this account to make it up-to-date.
Here’s how you can set up/add a school or work account to your Windows 11 PC:
- Open the Settings app from the Start Menu.
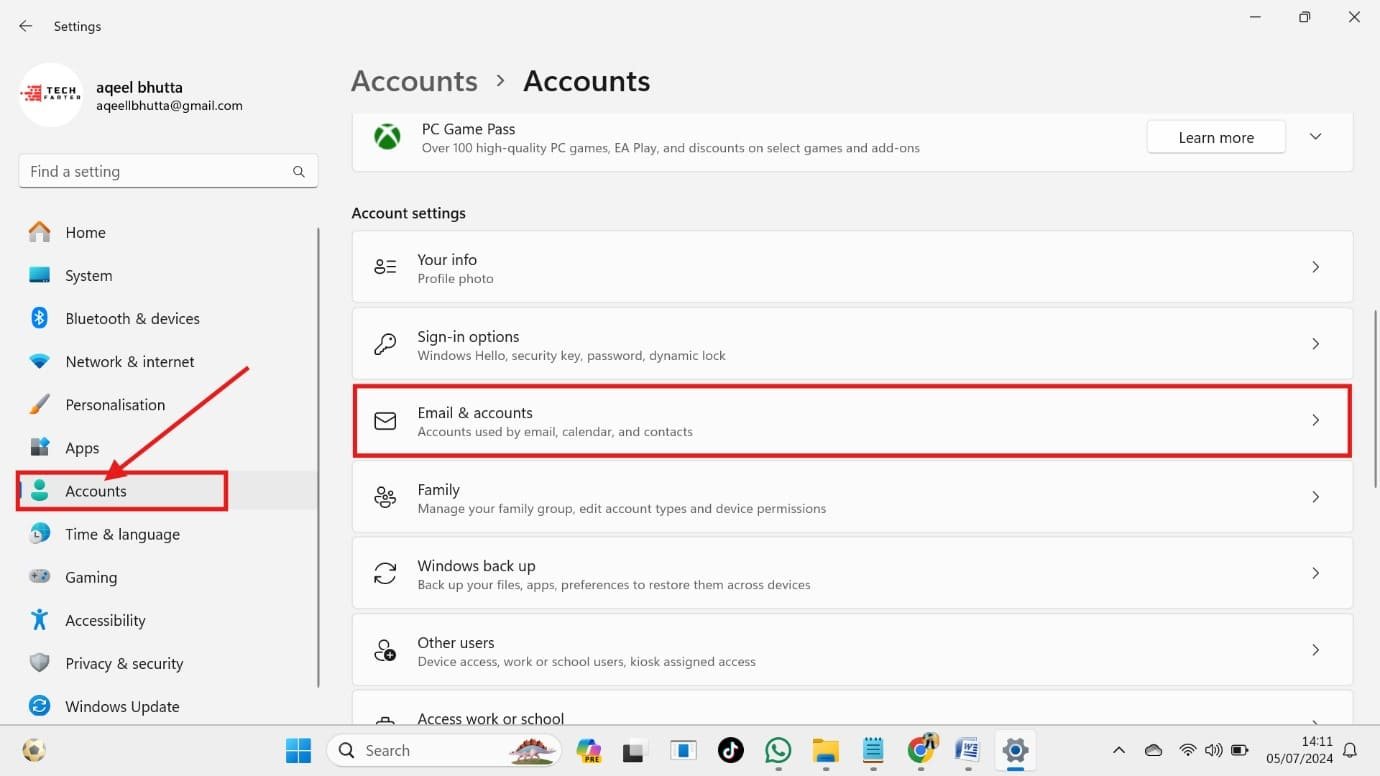
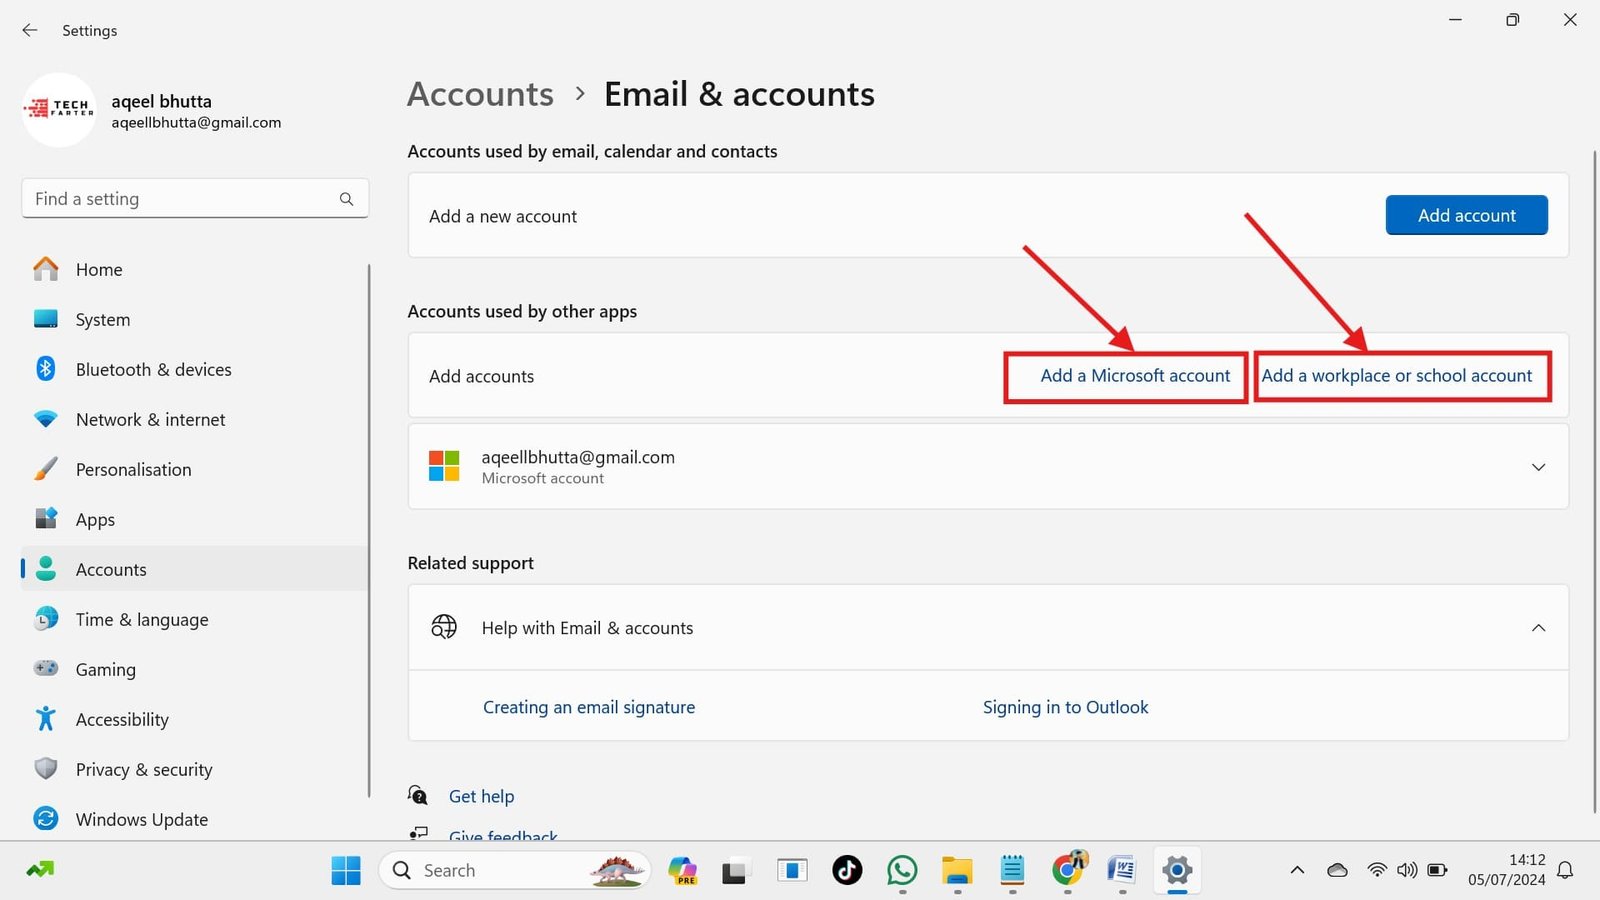
- Navigate to the Accounts section and click on Email & accounts.

- Here, you’ll see two options:
- Add a Microsoft account: This is ideal if your secondary email address is an Outlook.com, Hotmail, Live, or MSN address.
- Add a work or school account: Choose this if your secondary email is associated with an organization or uses a different provider like Gmail or Yahoo.

To add a Microsoft account, click on “Add a Microsoft account,” or if you want to add a work or school account, then click on “Add a workplace or school account,” follow the onscreen procedure, and you’ll successfully link your desired account on your computer.
Conclusion
Changing the administrator email on Windows 11 offers greater control and privacy. By following the steps outlined in this guide, you can easily switch from a Microsoft account to a local account, add a new email address, and update the email address associated with your Microsoft account. With these easy steps, you’ll easily manage your Windows 11 administrator account and Microsoft account.
Take full advantage of your Windows 11 device by switching accounts on the Xbox app to enjoy a personalized gaming experience and seamless integration across devices. Plus, checking your Windows version ensures you’re up to date with the latest features, security enhancements, and exclusive perks. Take control today and make the most of both your local and Microsoft accounts!
FAQs: How to Change the Administrator Email on Windows 11
Is Changing the Administrator Email Secure?
Yes, changing the administrator email is a secure process that uses encryption to protect your data. When you change the administrator email, Windows 11 uses secure protocols to authenticate and verify your account information. This ensures that your personal data and account settings are protected from unauthorized access.
Why Should I Change The Administrator Email?
Changing the administrator email offers several benefits, including enhanced privacy, improved security, and greater control over your device and Microsoft account settings. It also helps keep work or school accounts organized and separate from personal accounts. Additionally, using a dedicated administrator email can limit access to your device and Microsoft account, reducing the risk of unauthorized access. Overall, changing the administrator’s email is a best practice for security and privacy.
Can I Rename the Administrator Account?
Renaming the Windows 11 admin account is simple and improves security. It makes it harder for unauthorized users to gain access. We’ll show you how to rename it in a few easy steps.
- Press the “Windows key + I” to open Settings.
- Click on “Accounts”.
- Select “Your info” from the right menu.
- Click on “Account options“.
- Click on “Rename” or “Edit name“.
- Enter the new name for the administrator account.
- Click “Save” or “OK“.
How to change the email on an Administrator account in Windows 11?
- Open Settings and go to Accounts.
- Select Your info under account settings.
- Click Accounts in related settings.
- Sign in to your Microsoft account in the browser.
- Go to the Your info tab and select Edit account info.
- Click Add email and create a new address or use an existing one as an alias.
- Click Add an alias.
- Change the primary alias to the new email.
- Delete the old email if it's not needed.
How to change the admin email on Windows 11?
- Open Start > Settings > Accounts > Your info.
- Select Sign in with a local account instead.
- Follow the setup steps to create a local account (password optional).
- Log out and log back in using the local account.
- To switch back, go to Accounts > Your info and select Sign in with a Microsoft account instead, then complete the setup.

