Probably, you are tired of seeing news articles and updates on your Windows 11 desktop. If you prefer a cleaner and more focused workspace, you can remove Bing from Windows 11 and also turn off, remove, or disable the news feed in Windows 11.
In this quick guide, we will show you several ways to disable the interests and news feed in Windows 11, answering common questions like “How do I turn off News from Windows 11?” and “Windows 11 removes news from widgets but keeps weather.”
We’ll cover methods using settings, Group Policy (GPO), and even removing the Widgets board entirely.
Before proceeding to any of the methods above, let’s understand the terms first so that you may have a clear idea of the outcome resulting from removing, turning off, or disabling the annoying news widgets from your system:
Related: How to Clear Quick Access in Windows 11? All Methods
- Turning off News Article: The process of “turning off News from Windows 11” will stop the news from showing up but not necessarily remove the widget itself.
- Disabling News: The procedure of “disabling news feed from Widgets on Windows 11” turns off the news content inside the widgets, but the widget panel will still be there.
- Removing News Widget: The method of removing annoying News Widgets from Windows 11 will completely uninstall the widget, and it will no longer appear on your screen.
Quick Solution:
- To turn off News Widgets: Win + W > Settings > Show or hide feeds > Turn off “My Feed”.
- To Disable News Widgets: Right-click on Empty Taskbar Settings > Toggle off “Widgets.”.
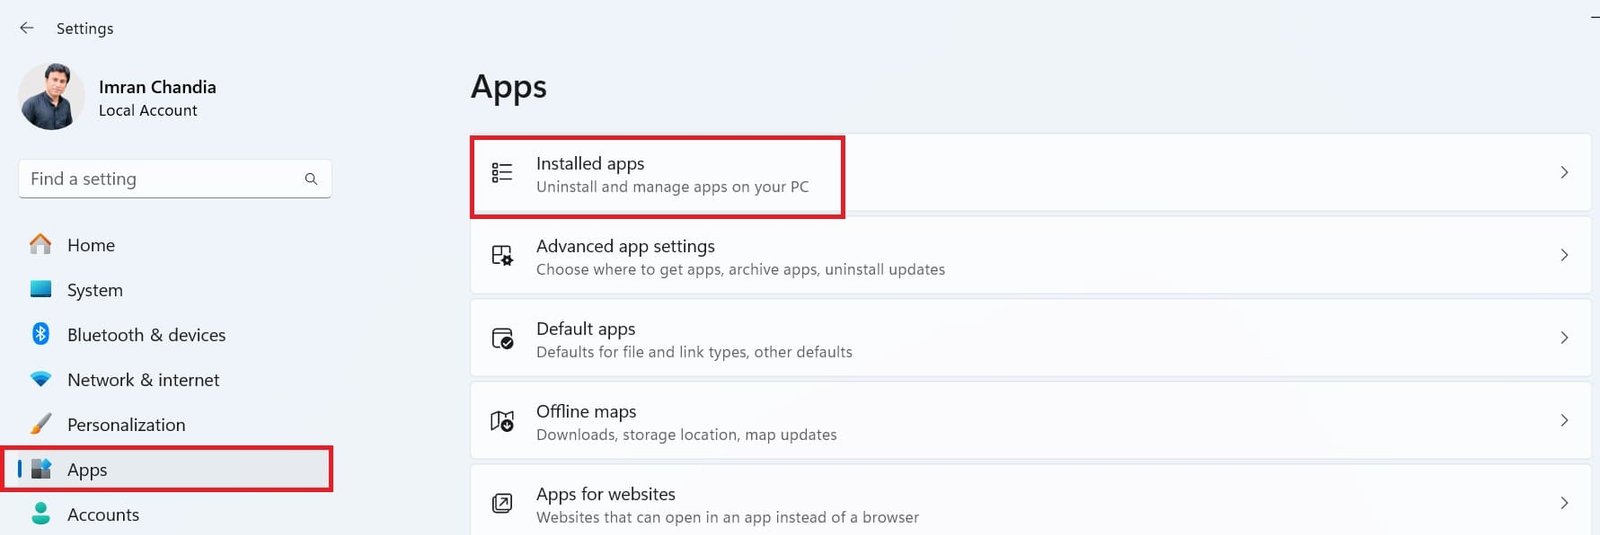
- To Remove News Widgets: Settings > Apps > Installed Apps > Search “News”
What Is News Feed in Windows 11?
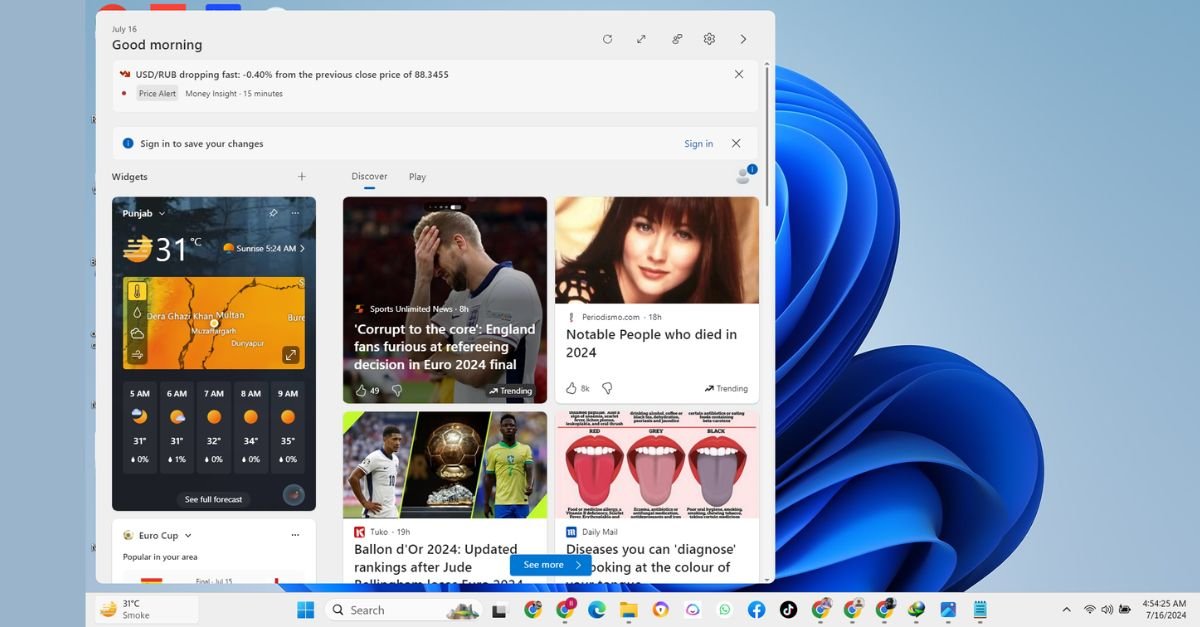
The News Feed in Windows 11, also called “My Feed” within the Widgets board, is a personalized feed that displays news articles, weather updates, and other information. It curates content based on your interests and browsing activity using Microsoft News (formerly MSN).
Now, let’s move ahead and learn how to stop the taskbar News and Interests from opening on hover in Windows 11.
How to Turn Off News Feed from Widgets in Windows 11
If you’d prefer a calmer and more focused workspace, you can easily disable the News Feed. This will leave you with just the widgets you find useful, like the weather or the calendar.
Let’s jump into the quick steps to find out how to turn off the news feature in Windows 11 and stop seeing news updates with our simple instructions.
Related: How to Hide the Search Bar on Windows 11 and 10?
- Open the Widgets board by pressing (Win + W).
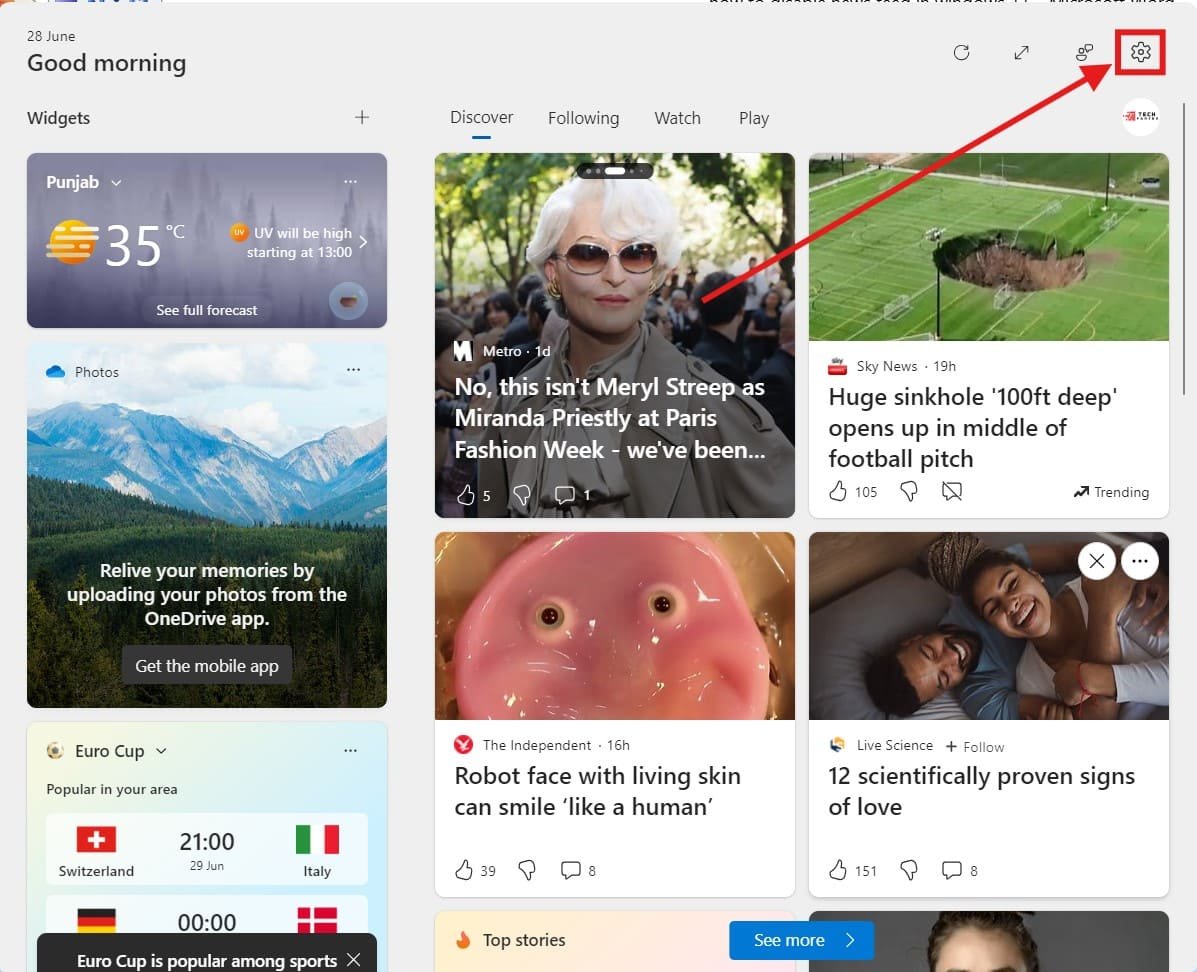
- Look for the settings icon in the top right corner and click it.

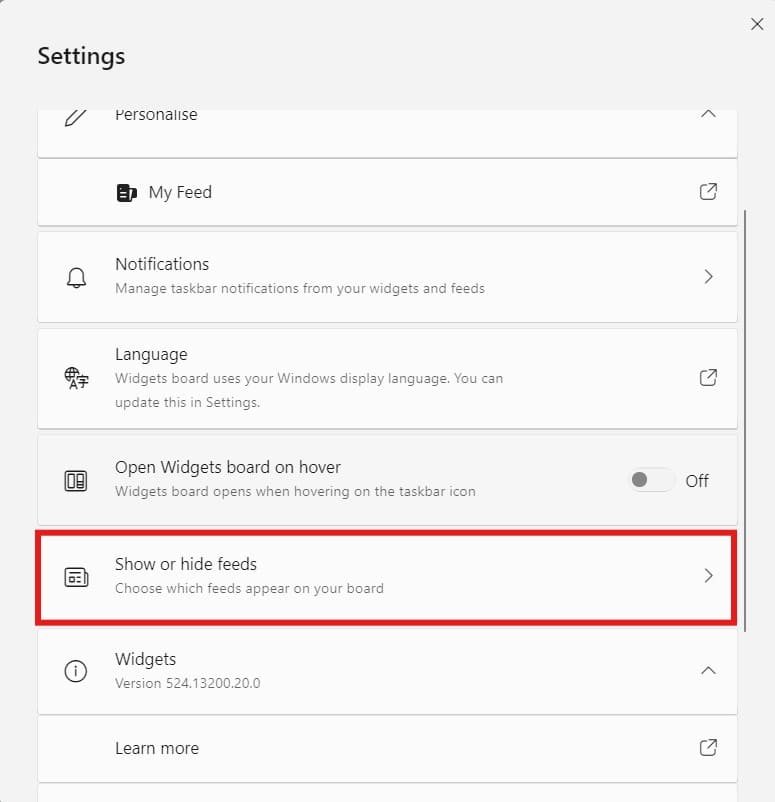
- There will be an option called “Show or hide feeds“; click on it.

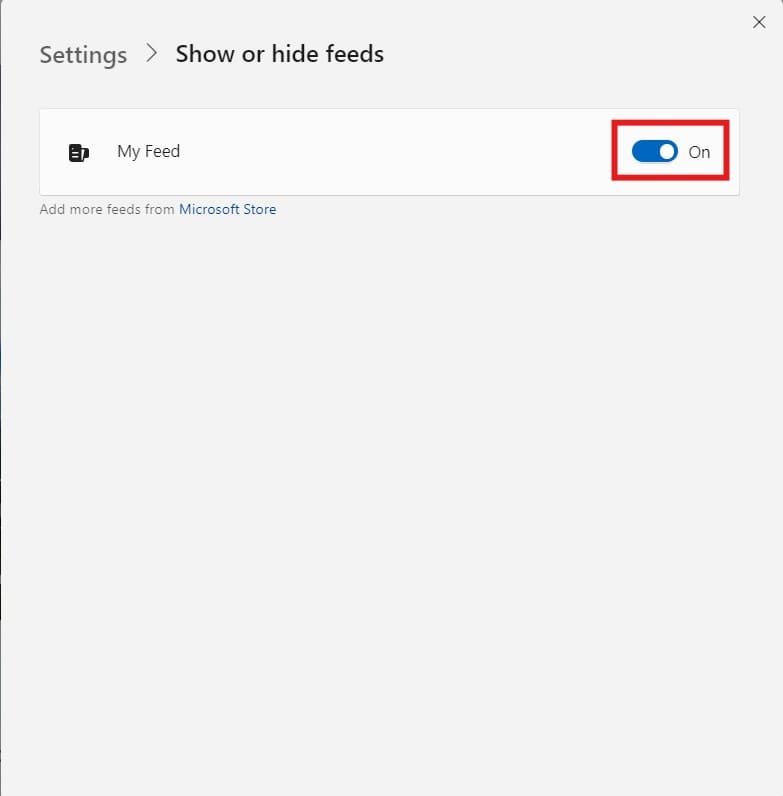
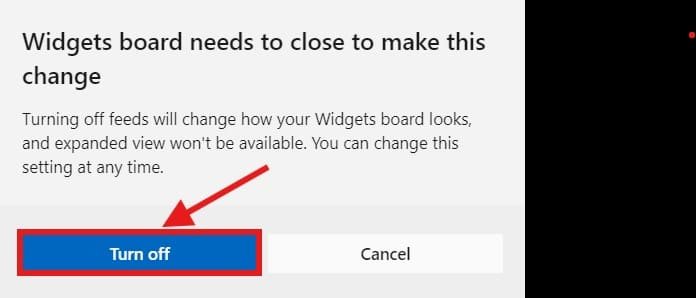
- Then simply turn off the switch for “My Feed.”

- A pop-up might ask you to confirm. Click “Turn off,” and voila! No more news cluttering on your Widgets board.
How Do I Remove the News App from Windows 11?
The built-in News app in Windows 11 can’t be completely uninstalled like some traditional programs. However, you can remove or hide the Widgets board from your computer by uninstalling the “Microsoft News and Features” app.
Here’s how to fully remove annoying news widgets from Windows 11 and get rid of unwanted news pop-ups to keep your screen clutter-free:
- Click on the Start menu and select “Settings” or press (Win+i).
- In the left-hand menu, navigate to “Apps.”.
- Within “Apps,” select “Installed Apps” from the right-hand side.

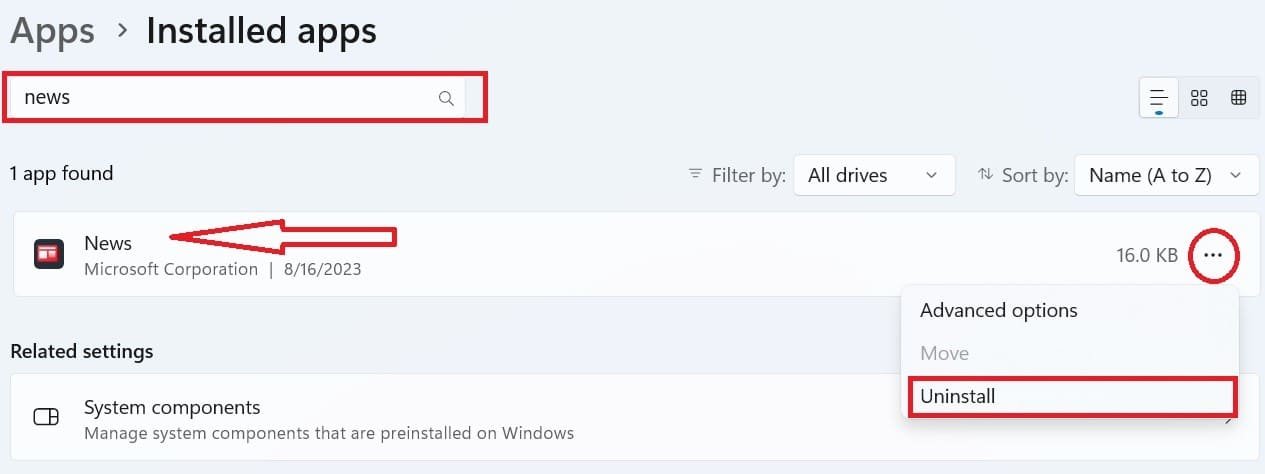
- In the search bar at the top, type “News.”.
Once you see “News Microsoft Corporation” appear in the list, click on the three dots next to it. This will reveal an option to “Uninstall.”. Click on it. - A confirmation window might pop up. Click “Uninstall” again to proceed with removing the app.
How to Disable News in Widgets on Windows 11?
Disabling Widgets will remove the entire Widgets board, leaving you with a more streamlined and focused workspace. Discover how to disable the news feed within widgets on Windows 11. Follow our steps to turn off news content in the widget panel without removing the widget itself:
- Locate the taskbar at the bottom of your screen and right-click on empty space.
- A small menu will appear. Choose “Taskbar settings” from the options.
- In the Taskbar settings window, find the option labeled “Widgets.” Simply toggle the switch next to it to the “Off” position.

This will completely disable the Widgets button on your taskbar and prevent the Widgets board from opening.
Conclusion:
If you’re looking to minimize distractions and personalize your Windows 11 experience, disabling the News Feed and Game Bar in Windows 11 temporarily/permanently is a great option. By following these simple steps, you can finally reclaim your taskbar and customize your Windows 11. No more unwanted news cluttering your screen!
For those looking for more advanced options, we’ve also included instructions on using Group Policy (GPO) to disable News and Interests. So, choose the method that works best for you and enjoy a clutter-free Windows 11! This quick and easy process takes just a few clicks and frees up space on your Widgets board for the information that truly matters to you. With the News Feed gone, you can focus on staying productive and keep your desktop clutter-free.
FAQs: How to Fix Bluetooth Headphones Sound Delay on Windows 11
How do I reduce Bluetooth audio delay in Windows?
Here are some steps you can try to reduce Bluetooth audio delay in Windows 10 and 11:
- Simple fixes: Restart your computer, reconnect your Bluetooth headphones, or try playing audio in a different app.
- Windows tools: Run the Bluetooth troubleshooter or restart Windows’ audio services.
- Settings adjustments: Turn off “Enhance audio” for your headphones or update your Bluetooth driver.
- Hardware: If none of the above work, consider replacing your Bluetooth adapter or headphones (especially if they are older.
How Do I Turn on Bluetooth Faster in Windows 11?
To turn on Bluetooth Faster in Windows 11, follow the steps below:
- Click the network icons on the taskbar (if available). Look for them on the right side, next to the clock.
- Click the “Bluetooth” tile to turn it on/off.
You can also quickly switch on Bluetooth in Windows 11 by
- Clicking Start menu.
- Choosing Settings (cogwheel icon).
- Selecting Bluetooth & devices.
- Finally, toggle Bluetooth on/off.
You can also use the following link for faster Bluetooth settings:
Open Bluetooth & devices settings
Which Bluetooth codec is better AAC or SBC?
By default, Windows 11 uses two codecs for Bluetooth audio: SBC and AAC.
- SBC (Low Complexity Subband Codec): It is a mandatory codec that supports all Bluetooth devices. However, it offers the lowest audio quality.
- AAC (Advanced Audio Coding): It offers better audio quality than SBC, but it’s not universally supported by all Bluetooth devices.
Windows 11 Bluetooth Codec Compatibility
If you are thinking about upgrading your headphones for amazing wireless sound on Windows 11 then here are the key factors to consider codec compatibility.
While Windows 11 supports various codecs, it might not always use the highest quality one. This depends on what your Bluetooth device also supports. Here’s a breakdown:
- Windows 11 prioritizes compatibility: Even if your headphones boast a high-fidelity codec like aptX or LDAC, Windows 11 might default to AAC or SBC to ensure a smooth connection.
- Not all codecs are created equal: Currently, Windows 11 doesn’t support LDAC, a high-resolution option.
- Limited codec control: Choosing a specific codec on Windows 11 usually requires third-party tools.
Wondering which codec your Windows 11 PC is using? While there are workarounds, they might involve additional software.
Does 2.4 GHz WiFi have a higher delay than 5 GHz?
Yes, 2.4 GHz has a slight delay. All signals travel at a finite speed, and it takes some time for the signal to travel from the transmitter to the receiver. This delay is called propagation delay and for a 2.4 GHz signal, it’s approximately 417 nanoseconds (billionths of a second).
However, this small delay is minor for most applications like web browsing or video streaming. It becomes noticeable only in specific situations like high-frequency trading or real-time gaming where even millisecond delay matters a lot.
Traffic congestion is another factor affecting the overall delay experienced with a 2.4 GHz connection. Many devices widely use the 2.4 GHz band, and if there’s a lot of interference, it can cause delays and lag. This is why the 5 GHz band, though having a shorter range, is preferred for applications that require consistently low latency.
How to improve the sound quality of Bluetooth headset Windows 11?
Want crystal clear sound during Bluetooth calls? Here are your options!
Have trouble with scratchy audio on Bluetooth calls? You’re not alone! But fear not, there are a few ways to boost the sound quality – each with its pros and cons. Let’s explore which option works best for you:
- Adjust Audio Settings
- Go to your Windows sound settings.
- Find your Bluetooth headphones under “Playback” or “Recording” devices.
- Right-click and choose “Properties.”
- Under the “Advanced” tab, try different sample rates (like 48000 Hz) and bit depths (like 16-bit or 24-bit).
Test your headphones after each adjustment to ensure smooth operation.
- Upgrade to Wireless Gaming Headphones:
Pros: Ditch Bluetooth altogether! These headphones use a dedicated 2.4GHz dongle for superior sound quality and low lag, perfect for calls and gaming.
Cons: Requires buying new headphones and a free USB port on your computer.
- Disable Hands-Free Mode:
Pros: Keeps your Bluetooth connection and high-quality stereo sound during calls.
Cons: The microphone on your Bluetooth headphones won’t work. You’ll need a separate mic, like your computer’s built-in one.
- Tweak Audio Settings:
Pros: Fine-tune your Bluetooth audio for potentially better sound quality.
Cons: Requires some technical know-how. Experimenting might lead to lag or compatibility issues with your headphones.
How to reduce Bluetooth speaker delay in Windows 10?
- Update Bluetooth drivers via Device Manager.
- Use low-latency codecs (e.g., aptX).
- Uncheck Exclusive Mode in Sound settings.
- Reduce interference by placing the speaker closer to the PC.
- Upgrade to a low-latency Bluetooth adapter if needed.
How to fix sound delay on Bluetooth headphones?
- Restart devices (headphones and source).
- Update firmware for headphones.
- Disable audio enhancements on source device.
- Use aptX Low Latency if supported by both devices.
- Reduce distance between devices.

