Do you ever feel like your Windows 11 desktop is cluttered with icons? This guide will show you different methods on how to customize your desktop. You can show, hide, or resize the icons on your desktop in Windows 11. We will also talk about how to add or remove legacy system icons on a desktop in Windows 11.
Whether you want a clean, minimalist look or easy access to your favorite programs, we’ll walk you through the simple process in just a few clicks.
Let’s get started
Quick Fix
1. To show or hide desktop icons:
- Right-click on your desktop > Click “View” >
- To show your icons, choose “Show desktop icons.”
- To hide, simply uncheck the box.
2. To add or remove icons on your Windows 11 desktop:
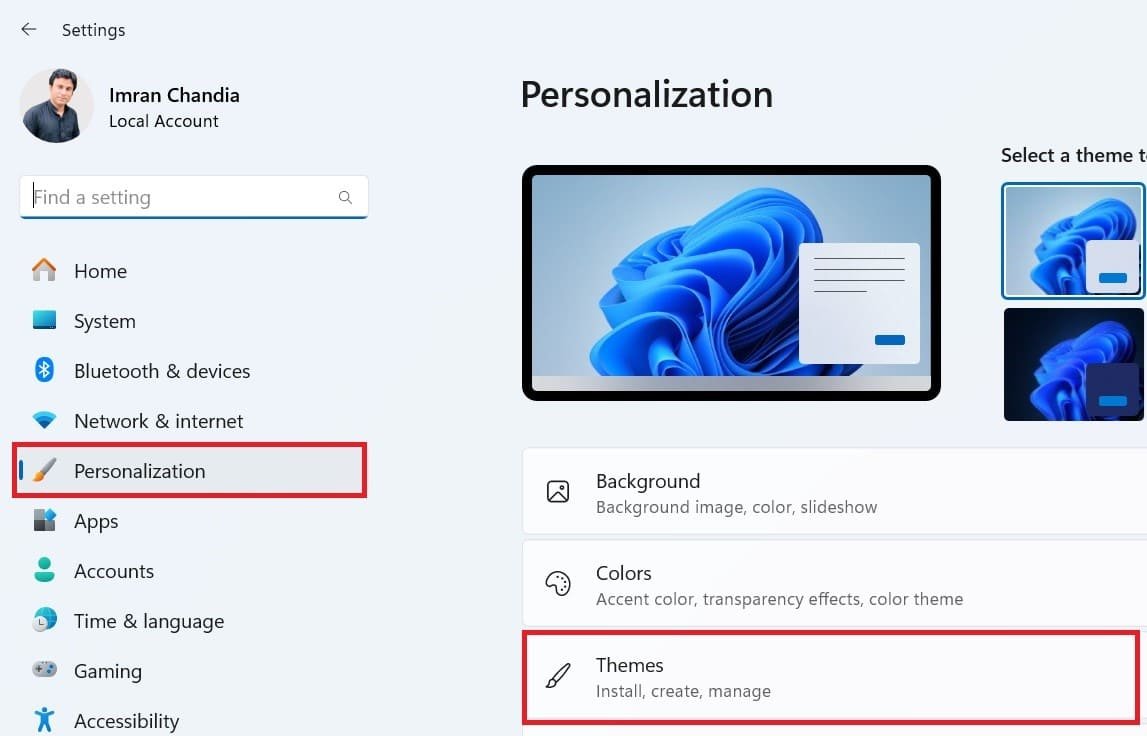
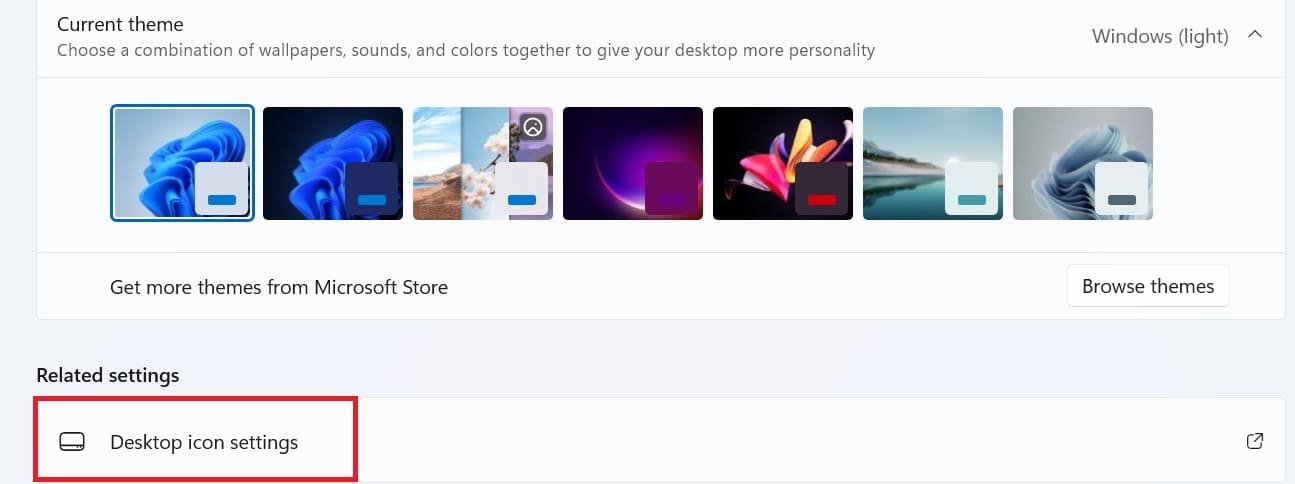
- Settings > Personalization > Themes > Desktop icon settings, and then check or uncheck icons to add or remove them, respectively.
Now, let’s move ahead and discuss how you can show desktop icons on your Windows 11 PC.
How to Show or Hide Desktop Icons in Windows 11
Show or hide desktop icons in Windows 11 using easy methods:
Show or Hide Icons on Your Desktop in Windows 11
Here is a step-by-step guide on showing or hiding desktop icons in Windows 11:
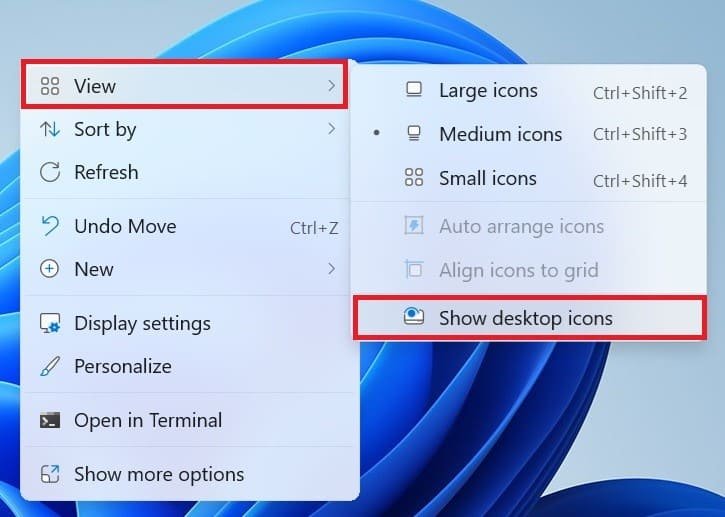
- Right-click anywhere on your desktop background.
- A menu will appear. Look for “View” and click on it.
- You’ll further see a list of options; choose “Show desktop icons” to make your icons appear or uncheck them to hide them.

Optional Settings
You can also change the size of the desktop icons to:
- Small Icons
- Medium Icons
- Large Icon
Also, you can automatically arrange icons to the left side of the desktop screen.
Related: How to Remove Red X on Files in Windows 11/10 Effortlessly
To do this, simply check the box “Auto arrange icons.”.
Note*: If “Auto arrange icons” is checked, you can’t arrange icons by hand. So, to transfer one or more icons to another part of the screen, disable the option.
Additionally, you can also check the “Align icons to grid” box to make the icons on your screen line up.
All of the desktop icons will be visible after you finish the steps.
Add or Remove Icons on Your Desktop in Windows 11
You can add or remove legacy system icons on your desktop and choose which ones to show or hide. Here’s how:
- Right-click anywhere on your desktop.
- Click on “Personalize.”.
- Look for “Themes” and click on it.

- Scroll down and click “Desktop icon settings.”.

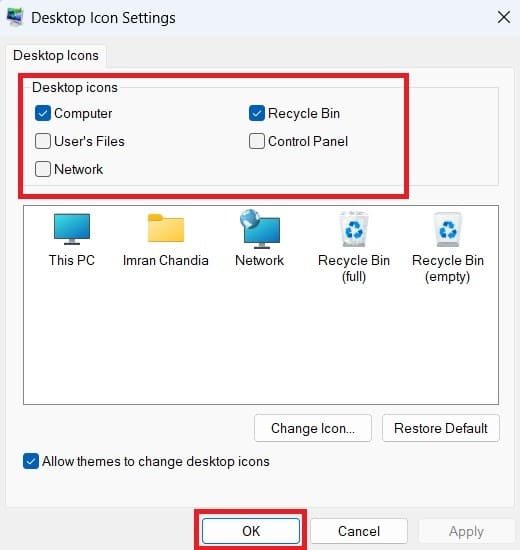
- On the Desktop Icon Settings, check or uncheck the tick box before the icon you want to show or hide on the desktop and select OK to save changes.

You can add or remove the following legacy system icons on your Windows:
1. Computer.
2. User’s Files.
3. Network.
4. Recycle Bin.
5. Control Panel.
In our case, we have checked the computer and Recycle Bin to show icons on our desktop screen.
Conclusion
In short, showing or hiding icons on your Windows 11 desktop is a simple process. Just right-click on your background and choose “View” from the menu. Show your icons, and select “Show desktop icons.” To hide them, uncheck the same box.
To control which icons appear, right-click, go to “Personalize,” then “Themes,” and select “Desktop icon settings.” Similarly, if you’re wondering “How to Change the Time Zone in Windows 11,” go to Settings > Time & Language to adjust it easily.
FAQs: How to Show or Hide Desktop Icons Windows 11
How do I show the icons on my Windows 11 desktop?
It’s easy! Right-click anywhere on your desktop background. A menu will appear. Find “View” and click on it. You’ll see a list of options. Simply, choose “Show desktop icons” and your icons will reappear.
How do I hide the icons on my Windows 11 desktop?
Follow the same steps as showing icons, but this time, uncheck the box next to “Show desktop icons” in the “View” menu.
Can I choose which specific icons appear on my desktop?
Yes! For more control, right-click on your desktop again. This time, click on “Personalize,” then “Themes,” and finally “Desktop icon settings.” There you can choose which icons you want to see by checking or unchecking the boxes next to them.


