Mastering screen recording on Windows 11 unlocks a world of possibilities, whether you’re creating tutorials, capturing epic gaming moments, or crafting bug reports. This guide helps beginners and Windows users, offering a comprehensive breakdown of the available methods.
This guide explores how to use the built-in Windows 11 screen recorder (Xbox Game Bar) and the convenient Windows Key + Alt + R shortcut for screen capture,
We will also discuss the feature-rich world of third-party screen recording software. In this guide, we’ll provide clear instructions and helpful tips and even recommend the perfect tool based on your needs.
So, get ready because after reading this article, you can master screen recording in Windows 11.
Methods of Screen Recording on Windows 11
Regarding Windows 11, our tech expert team at TechFarter found two primary methods for screen recording. One uses Windows 11 built-in tools to help you record your screen in just a few clicks. Another method is by using third-party tools.
Built-in Tools
You can use the Windows 11 Built-in Screen Recording Tools. These built-in tools are reliable and easy to use. These tools also provide a sense of security to users because these are built-in tools. The following are methods to use them:
Method 1: Using the Built-in Game Bar
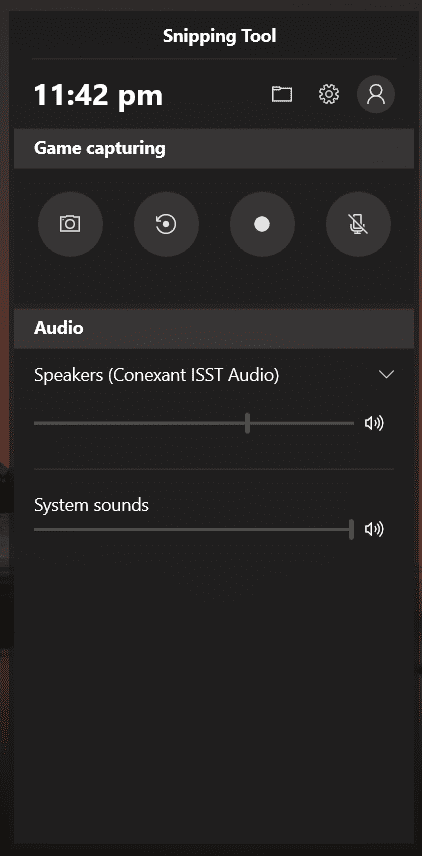
Initially designed to capture gaming moments, the Xbox Game Bar is a Windows 11 screen recorder. You will be surprised to know that the Xbox game bar record Windows 11 screen in just a few clicks. Here’s how to use it:
- Press the Windows Key + G simultaneously. This is the quickest way to launch the Game Bar overlay.
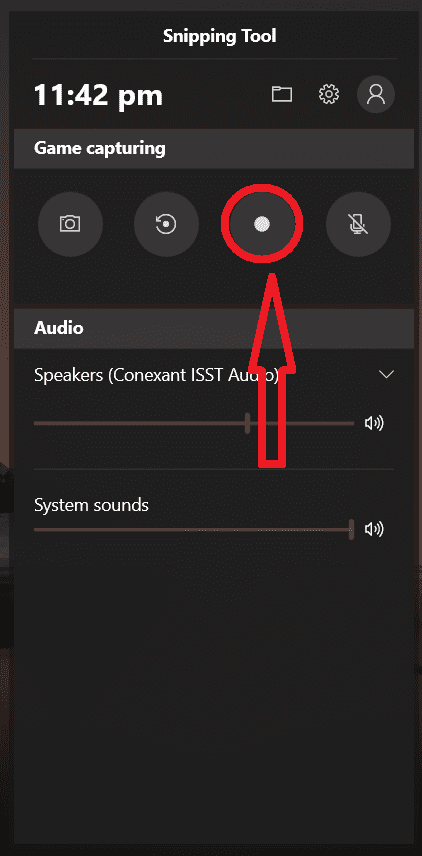
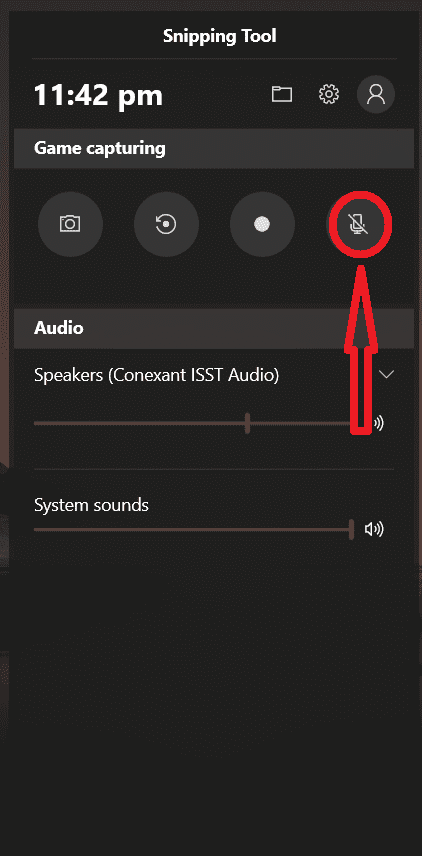
- Click the circular record button within the Game Bar to begin screen capture Windows 11.
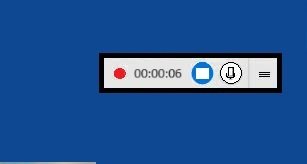
- Alternatively, press Windows Key + Alt + R to start recording without opening the Game Bar interface.
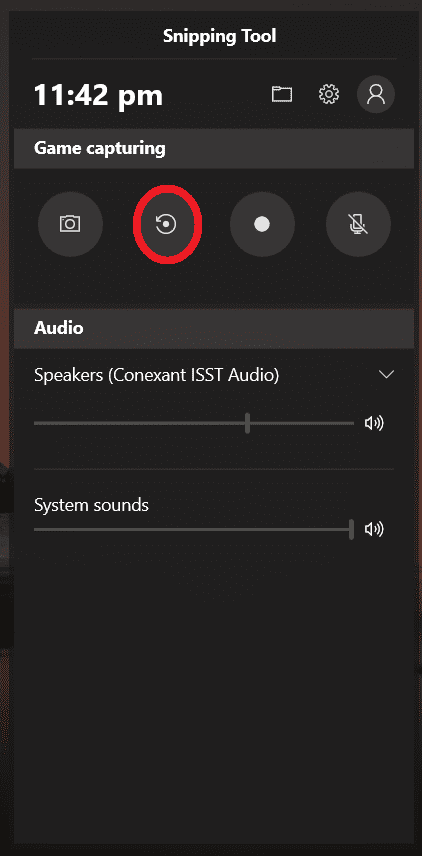
- Utilize the handy Windows Key + Alt + G shortcut to retroactively record the past 30 seconds of your screen activity. This is perfect for capturing unexpected moments you want to preserve.
- The microphone button within the Game Bar toggles microphone recording on or off. This allows you to narrate your recordings or capture in-game audio.
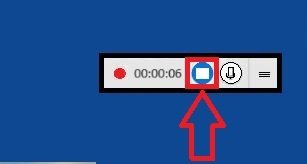
- Click the square stop button in the Game Bar to finalize your recording.
- Press Windows Key + Alt + R again to stop the recording process.
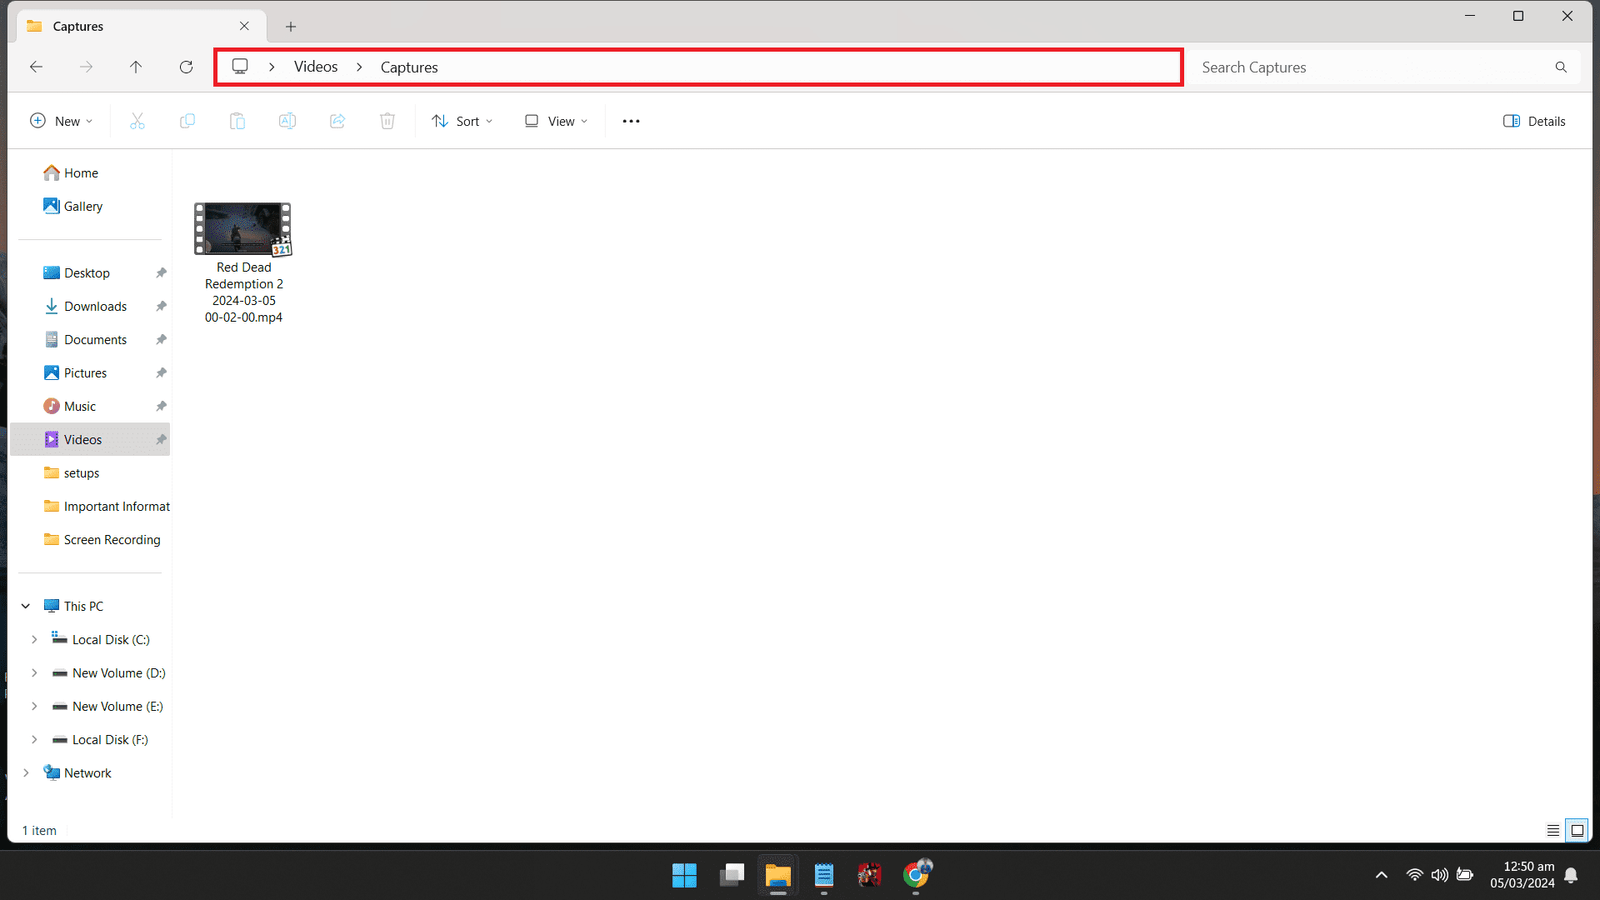
- All your screen recordings are automatically saved in the Captures folder within your Videos directory. You can access this folder through File Explorer.
Xbox Game Bar: Additional Features to Explore:
- Settings: The gear icon in the Game Bar grants access to settings where you can configure recording quality (up to 1080p at 60 FPS), file format (MP4), and microphone preferences.
- Widgets: Explore the Widgets section (accessed through the Widget button) to view system performance metrics like FPS and CPU usage while recording.
Method 2: Using the Windows Key + Alt + R Shortcut
Windows 11 provides a convenient keyboard shortcut for quickly initiating screen recordings. Follow these steps to use this shortcut:
- Simply press the “Windows key + Alt + R” on your keyboard to start recording your screen.
- Press the same keyboard shortcut again (“Windows key + Alt + R“) to stop recording.
- After stopping the recording, you can find your recorded videos in your user directory’s “Capture” folder.
Limitations of Built-in options:
Following are some limitations of Windows 11 built-in recording apps that make them less preferred than third-party apps:
Xbox Game Bar Limitations:
While there’s no official limit documented, the Xbox Game Bar recording seems capped at around 4 hours.
The Game Bar lacks built-in editing functionalities. You’ll need separate video editing software to trim, add text, or incorporate effects.
The Game Bar offers the option to capture microphone audio, but it doesn’t allow for simultaneous recording of both system sounds (like music playing in the background) and microphone audio. This can be limiting for tutorials or demonstrations that require capturing both.
The Game Bar can only record one window or application at a time.
While you can adjust recording resolution and frame rate, the Game Bar offers fewer customization options than dedicated screen recording software.
Windows Key + Alt + R Shortcut Limitations:
The following are limitations of the Windows Shortkeys that can prove a hindrance in your way.
This shortcut offers a bare-bones recording experience. You can’t preview your recording or adjust settings before hitting the record.
The shortcut doesn’t allow for webcam recording, which might be essential for video tutorials or presentations.
By understanding these limitations, you can decide whether the built-in options suit your needs or if exploring third-party software is necessary for a more feature-rich recording experience.
Third-party Software
While the Game Bar provides a relatively simple and quick solution for screen recording, third-party applications offer a range of advanced features for professional recording. There are several Windows 11 screen recording software, but popular among them are given below:
Selecting and Installing Third-Party Software:
Several reputed screen recording software options are compatible with Windows 11, including:
OBS Studio: is a free and open-source video recording and live streaming software. Among many other third-party OBS, it is considered the best screen recording software for Windows 11. To record Windows 11 screen, you just need to follow these steps:
Step 1: Download OBS Studio from these download links:
- For Windows: OBS Studio free download
- For iOS: OBS Studio free download
- For FlatHub: OBS Studio free download
To install this application, simply download the software and follow the installation wizard instructions. Make sure to check system compatibility before you download.
Step 2: After completing the installation, open the OBS Studio application and find the “Sources” menu; click the “+” button to add a display option.
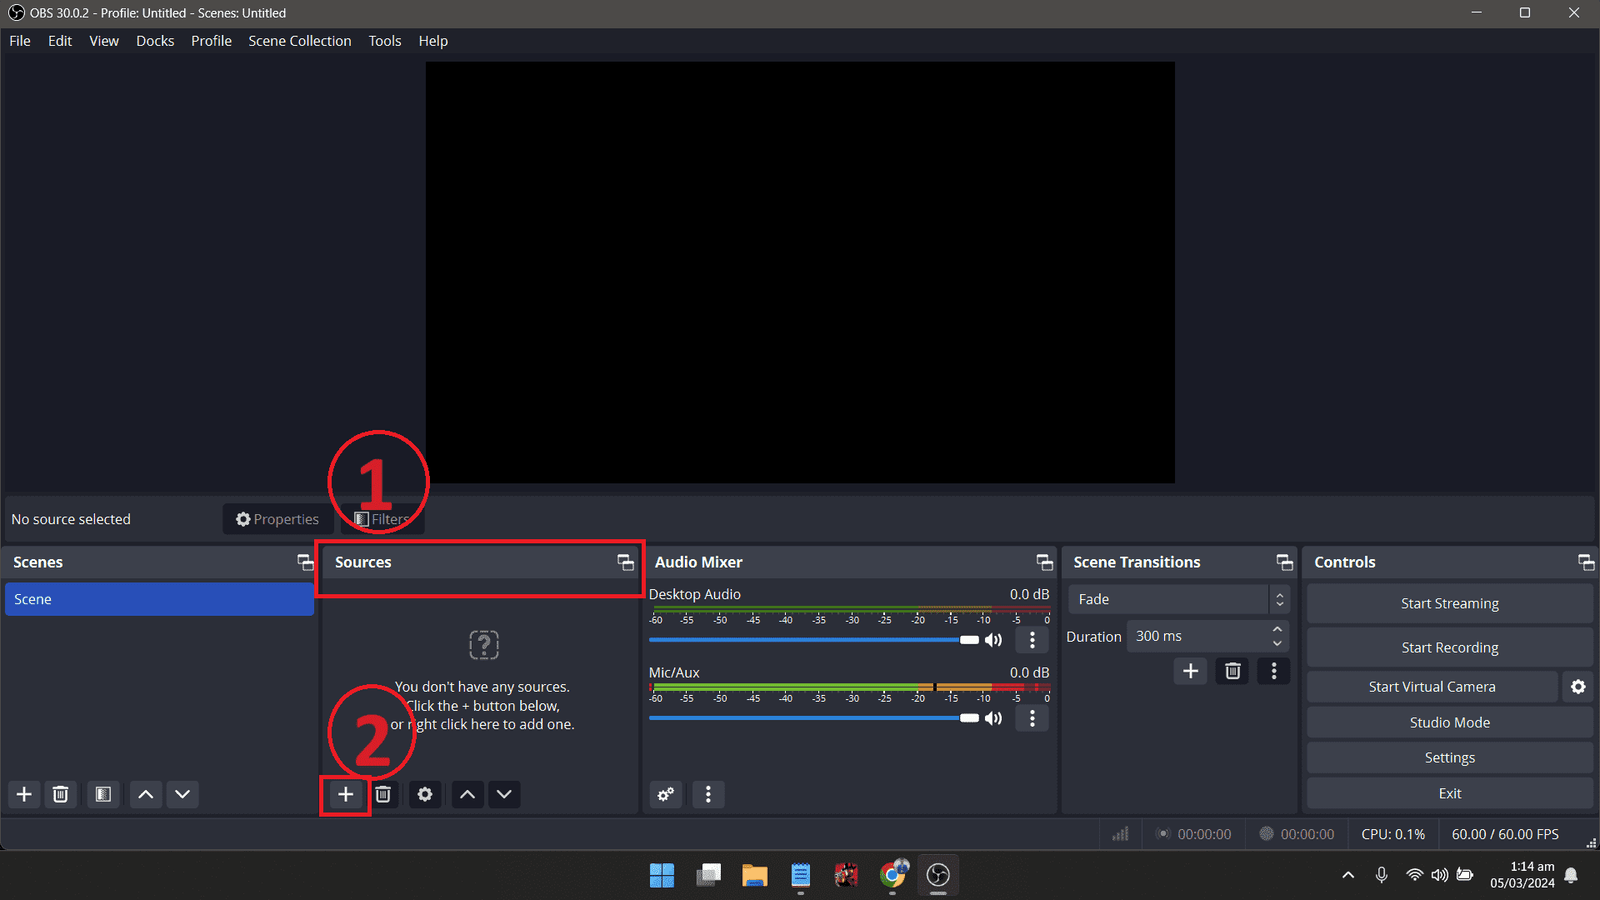
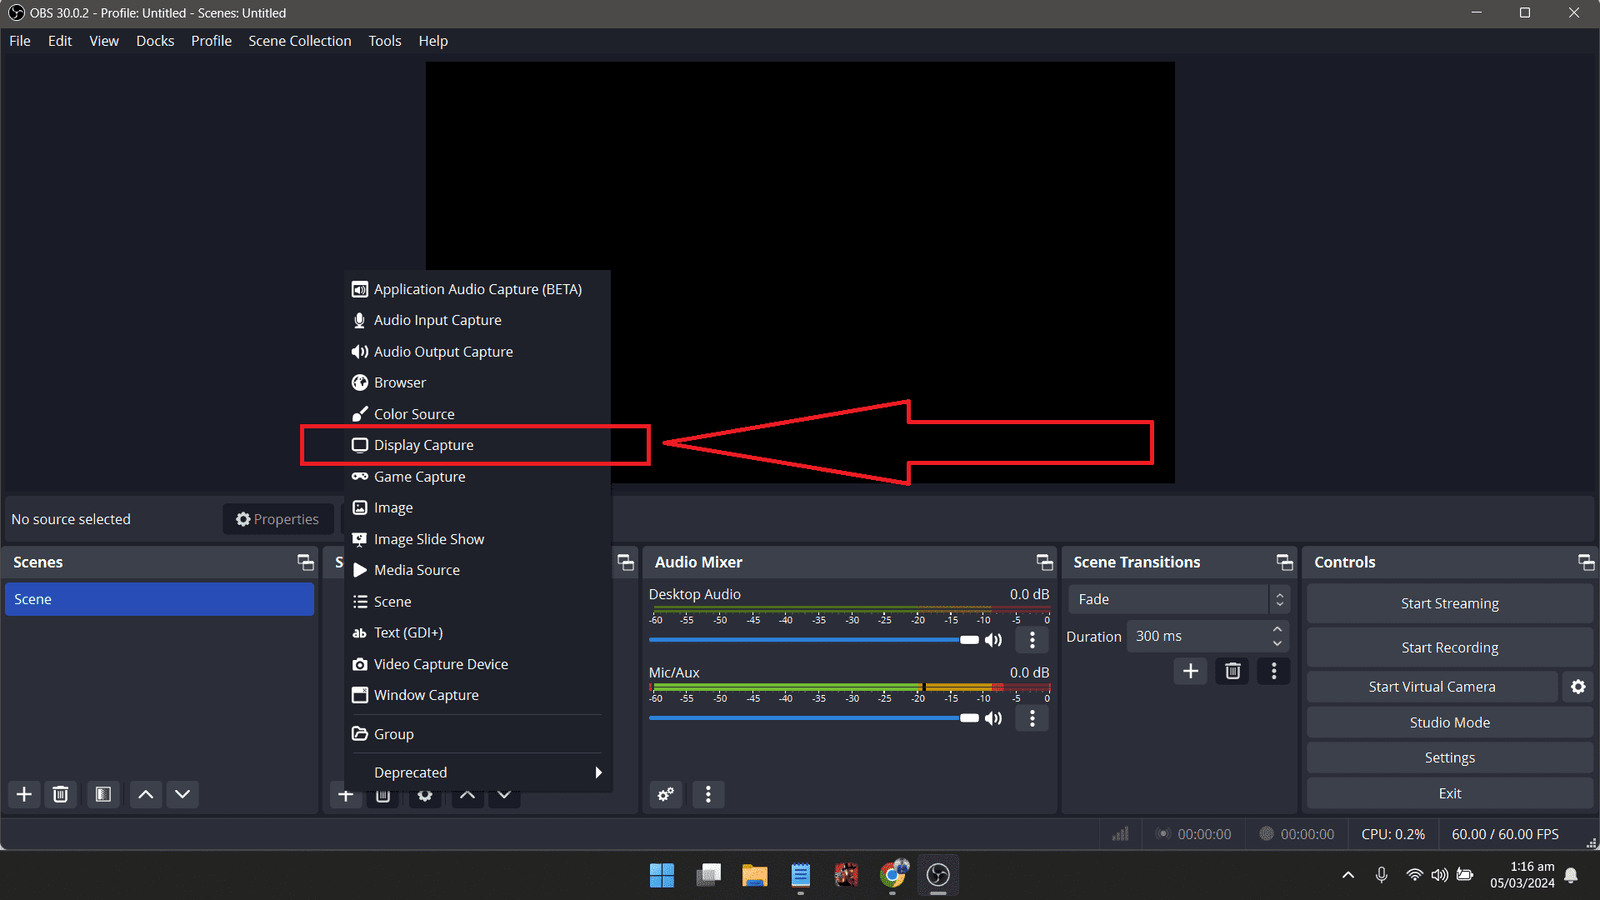
Step 3: After clicking the “+” icon, you will get a list of applications; click “Display Capture“.
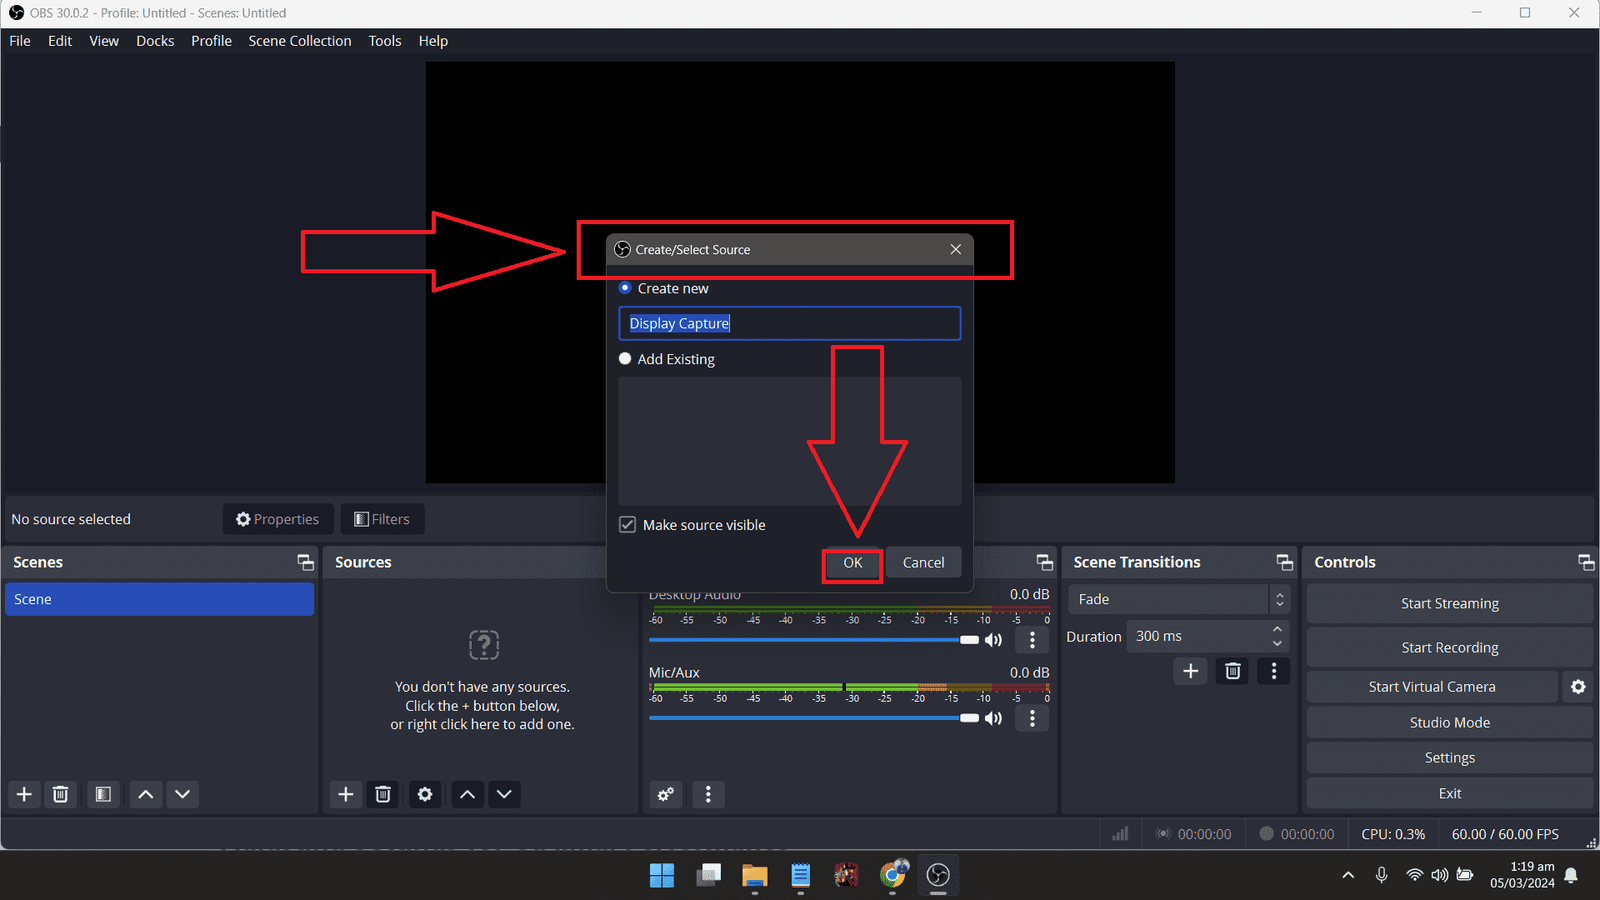
Step 4: After clicking “Display Capture,” you will be transferred to a new tab saying “Create/ Select Source.” Click “Create new” to capture a new display, but if you want previous settings, click “Add Existing.” Then click “OK” to create the display.
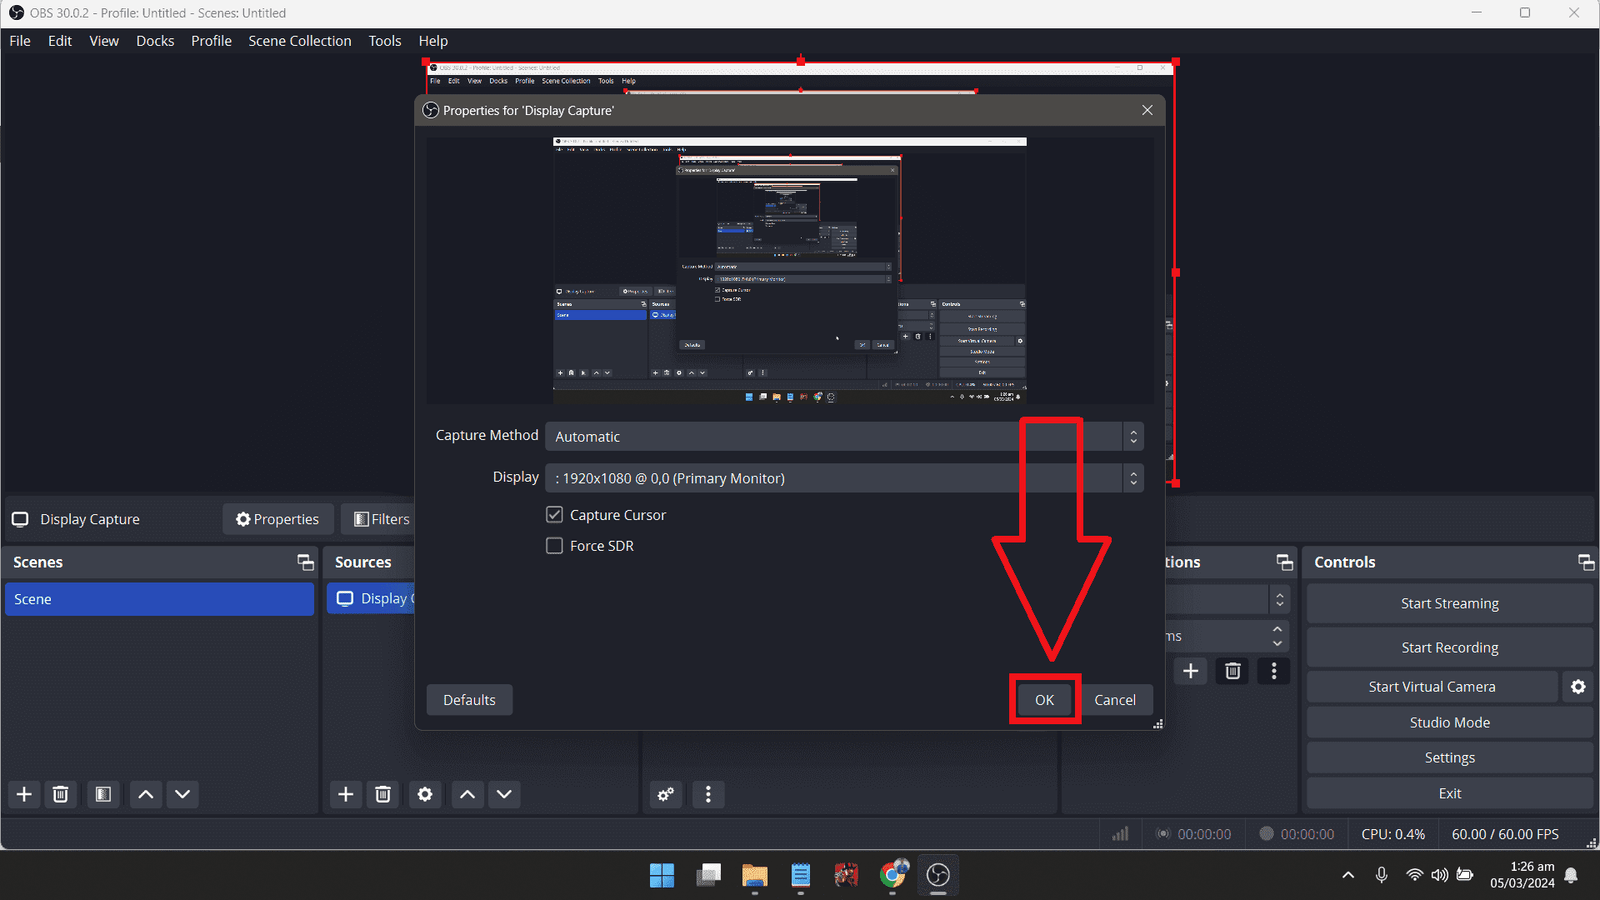
Step 5: Again click “OK” in the new tab.
Step 6: Click “Start Recording” to start video recording.
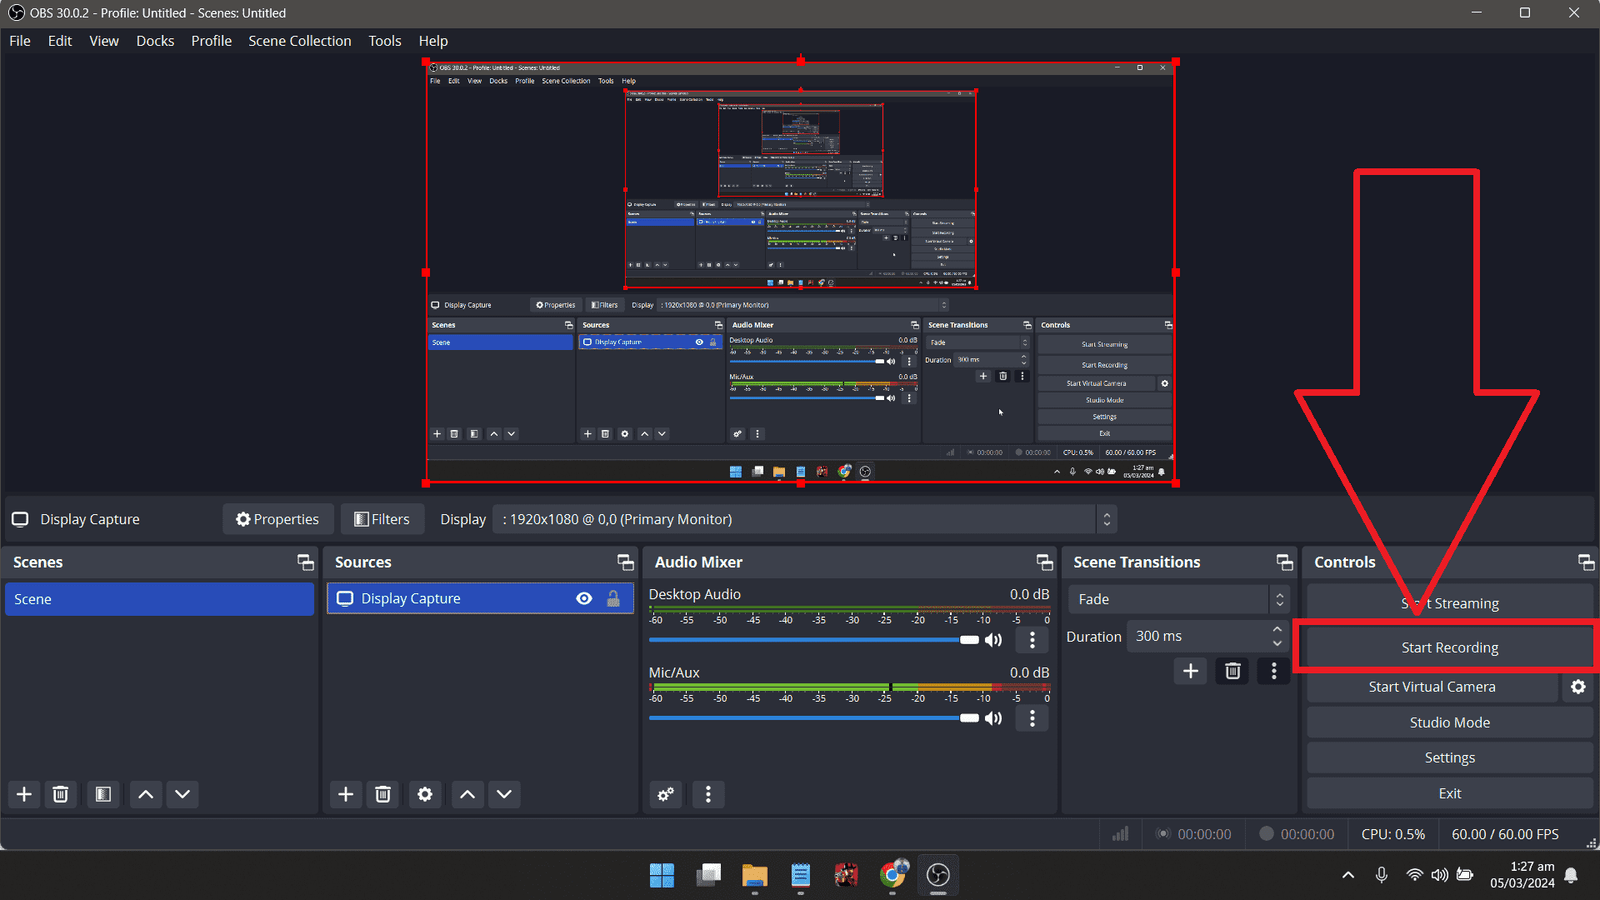
After starting this whole process, you can record your screen.
Tips for Effective Screen Recording
With the following tips, you can ensure that your screen recordings are clear, high-quality, and engaging.
Adjusting Settings for Optimal Performance
Before hitting record, take a moment to review the settings to personalize the software to your preferences. Adjustments you might consider include:
- Video resolution and framerate: Higher settings mean better video quality but can result in larger file sizes and slower performance.
- Audio inputs and volumes: Select the correct microphone or system sound option to capture the necessary audio.
- File save locations and formats: Decide where your recordings should be saved and in what format (MP4, AVI, etc.).
Enhancing Audio and Video Quality
To make your recordings more professional:
- Use a high-quality microphone to enhance audio clarity.
- Record in a well-lit area or in bright environments to avoid grainy video.
- Minimize background noise by choosing a quiet location for recording.
Keyboard Shortcuts for Convenience
Keyboard shortcuts can save you time and make the recording process more efficient. Common shortcuts include:
- Pressing the Windows + Alt + R keys to start and stop recordings with the Game Bar without opening the overlay.
- Assigning hotkeys within third-party recording software to perform common actions, such as pausing the video or taking screenshots.
Conclusion
Screen recording is a powerful tool that can serve various professional and personal needs. With Windows 11, Microsoft has made it easier than ever to capture your screen activities with features like the Game Bar.
With built-in options and various third-party screen recording software available for Windows 11, you can choose the tool that best suits your needs for capturing audio and video on your screen.
Ready to capture that epic gaming moment or to create a tutorial? Now, you know how to choose the perfect recording method for your needs on Windows 11. Hit record and share your creation!
For more advanced functionalities, third-party software is always a great option. By following the guidelines and tips in this post, you’ll be on your way to creating exceptional screen recordings ready to share with the world. Enjoy your screen recording adventures on Windows 11!
FAQs: How to Screen Record on Windows 11?
Is screen recording available on Windows 11?
Yes, Microsoft has added a built-in screen recording feature called Game Bar in Windows 11, making it easier to capture your screen activities.
Can I customize the settings for my screen recordings on Windows 11?
Yes, both the Game Bar and third-party recording software available for Windows 11 allow you to adjust various settings such as video resolution, audio inputs, and file formats to suit your preferences.
Are there any tips for improving the quality of my screen recordings on Windows 11?
Yes, some tips for enhancing audio and video quality include using a high-quality microphone, recording in a well-lit area, and minimizing background noise. You can also use keyboard shortcuts for convenience during the recording process. Overall, reviewing and adjusting settings before starting the recording is important to ensure optimal performance.

