Graphics drivers are like special instructions that help your computer understand how to work with your graphics card. Outdated drivers in the latest powerful graphics cards like Nvidia GeForce RTX 4060, Nvidia GeForce RTX 4070, GeForce RTX 4080 Super, and GeForce RTX 4090 (etc.) can lead to performance issues and even crashes. Your computer screen may also glitch or freeze. But resetting, or updating them may fix the problem. In this article, we’ll lead you through three simple steps to quickly reset by short keys, uninstall, reinstall, and update your graphics driver in Windows 11 or 10.
Let’s get your graphics running smoothly again!
Quick Solution
- To quickly reset graphics driver Press (Windows + Ctrl + Shift + B)
- Press Ctrl+X > Device Manager > Display adapters > Uninstall device > Restart PC
- Ctrl+X > Device Manager > Display adapters > Disable device > (then Enable device).
- Press Ctrl+X > Device Manager > Display adapters > Update driver > Search Automatically for drivers.
Method 1: How to Restart the Graphics Driver Using a Hotkey
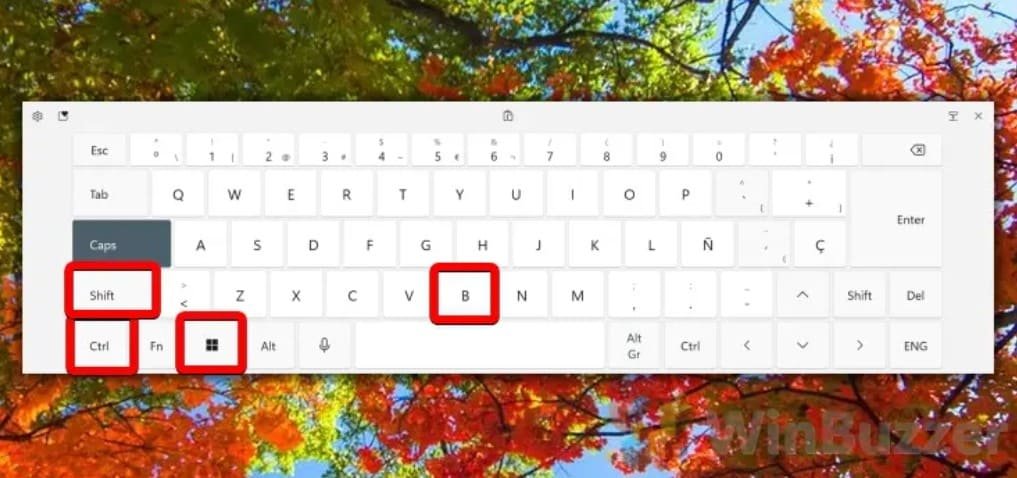
There’s a super handy shortcut (Windows + Ctrl + Shift + B) to restart your graphics driver in Windows 10 or 11.
It’s like a quick refresh button for your computer’s graphics, fixing minor glitches without a restart. Just be aware that this might reset any graphics settings you’ve made, so save your work first!
Use it only when your graphics are acting up, not all the time, to avoid any weirdness.
Method 2: How to Reset the Graphics Driver Using Device Manager
Here, resetting means uninstalling the graphics driver and then reinstalling it from the official website or letting Windows 11 or 10 select and reinstall the latest one.
Resetting the graphics driver in Windows 10 or 11 with Device Manager resolves crashing and slow performance issues. Resetting is like giving your graphics card a fresh start. The process can fix glitches, crashes, and even compatibility problems with games, media, or programs!
To reset the graphics driver using Device Manager in Windows 11, follow these simple steps:
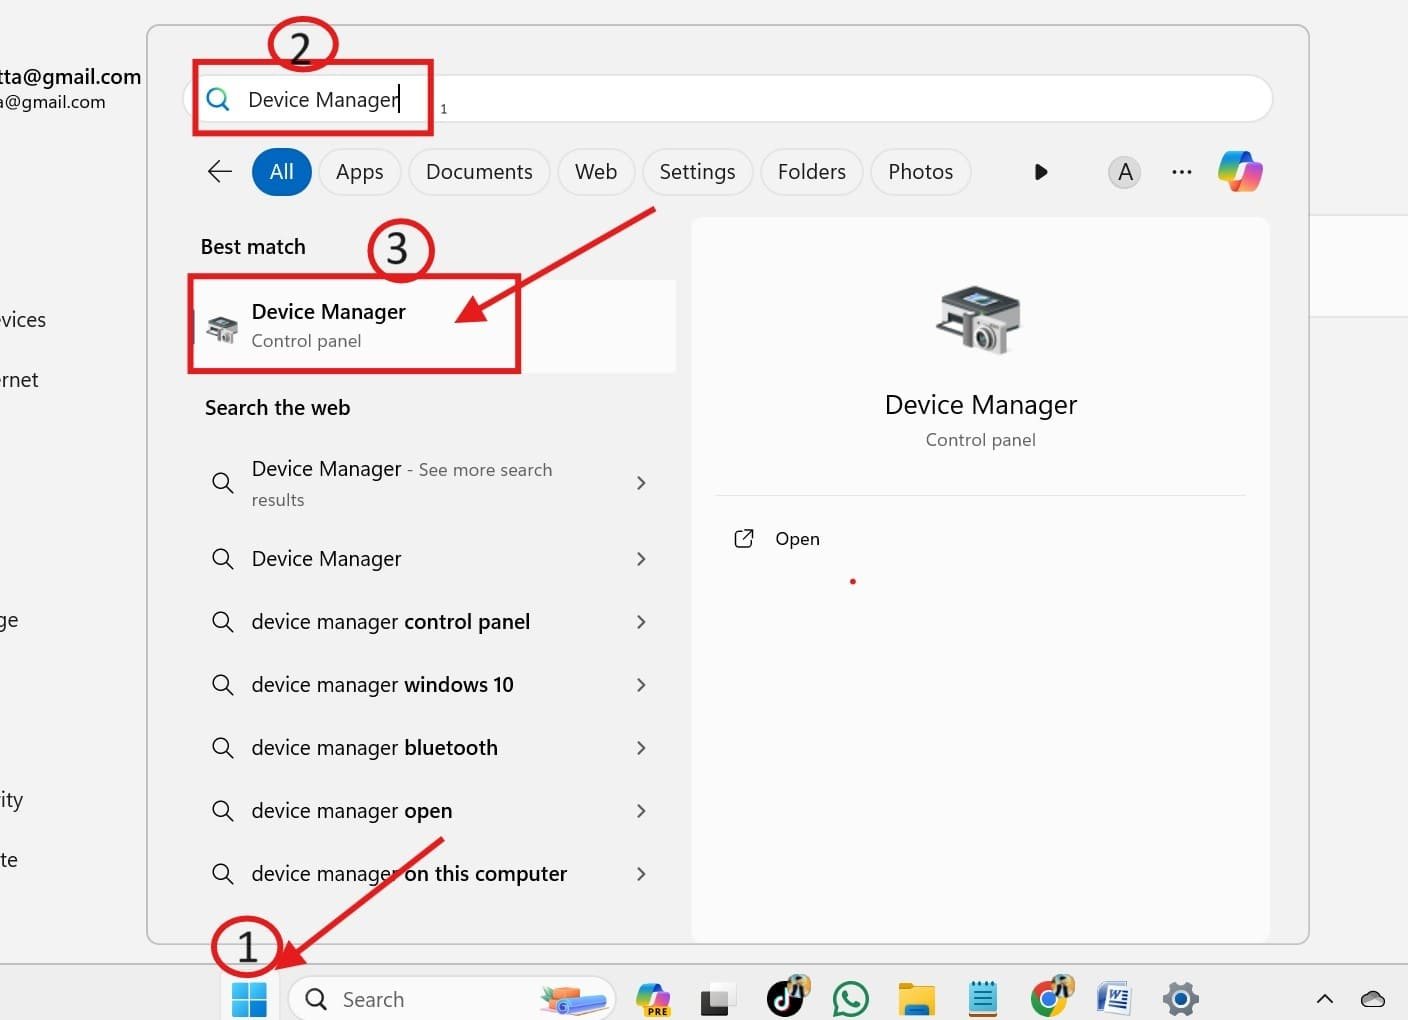
- Press the Windows icon, Type “Device Manager” in the search box and open it.

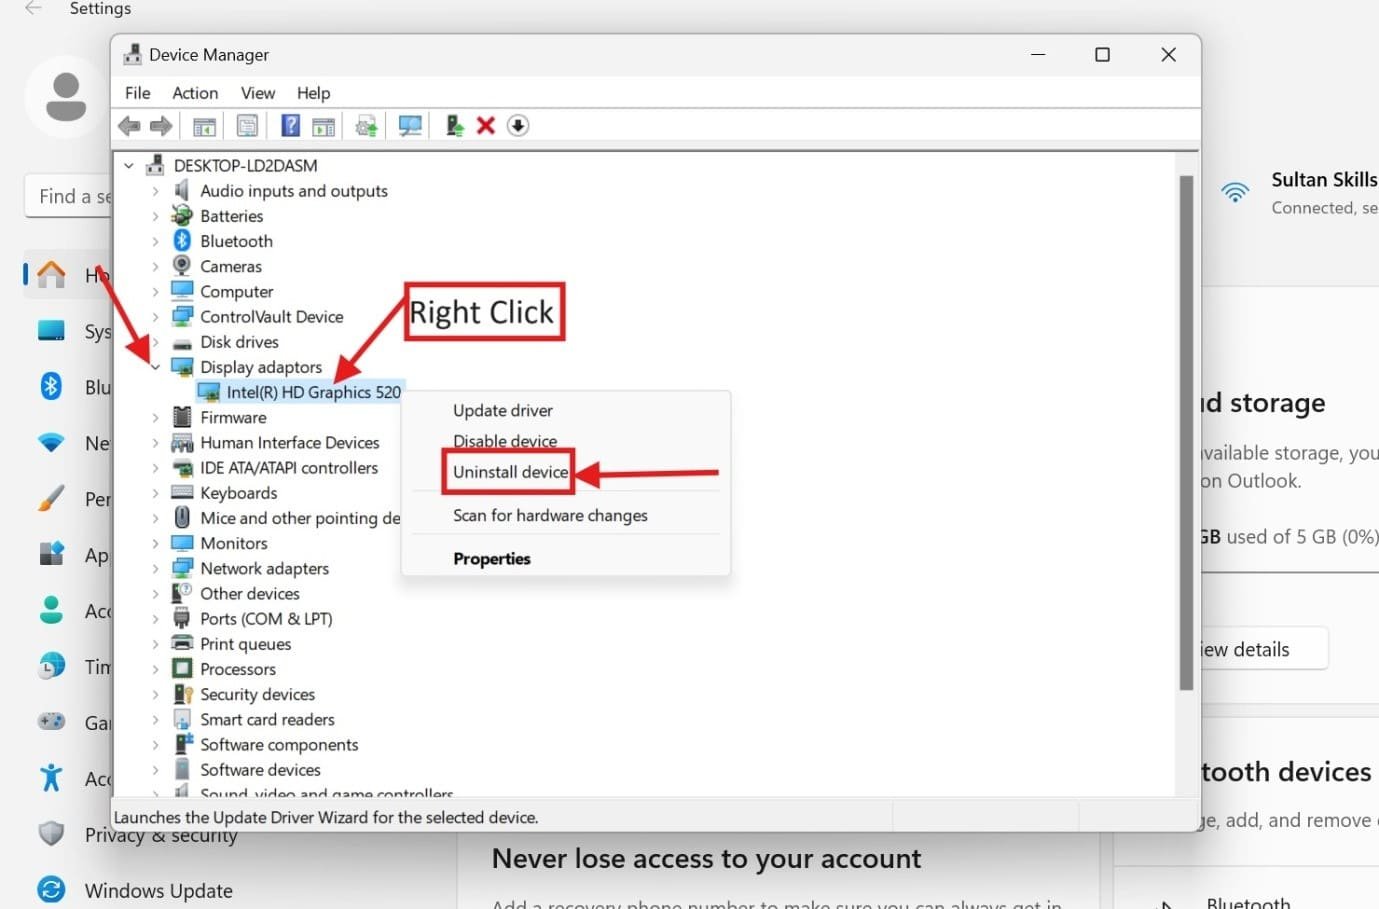
- Click on “Display adapters” to expand the list, then right-click on your graphics card/chipset, and select “Uninstall device”

Once you’ve reset the driver, restart your computer.
Upon restarting, Windows 10 or 11 will automatically find and reinstall the newest graphics driver for you. If you prefer, you can also grab the latest driver directly from your graphics card manufacturer’s website after uninstalling the old one.
Method 3: How to Reset the Graphics Driver via Windows Settings
Some graphics cards come with their driver software to improve performance. If you’re using that, you might be able to reset the graphics driver through that software instead of messing with Windows settings.
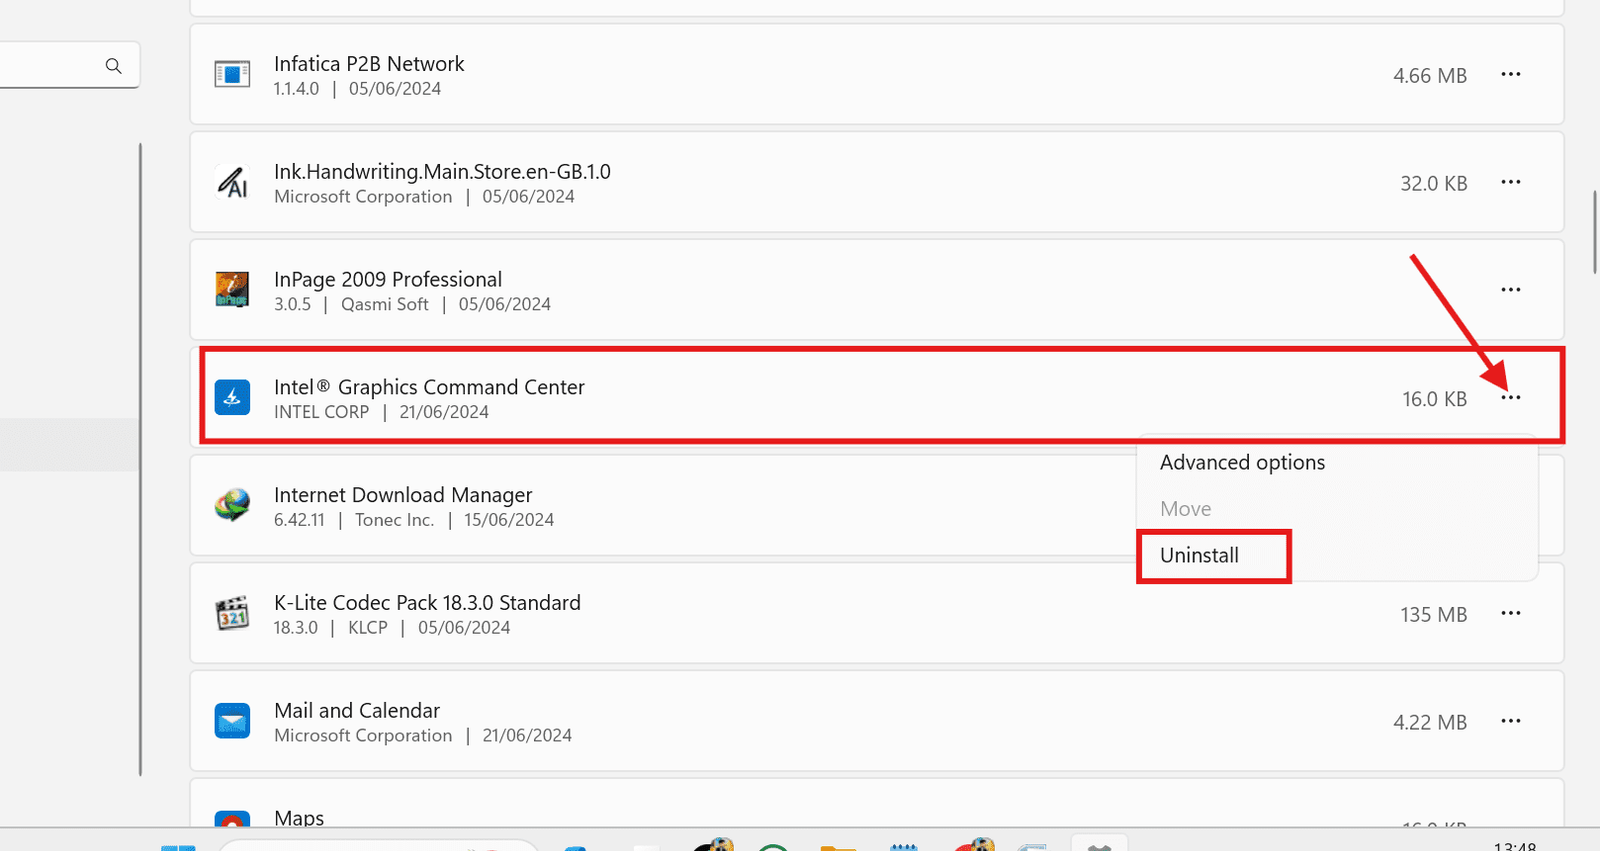
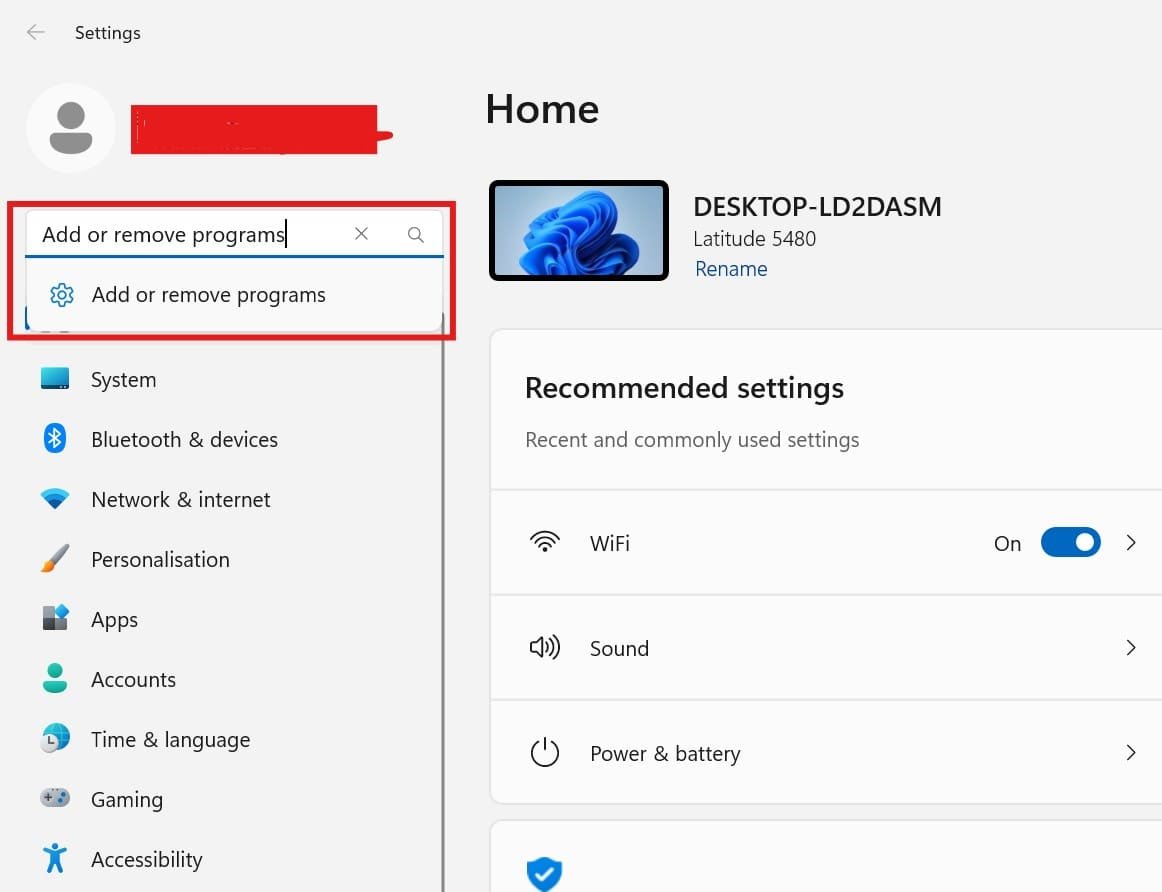
- Press the “Windows key”, Search for “Add or remove programs” and then click on it.

- Here find the graphics driver software, click the usual three dots menu you see in most apps, and choose “Uninstall.” Your computer will need a restart to finish things up.
That’s how you can reset the graphics driver by uninstalling graphics software and then reinstalling may fix the issue.
How to Update the Graphics Driver in Windows 11 or Windows 10
Keeping your graphics driver up to date in Windows 11 or 10 is important for achieving peak performance on your computer. New drivers can improve compatibility with the most recent games and apps, enabling new graphics card features. It also resolves bugs that may be creating issues. You may quickly update your driver via Windows Update, Device Manager, or by downloading it directly from the website of your graphics card manufacturer (such as Nvidia or AMD). This ensures that your graphics card performs smoothly and efficiently, resulting in a better overall experience.
We’ll show you two easy ways to update your graphics card driver in Windows 11 or 10.
Check Windows Update Settings
- Open the Windows Settings app (by pressing the keys Windows + i)
- Navigate to the “Windows Update” and click on it
- Click on “Check for updates” (the option tells Windows to search for any available updates, including new drivers for your graphics card.)
- If a new graphics driver is available, Windows might install it automatically.
- In some cases, you might see a “Download and install” button. Click it if needed.
Just follow the on-screen instructions to finish the update process.
Using Device Manager
The Second Way to Update the Graphic Driver in Windows 11 by Using Device Manager
Updating the graphics driver using Device Manager lets you pick the exact graphics driver update yourself. It’s helpful if Windows Update doesn’t have the latest driver, or if you’re having graphics problems.
- Press “Windows + X”, and select “Device Manager” from the appeared menu to see a list of all your computer’s hardware devices.
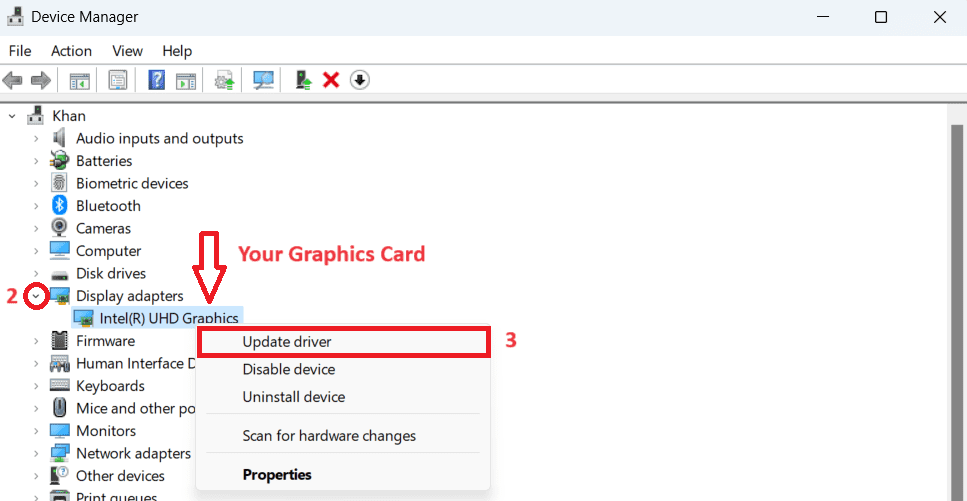
- Look for “Display adapters” and click the arrow to expand it. You’ll see your graphics card listed there.
- Right-click your graphics card and select “Update driver.” (This process is similar to resetting the driver.)

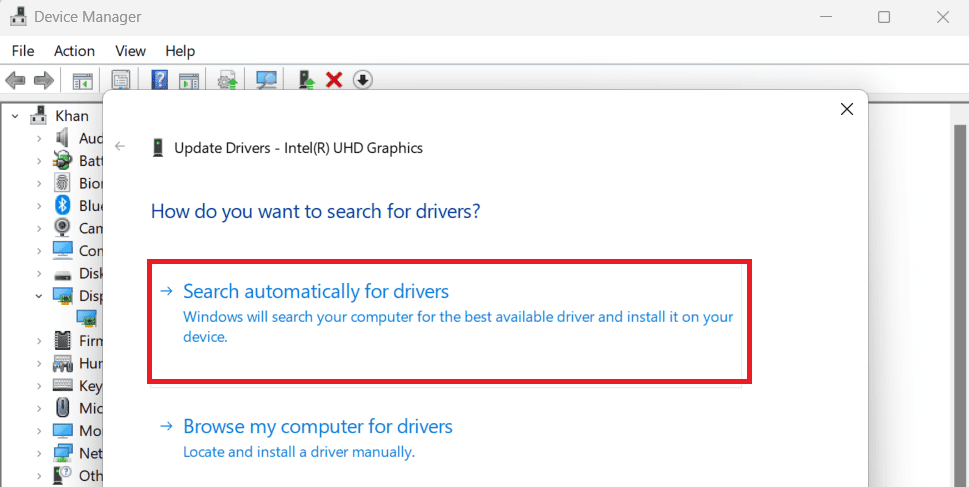
- Choose “Search automatically for updated driver software.” This tells Windows to look online for the latest driver for your graphics card.

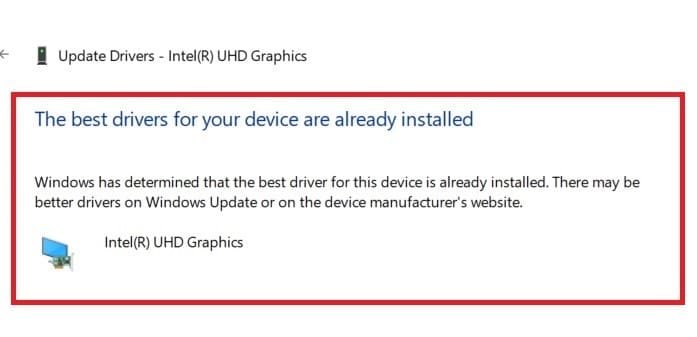
- If Windows finds a new driver, follow the on-screen instructions to complete the installation. If your driver is already updated then you’ll see the following message:
Conclusion
The graphics driver updated is like giving your computer’s visuals a tune-up! This guide showed you three ways to quick restart, reset, or update your graphics driver in Windows 10 or 11 for a beginner or tech pro. With a few clicks or a handy shortcut, you can get your graphics running smoothly again and enjoy a better overall computer experience!

