Are you trying to open a RAR file in Windows 11 or any other folders and share it with others, but a red X symbol on the file is preventing you from doing so? We all know that sharing files on Windows 11 is straightforward.
The Red X symbol on files in Windows 11 indicates a problem with the file or folder, such as corruption, permission issues, or missing files. But don’t worry; removing the Red X on files and icons in Windows 11 is usually a simple process.
In this article, we’ll guide you through the steps to resolve the issue and restore your files to normal. We’ll cover various methods to get rid of the Red X problem, including changing file attributes, updating applications, and running system diagnostics.
Whether you’re dealing with a single file or multiple files, our step-by-step instructions will help you fix the problem and get back to work quickly.
So, let’s dive in and learn how to remove the red X on files in Windows 11.
Quick Fix
- The Red X symbol indicates a problem with the file/folder (corruption, permission issues, missing files).
- The main causes for the appearance of the red X sign are read-only attributes, corruption, missing files, shortcut errors, and broken links.
- You can fix it through a simple process with various methods (changing attributes, updating applications, running system diagnostics).
What is a Red X?
A Red X is a symbol that appears on desktop icons in Windows operating systems, including Windows 11. It indicates that the file or folder has been marked as read-only, meaning it cannot be modified or deleted.
The Red X can also appear if the file or folder is corrupted, missing, or has permission issues. In some cases, it may indicate a shortcut error or a broken link.
The Red X can be frustrating, but it’s usually easy to remove by changing the file’s attributes or resolving the underlying issue. It’s important to note that the Red X does not affect the functionality of the file or folder but rather serves as a visual indicator of its status.
How to Remove Red X on Desktop Icons in Windows 11?
The Red X on your desktop icons in Windows 11 is not a major issue and can be fixed easily. The red X typically indicates a broken shortcut or a missing file. Here are a few troubleshooting steps to identify the cause and remove the red X from your desktop icons.
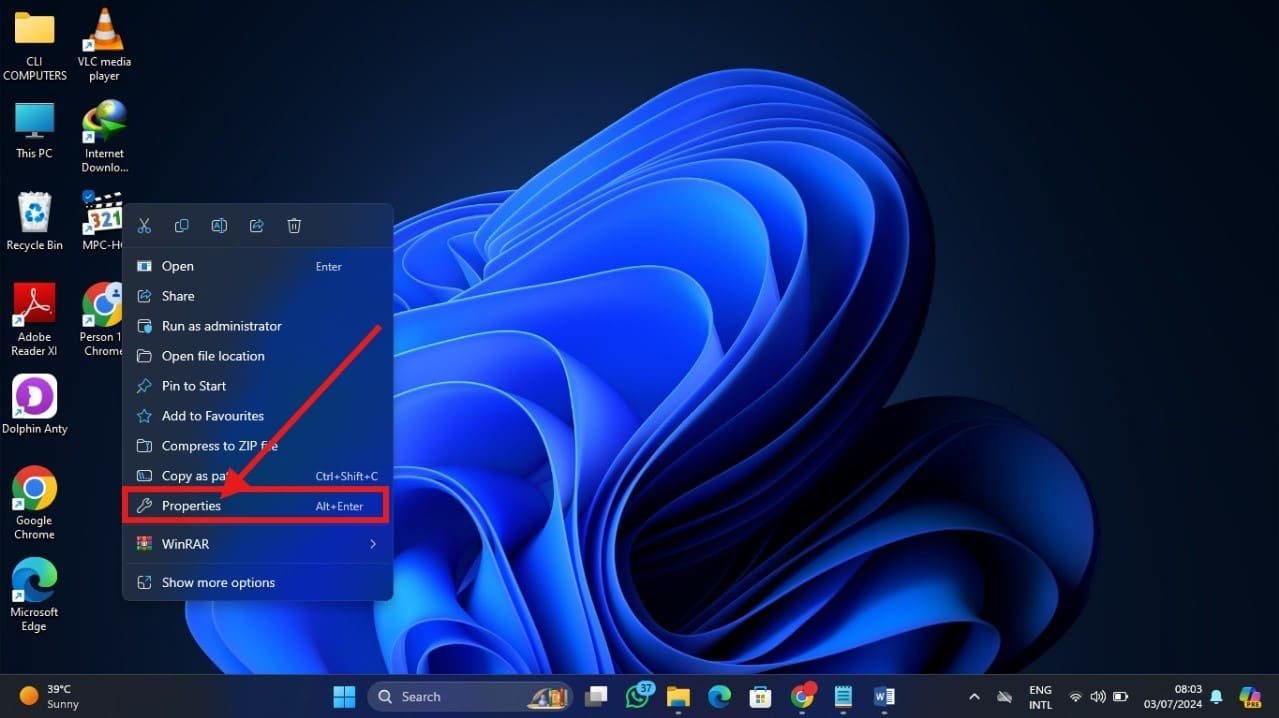
- Right-click on the icon with the red X.
- Select “Properties” from the context menu.

- In the Properties window, click on the “General” tab.
- Look for the “Attributes” section and uncheck the box next to “Read-only,” then click “Apply” and then “OK.“.
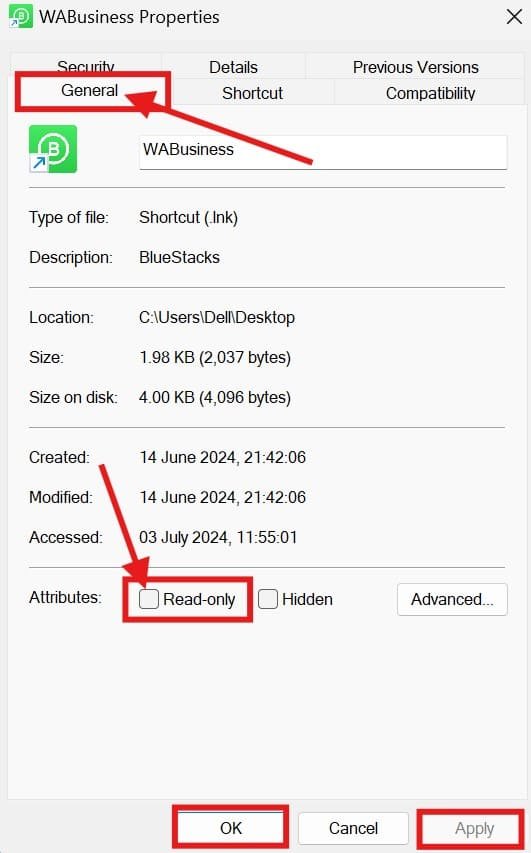
The red X sign will remove now from the desktop icon and files.
Related: How to Show or Hide Desktop Icons in Windows 11
Tips to Remove Red X Symbol from Files and Desktop Icons
Here are some tips and tricks to remove the red X symbol from files and desktop icons in Windows 11:
1. Check File Association
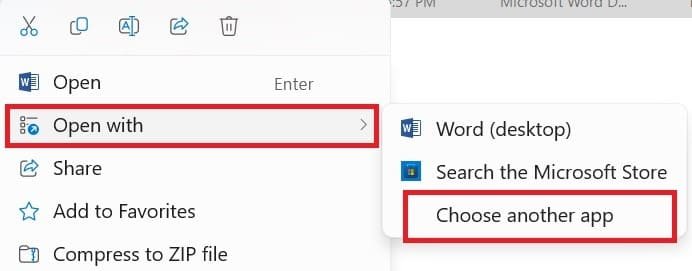
- Right-click on the file with the red X and select “Open with.”.
- Ensure the correct program is associated with the file type.
- If not, select “Choose another app” and associate the file with the correct program.
2. Repair File Associations
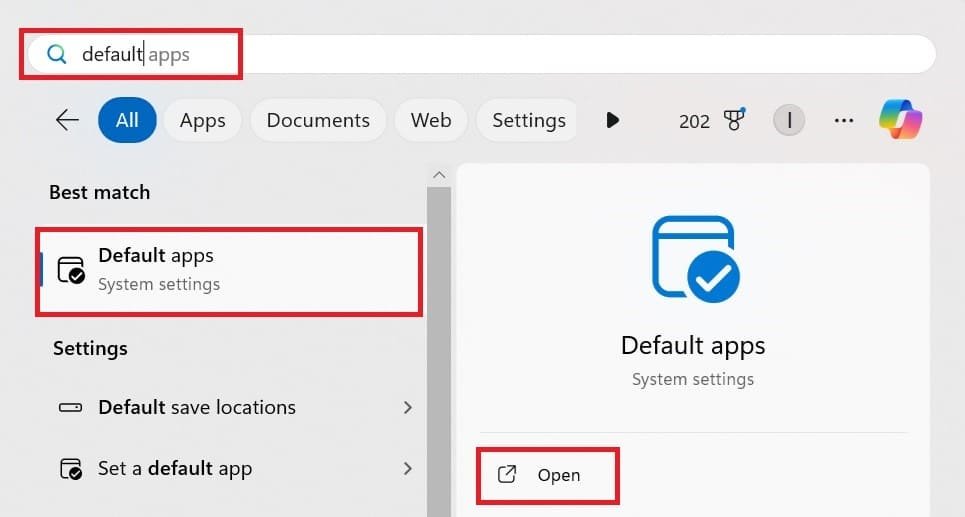
- Open the Start menu and search for “Default apps.”.

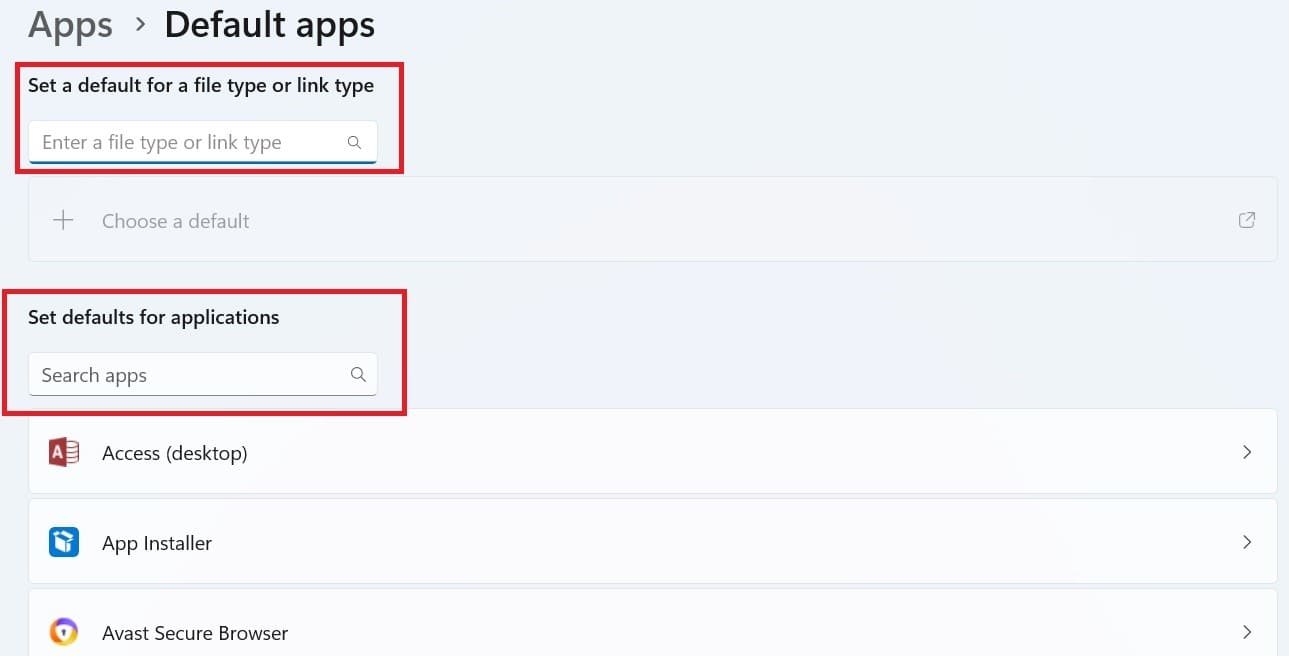
- Click on “Choose default apps by file type.”.
- Scroll through the list and ensure all file types are properly associated.

- If any are incorrect, click on the file type and select the right program.
3. Rebuild Icon Cache
- Open an elevated command prompt (run as administrator).
- Type the following command and press Enter:ie4uinit.exe -ClearIconCache

The command will rebuild the icon cache and resolve red X issues.
4. Check Malware/Virus Infection
- Run a full system scan with your antivirus software.
- Malware can sometimes cause red X icons.
- Remove any detected threats.
5. Check Disk Errors
- Open File Explorer and right-click on the drive with the red X icons.
- Select “Properties” > “Tools,” then click on “Check” under the “Error checking” section.
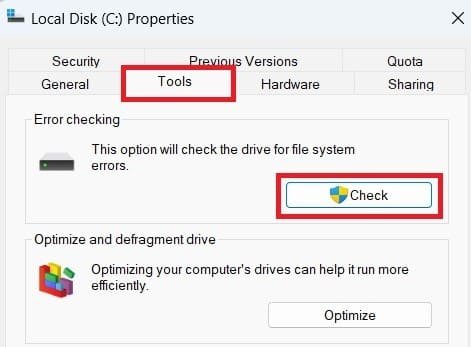
Let Windows 10/11 scan and fix any disk errors.
Following these steps should help you identify and resolve the root cause of the red X icons on your Windows 11 system.
6. Checking for Missing Icons
If the Red X is because of a damaged file, try deleting the file and then installing it again. This should fix the problem and remove the Red X.
If the Red X symbol isn’t because of a missing icon or damaged file, try running a full scan with your antivirus software. This can help find and fix any problems that might be causing the Red X.
7. Updating Applications
Users can attempt updating the application if they believe it is the cause of the Red X. You can accomplish this by visiting the application’s website and downloading the most recent version. The problem ought to be fixed, and the Red X ought to disappear from the desktop icon after the application has been updated.
8. Checking for System Issues
The user may attempt to do a system diagnostic to see if there is a system problem causing the Red X. To accomplish this, navigate to the System Settings menu and choose the Diagnostics option. This will enable the user to fix any system problems that might be the source of the Red X.
9. Checking for Unused Shortcuts
The user may attempt to remove the shortcut if it is the cause of the Red X. The “Delete” option can be chosen by performing a right-click on the desktop icon. This ought to fix the problem and get rid of the Red X on the desktop icon.
10. Checking the Recycle Bin
The user can attempt to restore the file if it is the cause of the Red X. The file may have been relocated to the Recycle Bin. To accomplish this, choose the “Restore” option from the Recycle Bin. This ought to fix the problem and get rid of the Red X on the desktop icon.
Why do I have a red X on my desktop icons in Windows 11?
A red X on desktop icons in Windows 11 usually indicates:
- OneDrive Sync Issues: Files in the Desktop folder are not syncing correctly with OneDrive, often due to insufficient storage or connectivity problems.
- Disconnected Network Drives: Mapped network drives referenced by your icons are no longer accessible.
- Corrupted Shortcuts: The shortcuts on your desktop point to files or programs that no longer exist.
- Antivirus Conflicts: Certain antivirus programs may flag files and add overlay icons.
- Storage Problems: Insufficient space on your device or external drives.
Solution:
- Check OneDrive: Verify your OneDrive sync status in the system tray and resolve any errors.
- Reconnect Network Drives: Ensure the drives are connected.
- Delete Invalid Shortcuts: Right-click problematic shortcuts and delete them if the target is missing.
- Check Storage: Free up space on your hard drive or OneDrive.
- Restart Explorer: Use Task Manager to restart Windows Explorer.
Addressing these issues will typically remove the red X.
Related: How to Change Icon Size in Windows 11
How to fix broken shortcuts in Windows 11?
Broken shortcuts in Windows 11 can occur when files or programs are moved, deleted, or become corrupted.
Here’s how to fix them:
- Delete and Recreate the Shortcut:
- Right-click the broken shortcut and select Delete.
- Right-click an empty area on the desktop, select New > Shortcut, and re-enter the correct file path.
- Check File Path:
- Right-click the shortcut, select Properties, and check if the target path is correct. If the file or program has been moved, update the path.
- Reinstall the Program:
- If the shortcut points to a program that’s missing, reinstall the application.
- Clear Icon Cache:
- Open Task Manager, find Windows Explorer, right-click, and select Restart to refresh icons and fix issues.
These steps should resolve broken shortcuts in Windows 11.
Related: How to Clear Quick Access in Windows 11?
Conclusion
Removing the Red X on desktop icons in Windows 11 is a relatively simple process. By following the steps outlined in this article, you should be able to resolve the issue and restore your desktop icons to their normal state. Remember to check for missing icons, corrupted files, and system issues, and try updating applications or removing unused shortcuts if necessary. If the problem persists, a system diagnostic or antivirus scan may be necessary. With these troubleshooting steps, you’ll be able to banish the Red X and enjoy a smooth and frustration-free Windows 11 experience.
FAQs: How to Remove Red X on Files in Windows 11/10
How to remove recent items from Windows 11?
- Open My PC, then click on the three dots.
- Go to Option.
- Tick the option "recently used files," then clear the file explorer history.
Why is there a red X on my desktop icons in Windows 11?
A red X appears due to:
- OneDrive Sync Issues (e.g., storage full or no internet).
- Disconnected Network Drives.
- Broken Shortcuts.
- Storage Problems.
Fix: Resolve OneDrive errors, reconnect drives, delete invalid shortcuts, and free up storage.
What does the red X mean on my files?
A red X on files typically means:
- OneDrive Sync Issues: The file is not syncing properly with OneDrive, possibly due to lack of internet or storage.
- File Conflicts: The file could be corrupted, missing, or in use by another program.
- Storage Problems: Your device or cloud storage is full or near capacity.
Fix:
- Check OneDrive sync status and resolve errors.
- Ensure there is enough storage space.
- Try restarting Windows Explorer or the app accessing the file.
Reference:

