A multi-core processor in a computer acts as a powerful workstation. If you have a Windows 11/10/8.1 PC with a multi-core processor, you can increase its performance by utilizing all of its cores. Windows is versatile and offers customization and a wide range of settings to enhance your experience. You can keep Num Lock on permanently and disable the Snipping Tool in Windows 11, 10, and 8 for a more customized user experience.
In this guide, we will talk about what a core processor is, how to check the number of cores your computer has, and how to easily enable all your CPU cores in Windows 11/10 and 8.1. You can check the RAM and CPU cores in your laptop and computer using some simple steps. As a result, you should be sure that your PC is using its full power and running faster and more responsively.
Let’s dive in!
Quick Solution:
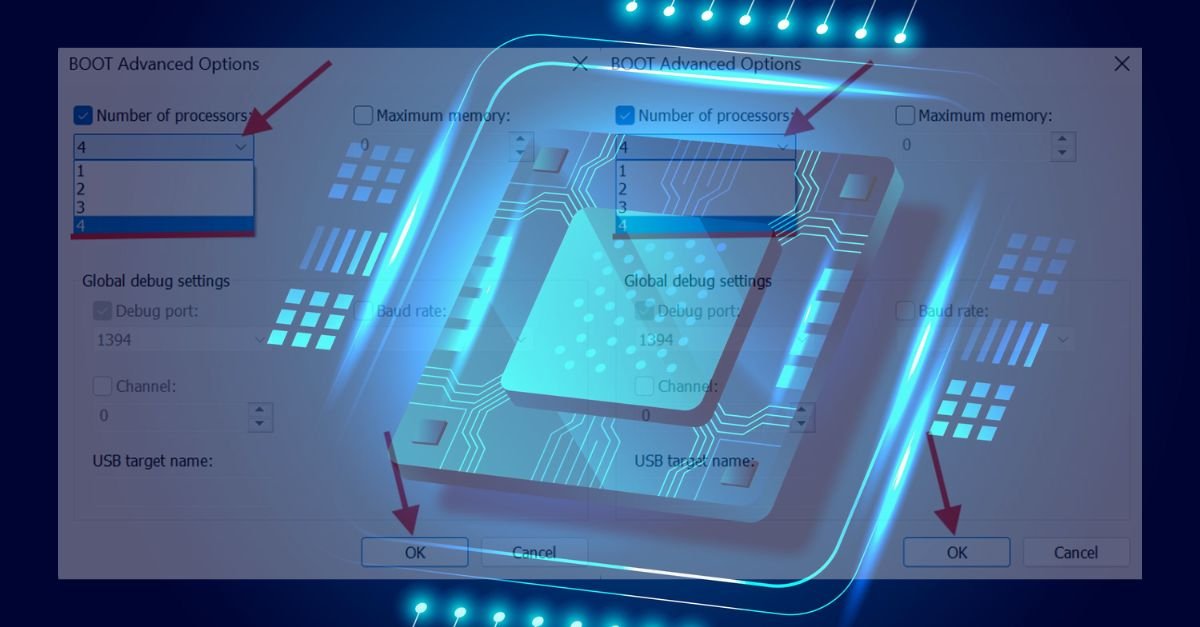
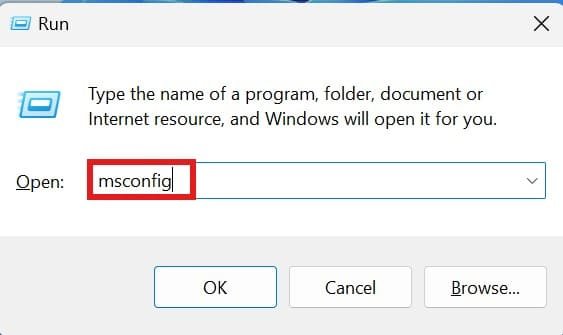
- Press “Windows key + R”; type “msconfig” in the Run Box. Go to the “boot” option, then select “advanced options,” and finally select the “number of processors.”
What is the Core in a CPU?
A core is the main processing unit inside a computer’s central processing unit (CPU). It does the actual computing tasks, for example, running default and third-party programs and processing various types of data.
All modern computers have multiple cores in their CPUs. So, these computers and laptops have multiple processing units that perform multitasking and improve computer performance.
Each core executes instructions and performs calculations individually. So with multiple cores, the computer can do more work at the same time rapidly.
The number of cores in a CPU is an important factor in how powerful and capable a computer is. More cores generally mean the computer can do more work in parallel.
How to Check the Number of Cores on Your PC in Windows 11?
Checking the number of cores on your laptop in Windows 11 is a simple process. Here’s how to find the number of cores your PC has:
- Open Task Manager by pressing “Ctrl+Shift+Esc.”
- Look for the “Performance” tab and click on the CPU on the right-hand side.

- Now, in the CPU section (on the right-hand side), right-click on it, select “Change graph to,” and then click on “Logical processors,” and there you can see all the cores in Windows 11.

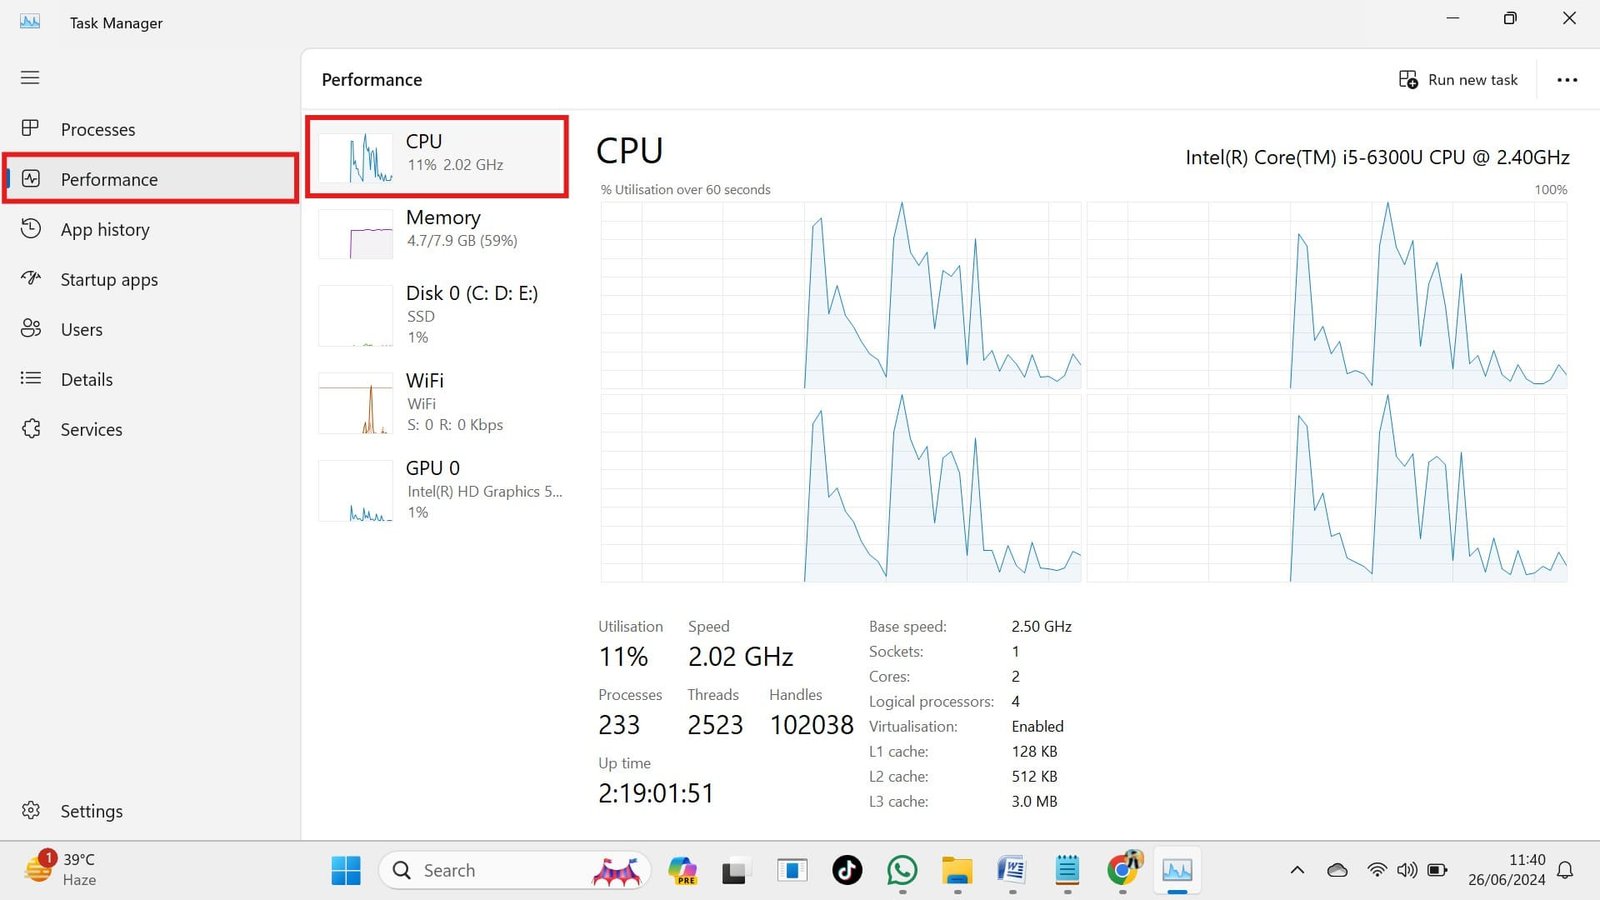
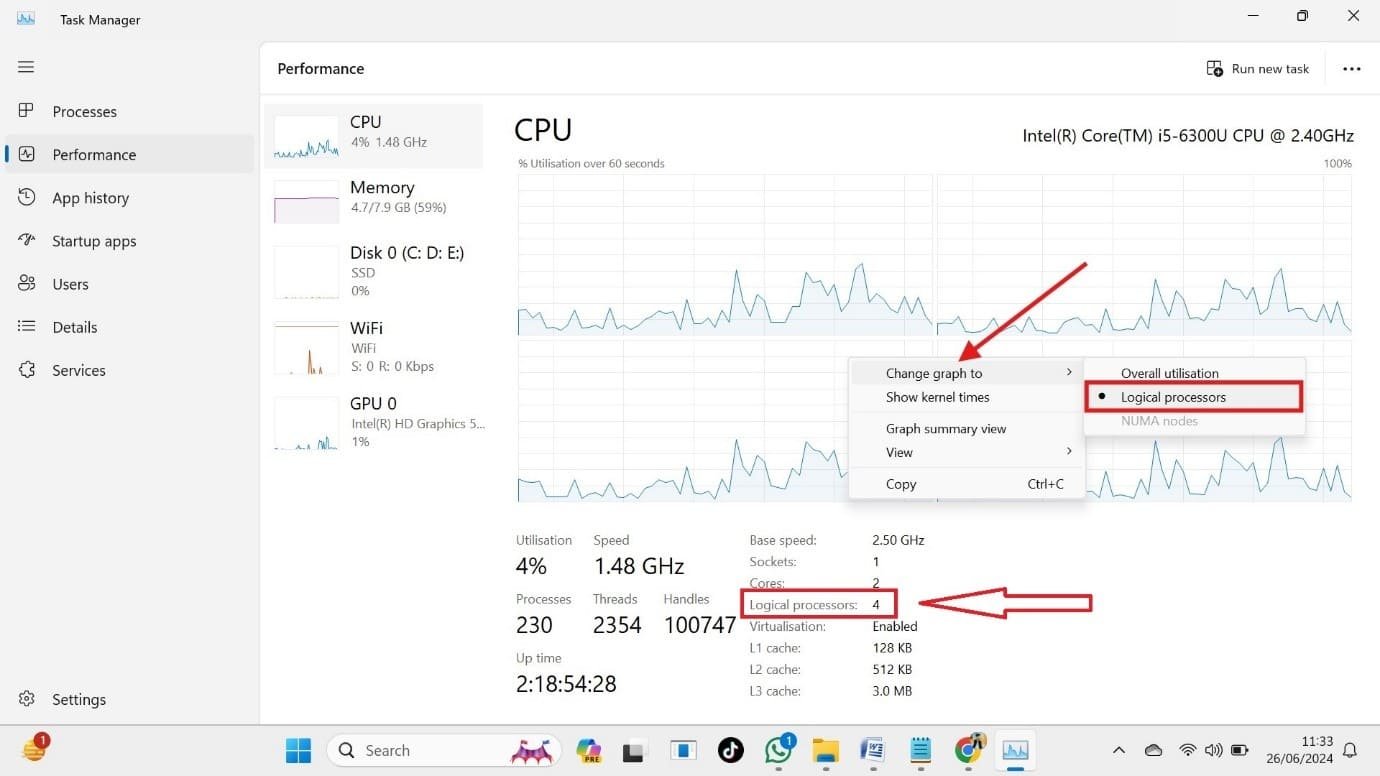
The picture above displays 2 cores and 4 logical processors, with virtualization enabled.
How to Enable All CPU Cores in Windows 11/10/8.1?
Many CPUs have multiple cores, like mini-engines working together. We will show you an easy way to ensure all these cores are activated in Windows 11. Turning on all cores will increase your PC’s performance.
Here’s how you can enable all CPU cores in Windows 11/10 or 8.1:
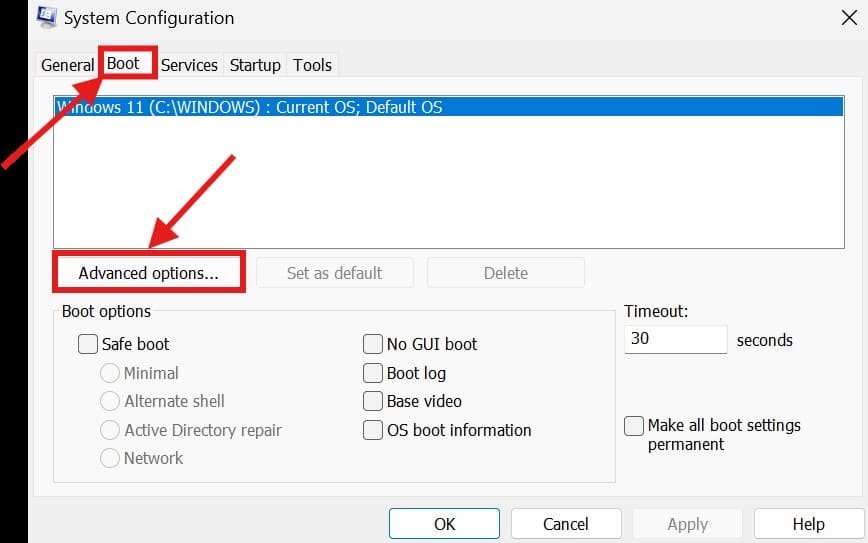
- Press “Windows key + R” to open the Run Box, type “msconfig” there, and hit Enter.

- Click on the “Boot” tab and go to “Advanced Options.”

- Tick the box in front of “Number of processors.” Select the maximum number of cores from the drop-down menu. Then click on “OK.”

- To save your changes, click “Apply” and “OK,” then restart your computer.


Using Task Manager to Adjust Processor Affinity
If you only want to enable all cores for specific applications, you can adjust the processor affinity for those apps. This method is less common but may be useful for certain scenarios.
- Open Task Manager (Ctrl + Shift + Esc).
- Go to the Details tab.
- Right-click the process you want to adjust (e.g., a program that’s not utilizing all cores).
- Select Set affinity.
- In the Processor Affinity window, check all the processors (cores) available to the process.
- Click OK.
This ensures that the selected application can use all the cores, but it won’t change the core usage for other tasks.
BIOS/UEFI Settings (Optional)
In some cases, if you’re still seeing that not all cores are being used after adjusting Windows settings, your BIOS or UEFI settings might be limiting the number of active cores.
To check this:
- Restart your computer and enter the BIOS/UEFI settings (usually by pressing F2, Del, or another key during boot).
- Look for a setting related to CPU or cores. It might be under Advanced, CPU Configuration, or similar.
- Ensure that the option for Core Control, Core Disable, or any similar setting is disabled or set to enable all cores.
- Save your changes and exit the BIOS.
Why Enable All Cores?
While modern systems are good at automatically managing core utilization, there are a few reasons why you may want to enable all CPU cores:
- Better Performance for Multi-threaded Applications: Software like video editing tools, 3D rendering programs, and even some games can benefit from using all available cores.
- Efficiency in Multitasking: Enabling all cores ensures that your system runs smoothly even when handling multiple tasks or processes simultaneously.
- Prevent Bottlenecks: If your CPU isn’t using all its cores, it may create performance bottlenecks, especially during resource-intensive activities.
Conclusion:
In summary, by enabling all cores in a CPU in Windows 11/10/8.1, you can get rid of slow processing and make your PC faster. By following the above simple steps, you can quickly check the number of cores your CPU has and ensure your PC is using all of them. By taking advantage of all the processing power available, you can enjoy faster speeds, smoother multitasking, and better overall system performance. You can also use Nvidia GeForce RTX 4070 or GeForce RTX 4090 for a better graphics experience.
FAQs: How to Check and enable all cores in Windows 11/10/8.1?
How Many Cores Are Good for Multitasking?
Answer: Multiple CPU cores are great for multitasking, but it generally depends on the types of tasks and the software you are using. Further, the more cores a processor has, the better its performance. However, you need a higher budget for a processor with more cores.
Here’s a quick guide on how many cores are required for better performance:
- Quad Core Good for Basic Multitasking: 4 cores are sufficient for most users for everyday tasks like web browsing, word processing, and media consumption.
- Hexa Core, Great for Moderate Multitasking: 6 Cores offer superior performance for tasks such as photo editing, light video editing, and simultaneous operation of multiple programs.
- Octa Core Heavy Multitasking: 8 cores and above are ideal for intensive multitasking and professional workloads such as software development, 3D rendering, heavy video editing, and running virtual machines.
- 6 to 8 Cores is Better for Gaming: For gaming while streaming or running background applications, 6 to 8 cores is the best solution. Such processing power can boost your overall performance and provide a faster gaming experience.12 Core and Above Ideal for server and enterprise workloads: We recommend 12 cores and above processors for servers, database management, and enterprise-level applications.
How do you enable CPU cores in BIOS?
Answer: Enabling CPU cores in BIOS depends on your motherboard manufacturer, so the exact steps may vary. But generally, you’ll need to:
- Restart your PC and press a specific key (like Del, F2, or Esc) to enter BIOS during start-up.
- Look for settings related to CPU configuration, advanced BIOS, or something similar.
- Look for “Multi-Core Support” or “Enabled Cores” and turn all of them to “Enabled” or “All.”
- Press F10, or save your changes, and exit BIOS.
Your computer will restart with all cores activated.
Is 2 Cores Enough for Gaming?
Answer: Simply no. Dual (2) cores are no longer ideal for most modern tasks, such as video editing and gaming. They might run older or less demanding games but will struggle with newer or graphically intensive ones. For a fast gaming experience, especially with recent releases, you’ll need at least a quad-core CPU. Most games like Microsoft Flight Simulator, Star Citizen, Red Dead Redemption 2, Crysis, Cyberpunk 2077, and PUBG: Battlegrounds require at least 8 core processors for a faster experience.
How to use or enable all cores in Windows 11?
- Press
Win + R, type msconfig, and hit Enter. - Go to the Boot tab and click Advanced options.
- Check Number of processors and select the maximum number.
- Click OK, then Apply, and restart your PC.
This enables all CPU cores for better performance.
How to enable multi-core processors in Windows 11/10?
- Open the Run dialog box and type msconfig, then press Enter to access the System Configuration window.
- Navigate to the Boot tab and select Advanced Options.
- Enable the option for Number of Processors by checking the box, and choose the highest number available from the drop-down menu.
- Click OK to confirm.
- Return to the System Configuration window, select Apply, and then click OK.
- When prompted, restart your computer by clicking Restart.
How many cores can Windows 11 use?
Windows 11 can support up to 256 CPU cores for 64-bit processors, depending on the edition and hardware capabilities.
Is it safe to enable all cores?
Yes, enabling all CPU cores is generally safe. Modern processors are designed to manage core usage efficiently, and enabling all cores can improve performance for demanding tasks. However, it may slightly increase power consumption and heat generation. Ensure your cooling system is adequate.