OneDrive, Microsoft’s built-in cloud storage solution for Windows 11, offers a convenient way to store, sync, access, and share your files across devices. However, it may not suit everyone’s needs, especially if you prefer alternative storage services or wish to manage files locally. Whether you’re looking to pause syncing temporarily, disable its functionality, or completely uninstall it from your system, Windows 11 provides multiple straightforward options to customize how OneDrive operates.
In this guide, we’ll walk you through simple and effective methods to manage, disable, and remove OneDrive or completely uninstall it, helping you take full control of your cloud storage preferences.
Quick Solution to Manage OneDrive on Windows 11
- Pause or Stop OneDrive:
- Click the OneDrive icon in the system tray (near the clock).
- Select Pause Syncing and choose a duration (2, 8, or 24 hours).
- Select Quit OneDrive and confirm.
- Uninstall OneDrive:
- Open Settings by pressing
Win + I. - Navigate to Apps > Installed Apps.
- Search for Microsoft OneDrive, click the three-dot menu, and select Uninstall.
- Open Settings by pressing
- Disable OneDrive Without Uninstalling:
- Right-click the OneDrive icon and select Settings.
- Uncheck Start OneDrive automatically when I sign in to Windows.
- Alternatively, use Group Policy Editor to prevent OneDrive from starting or syncing.
- Remove Leftover Files (Optional):
- Delete the OneDrive folder from
C:\Users\[YourUserName]. - Advanced users can clean up OneDrive registry entries via
regedit.
- Delete the OneDrive folder from
How to Uninstall OneDrive on Windows 11?
Windows 11 lets you uninstall the OneDrive app easily, offering flexibility to manage your storage preferences. You can also remove or uninstall the OneNote app and disable the Game Bar temporarily or permanently by the following instructions. These options give you complete control over your device’s features and applications.
On Windows 11, you can uninstall OneDrive in at least two ways: using the Settings app and Command Prompt through the Windows Package Manager tool.
Uninstalling OneDrive by using Settings
If you’re sure that you no longer require OneDrive in any aspect, you could go ahead and get rid of the application. Here are the simple steps to uninstall the OneDrive app from your Windows 11 PC.
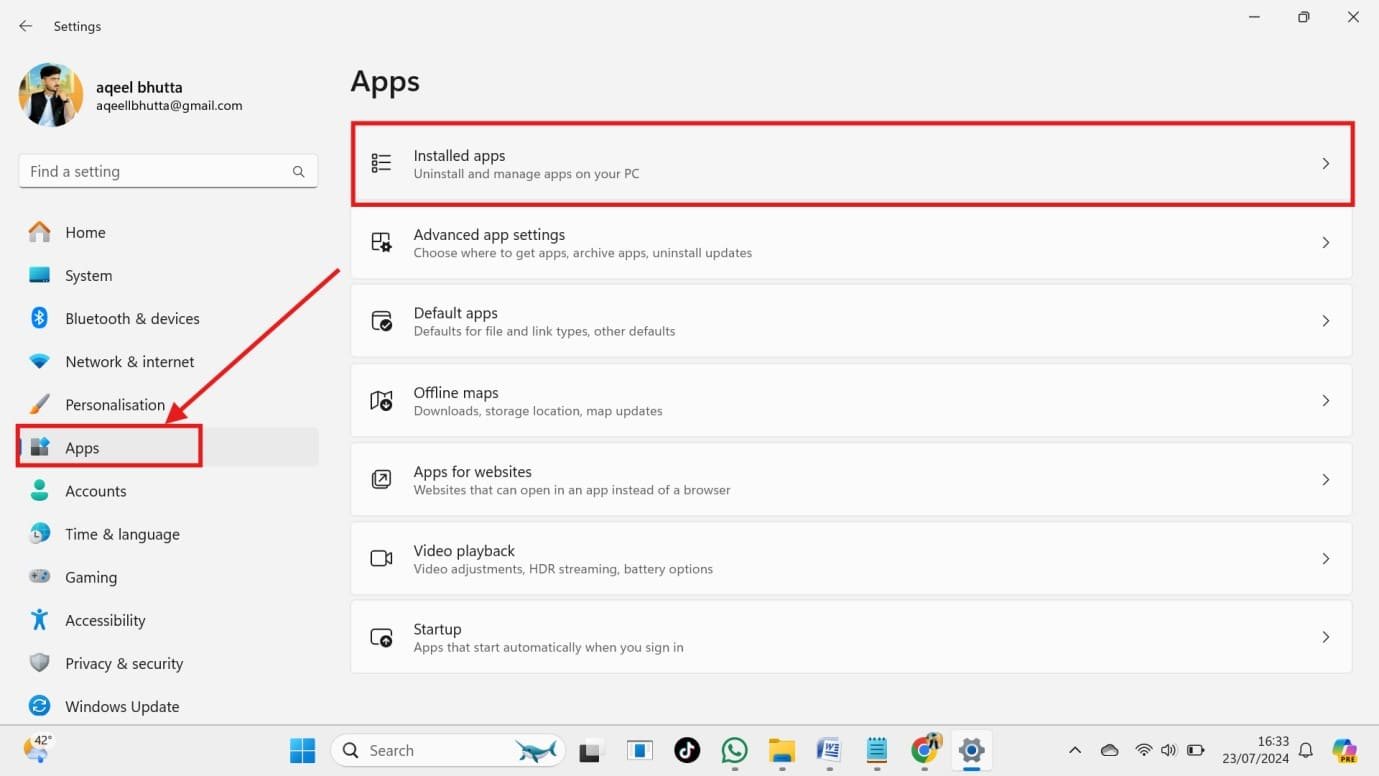
- Press the Windows key + I altogether to open Settings.
- Go to “Apps” and then select “Installed apps.”.

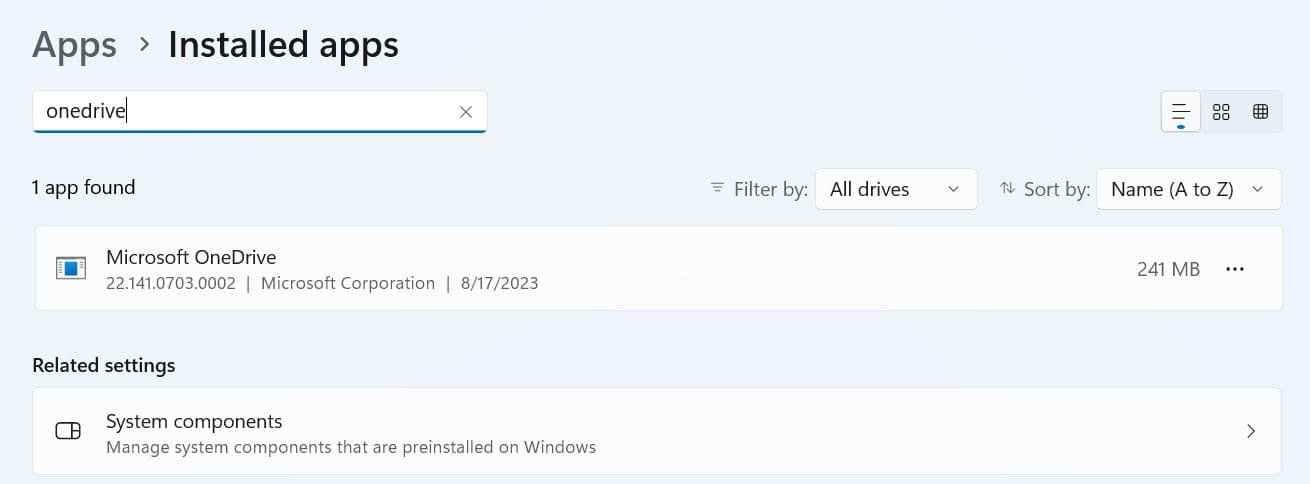
- Locate “Microsoft OneDrive” from the search option.

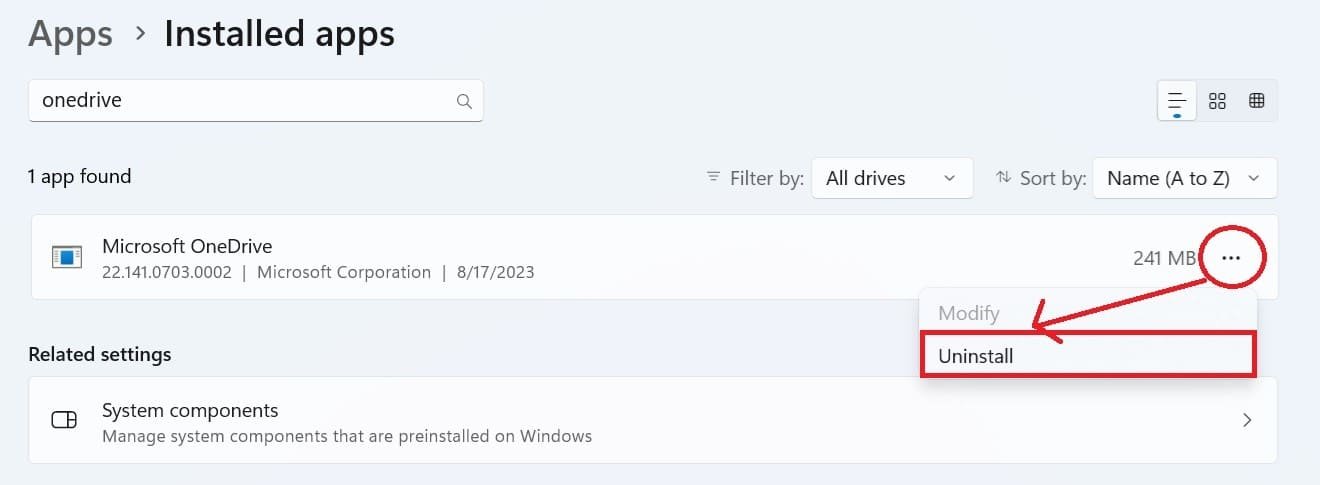
- Right-click on the three dots (in front of the OneDrive app on the right-hand side) and choose “Uninstall” from the option.

- Again, click on the “Uninstall” button to confirm the action.
After the confirmation, Microsoft OneDrive will be completely removed from your Windows laptop or PC. However, you can later install it whenever it is needed.
Option 2: Uninstall OneDrive Using Command Prompt
The most advanced users uninstall OneDrive from the Command Prompt because it is a quick and easy process. With a few easy commands, you can completely remove OneDrive and free up space on your device.
Here are the simple steps to uninstall OneDrive through Command Prompt.
- Search for Command Prompt in the Start menu, right-click it, and select Run as administrator.
- Type the following command to uninstall OneDrive on Windows 11 and press Enter:
[winget uninstall Microsoft.OneDrive]

Hit enter to execute the command. The Microsoft OneDrive app will be uninstalled completely from your Windows 11 system.
Once the uninstallation process ends, type “exit” and again hit enter to leave the Command Prompt.
Installing OneDrive App Using Command Prompt and Microsoft Store
- Uninstalling OneDrive does not delete files stored on your OneDrive account; it only removes the application from your PC.
- If you change your mind, you can reinstall OneDrive by downloading it from the official Microsoft site.
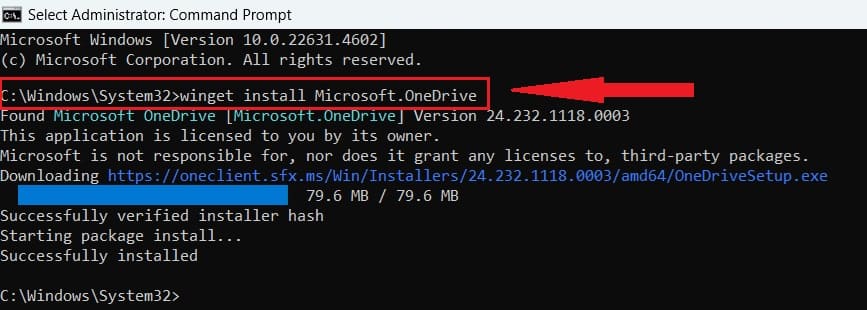
However, to install OneDrive via Command Prompt, follow the procedure below:
- Open command prompt as an Administrator
- Type the following command:
winget install Microsoft.OneDrive
- It will initiate the process of installing the OneDrive app on your Windows again.
Disable OneDrive (If Uninstallation is Not Desired)
If you don’t want to uninstall OneDrive completely but want to disable it:
Stop OneDrive from Starting Automatically:
You can also turn off OneDrive using the taskbar. To do this:
- Right-click the OneDrive icon in the taskbar (near the date & time).
- Click the Microsoft OneDrive “Settings.”
- Simply uncheck the “Start OneDrive automatically when I sign in to Windows” option
- Click “OK” to save the settings.
Now, every time you turn on your PC, OneDrive will not open automatically and will not back up your files and folders.
Unlink OneDrive Via Settings:
- In the OneDrive settings window, go to the “Account” tab and click “Unlink this PC.”
- A confirmation prompt will appear. Click “Unlink account” to proceed.
Hide or Disable OneDrive Via Group Policy Editor:
- Open “Group Policy Editor” (press Win + R, type gpedit.msc, and press Enter).
- Navigate to:Computer Configuration > Administrative Templates > Windows Components > OneDrive
- Double-click Prevent the usage of OneDrive for file storage and select Enabled.
- Click Apply and OK.
Now, let’s move ahead and find out how you can pause OneDrive temporarily and stop it from working automatically.
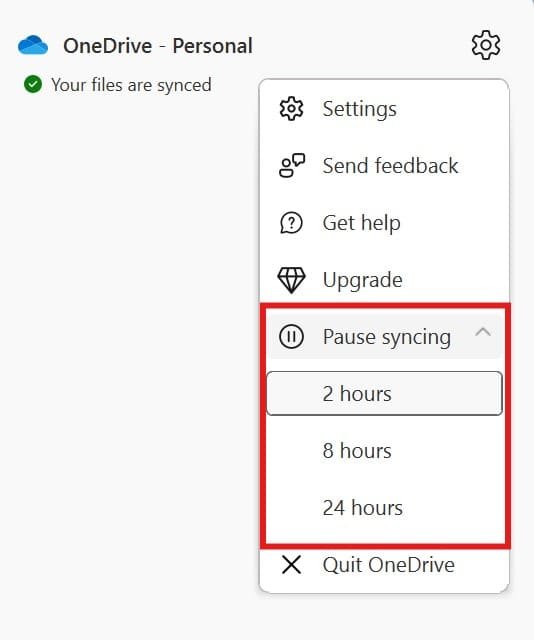
Pause OneDrive in Windows 11:
If you are not sure whether you want to remove OneDrive permanently, you can pause it temporarily. Pausing will stop the syncing of your files for a certain period you select (2 hours, 8 hours, 24 hours, or until you unpause).
- Click the right button of the mouse on the OneDrive icon located at the bottom of the screen.
- Click on “Pause syncing” and then select the time you want to pause the syncing for.

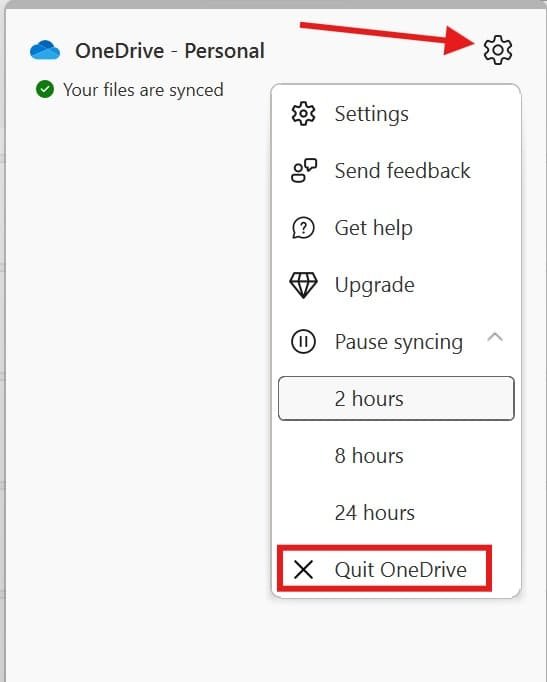
How to Quit OneDrive in Windows 11:
Turning off or disabling OneDrive will stop syncing or working in the background of your Windows system. However, you can turn it on by again opening it or restarting your PC.
To turn off OneDrive:
- Click with the right mouse button on the OneDrive icon placed near the Time and Date icon.
- Click on the OneDrive “Settings.””.
- Select Pause syncing and choose “Quit OneDrive.” A warning message will pop up asking if you are sure. Choose Close OneDrive to confirm.

Remove Leftover OneDrive Folders
After uninstalling OneDrive, you may want to clean up its leftover folders:
Remove the OneDrive Folder from File Explorer:
- Navigate to:
C:\Users\[YourUserName] and delete the OneDrive folder if it exists.
Remove Registry Entries (Advanced Users Only):
- Press Win + R, type regedit, and press Enter.
- Navigate to:
HKEY_CLASSES_ROOT\CLSID\{018D5C66-4533-4307-9B53-224DE2ED1FE6} - Delete the entry related to OneDrive.
Conclusion
In conclusion, managing OneDrive on Windows 11 is straightforward and flexible, allowing users to adapt the application to their preferences. Whether you choose to pause syncing, disable it temporarily, or completely uninstall OneDrive, the steps provided ensure you can make the best decision based on your needs. Similarly, if you’re wondering, “Why is Notes App not open on Mac?” it could be due to outdated software or minor glitches.
With multiple options, such as using Settings, Command Prompt, or Group Policy Editor, you have full control over your system’s cloud storage behavior. Remember, removing OneDrive does not affect your stored files on the cloud, so you can always reinstall or re-enable it if required.
FAQs: How to Uninstall or Remove the OneDrive on Windows 11
How do I permanently unlink my computer from OneDrive?
- Click at the OneDrive icon in the taskbar (it looks like a white cloud).
- Click the Settings (gear icon) to open the menu and pick out “Settings”.
- Go to the “Account” tab.
- Click on “Unlink this PC”.
What is OneDrive, and why is it on my Windows 11 system?
OneDrive is Microsoft’s built-in cloud storage service that comes pre-installed on Windows 11. It allows users to store files in the cloud, sync them across devices, and access them anywhere with an internet connection.
Will uninstalling OneDrive delete my documents?
No, uninstalling OneDrive may not delete your documents saved within the cloud. They will still be reachable online at https://onedrive.Live.Com/login/.
Can I reinstall OneDrive later?
Absolutely! You can reinstall OneDrive each time from the Microsoft Store.
How do I stop OneDrive from syncing files?
To stop syncing:
- Click the OneDrive icon in the system tray.
- Select Pause syncing and choose a duration.
- To stop completely, select Quit OneDrive.
How do I disable OneDrive without uninstalling it?
You can disable OneDrive by:
- Unlinking your account from OneDrive settings.
- Preventing OneDrive from starting automatically via its settings.
- Using Group Policy Editor to disable OneDrive system-wide.
What happens if I disable OneDrive on Windows 11?
Disabling OneDrive stops it from syncing or backing up files but keeps the application installed. You can enable it again anytime by reopening the app.
Is it safe to uninstall OneDrive from Windows 11?
Yes, it is safe to uninstall OneDrive if you do not use it. It won’t affect your system's functionality, and you can reinstall it if needed.