
Setting a static IP address in Windows 11 ensures that your device always has the same IP address, even after restarting. This is especially useful for tasks like remote access, online gaming, printer configuration, file sharing, and server hosting. A static IP helps maintain a stable connection and prevents issues that can arise when an IP address changes unexpectedly.
By default, most networks use dynamic IP addresses, which are automatically assigned by a DHCP server and can change periodically. While this works fine for everyday internet use, it can be problematic when you need a reliable and unchanging address for specific functions. A static IP eliminates this issue by providing a fixed address, making network management more predictable and efficient.
Why Use a Static IP Address?
- Improved Stability: Prevents IP address changes that may interrupt connections.
- Remote Access: Essential for servers, VPNs, and remote desktop access.
- Network Security: Helps in managing firewalls and access control.
- Better Performance: Reduces network conflicts and improves connection reliability.
- Device Management: Useful for printers, IoT devices, and smart home setups.
Different Ways to Set a Static IP Address in Windows 11
Let’s explore each method in step-by-step detail.
Set a Static IP Address Using Windows 11 Settings
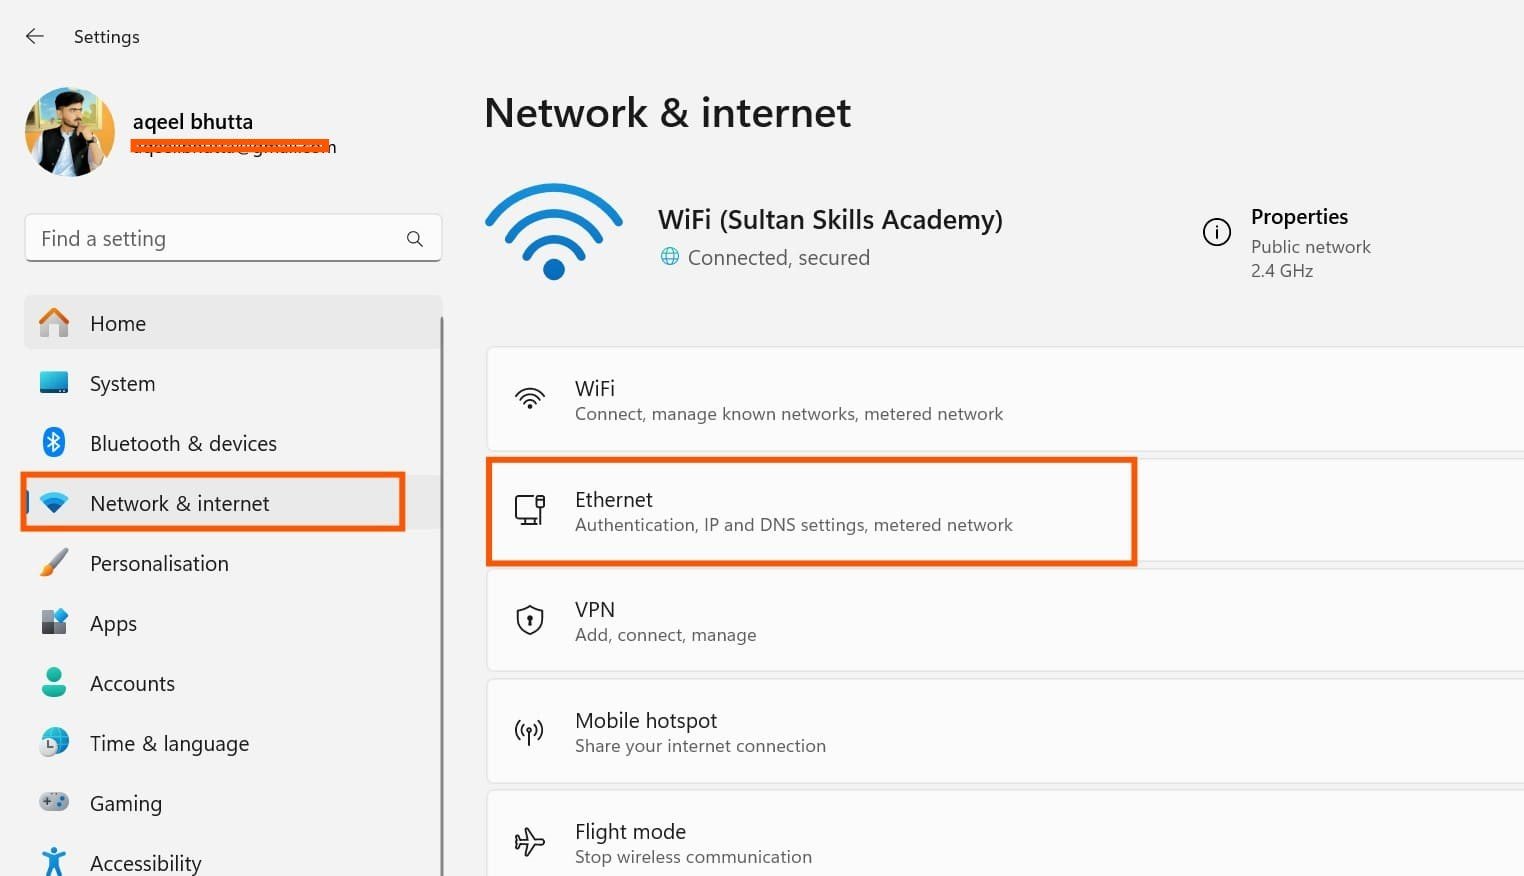
- Click the Start Menu, then open Settings.
- Navigate to Network & Internet.
- Select Ethernet (if using a wired connection) or Wi-Fi (for wireless).

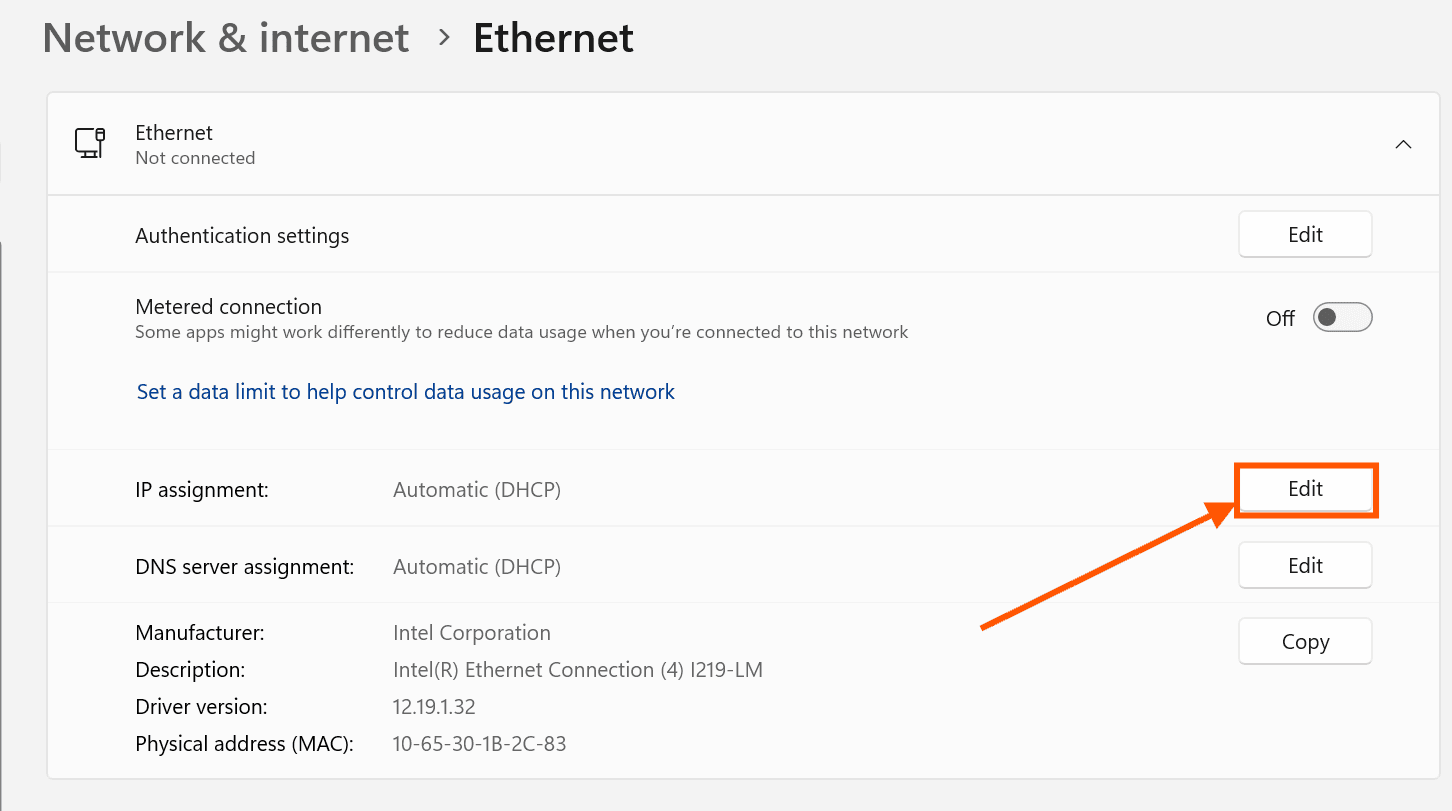
- Scroll down to IP Assignment and click Edit.

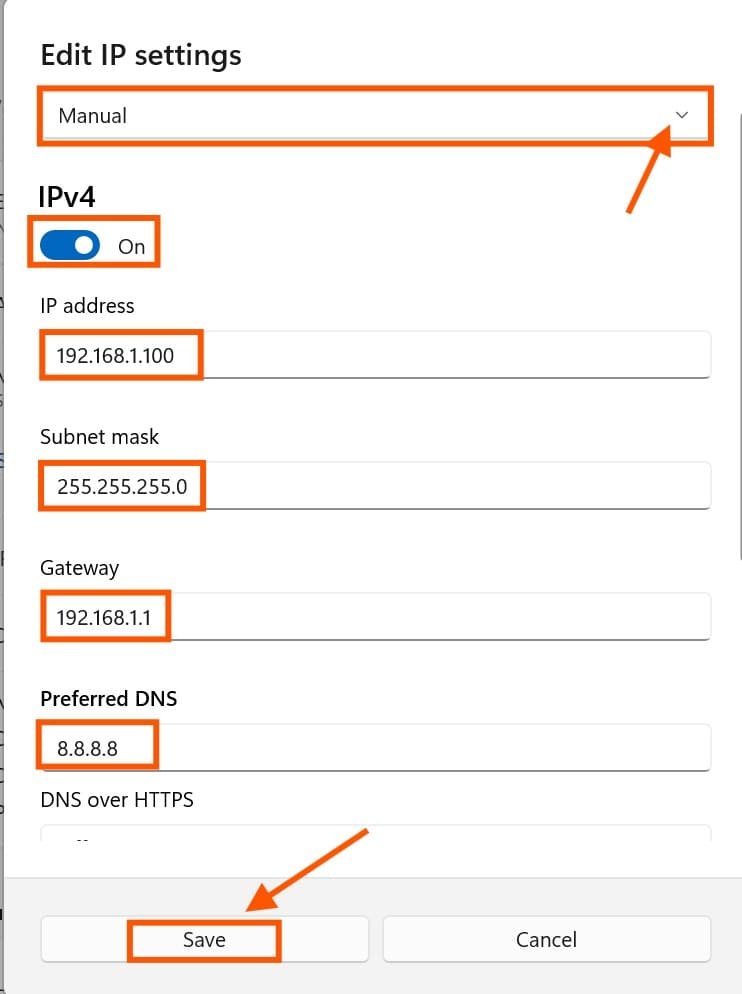
- Select Manual.
- Toggle IPv4 to On.
- Enter the following details:
- IP Address: (e.g., 192.168.1.100)
- Subnet Mask: (e.g., 255.255.255.0)
- Default Gateway: (e.g., 192.168.1.1)
- Preferred DNS: (e.g., 8.8.8.8)
- Alternate DNS: (e.g., 8.8.4.4)

- Click Save and restart your PC.
Related: How to Set Internet Priority Windows 11
Assign a Static IP via Command Prompt (CMD)
- Press Win + R, type cmd, and press Enter.
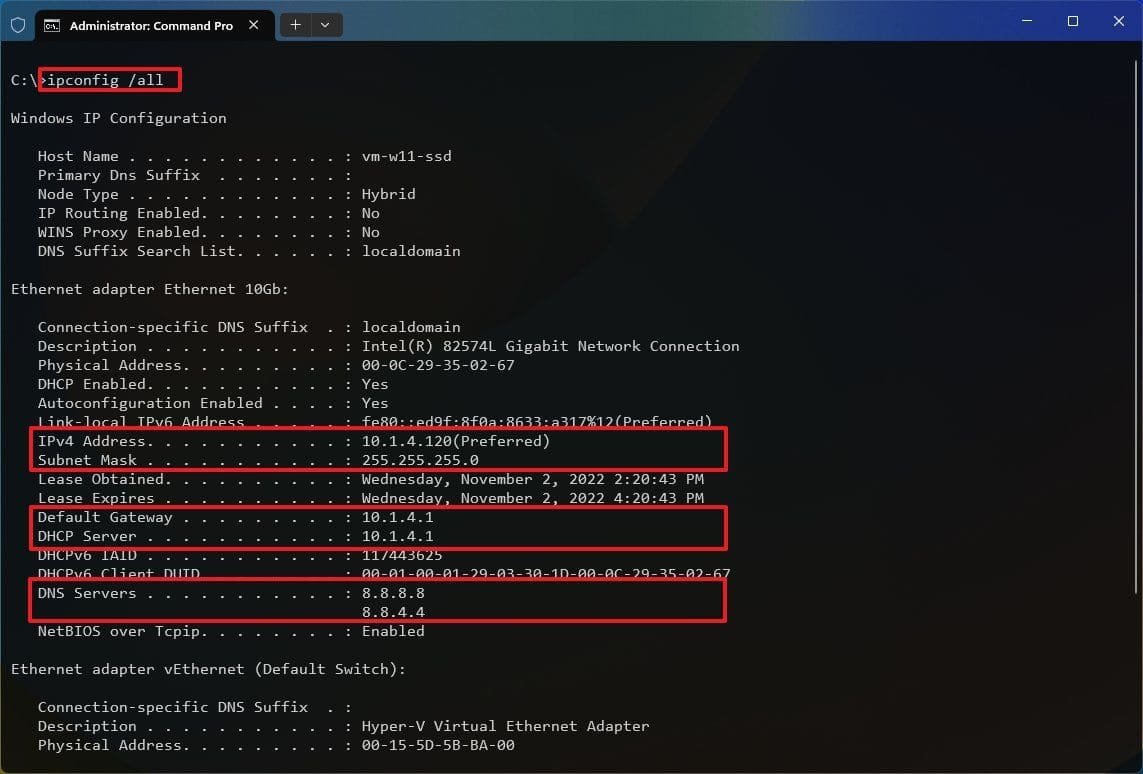
- Check your network adapter name by running:
netsh interface ip show config - Replace “Ethernet” with your adapter’s name:
netsh interface ip set address "Ethernet" static 192.168.1.100 255.255.255.0 192.168.1.1

netsh interface ip set dns "Ethernet" static 8.8.8.8

netsh interface ip add dns "Ethernet" 8.8.4.4 index=2 - Restart your computer for changes to apply.

Set a Static IP Using PowerShell
- Press Win + X and select Windows Terminal (Admin).
- Run:
Get-NetIPAddress
- Find your adapter name and execute:
New-NetIPAddress -InterfaceAlias "Ethernet" -IPAddress 192.168.1.100 -PrefixLength 24 -DefaultGateway 192.168.1.1

Set-DnsClientServerAddress -InterfaceAlias "Ethernet" -ServerAddresses 8.8.8.8, 8.8.4.4
- Restart your PC to apply changes.
Assign a Static IP via Router
- Open a browser and enter 192.168.1.1.
- Log in with your admin credentials.
- Navigate to LAN > DHCP Server.
- Locate static IP assignment.
- Enter the MAC address and desired IP.
- Click Save and reboot your router.
Understanding Static IP vs. Dynamic IP
| Feature | Static IP | Dynamic IP |
|---|---|---|
| Stability | More stable | Less stable |
| Remote Access | Required for servers | Not ideal |
| Security | More vulnerable | Less vulnerable |
| Cost | May incur fees | Usually free |
Troubleshooting Common Issues
No Internet After Setting Static IP
- Verify the subnet mask and default gateway.
- Ensure no IP conflict exists.
Can’t Access Router Settings
- Reset your router.
- Ensure you are connected to the correct network.
CMD or PowerShell Errors
- Run CMD/PowerShell as Administrator.
- Verify adapter name using
netsh interface show interface.
Advanced Static IP Configuration
Here’s the advanced static IP configuration:
Set Up a Static IP for Remote Desktop
A static IP is essential for Remote Desktop Protocol (RDP). Follow these steps:
- Assign a static IP using any method above.
- Enable Remote Desktop in Windows settings.
- Configure port forwarding in your router.
- Use your static IP to connect remotely.
Setting Static IP for Gaming & Streaming
For a low-latency gaming experience, setting a static IP helps:
- Assign a static IP to your gaming console.
- Enable UPnP or port forwarding.
- Optimize network settings for stability.
Using Static IP for Home Network & IoT Devices
- Assign static IPs to printers, smart cameras, and NAS storage.
- Avoid DHCP conflicts by manually assigning IP ranges.
Related: IP Vanish Review 2025: Features, Pricing, and Much More
Conclusion
A static IP address on Windows 11 provides network stability and control, ideal for gaming, remote work, and smart devices. Choose from Windows Settings, CMD, PowerShell, or Router Configuration based on your preference. Following these steps will ensure seamless network connectivity with minimal disruptions.
FAQs: How to Set a Static IP Address in Windows 11
How do I set a static DNS in Windows 11?
- Open Settings (
Win + I). - Go to Network & Internet > Wi-Fi or Ethernet.
- Click Hardware properties, then Edit under DNS settings.
- Select Manual, enable IPv4 or IPv6.
- Enter preferred and alternate DNS (e.g.,
8.8.8.8and8.8.4.4for Google DNS). - Click Save to apply changes.