How can you open BIOS on Windows 11 without restarting your PC? The process is simple. The BIOS and UEFI both let you change your computer’s settings, like the date and time or even how your processor works. BIOS is the older way, while UEFI is the newer, faster option found in most modern Windows 11 and 10 computers.
UEFI is like an improved BIOS: it supports bigger hard drives, works in 32- or 64-bit versions (compared to BIOS’s 16-bit), and even has security features to keep your computer safe.
But you might be worried about how to enter the BIOS in Windows 11.
In this comprehensive guide, we’ll discuss 5 easy methods to access BIOS (also known as UEFI Firmware Settings) on Windows 11 without restarting your PC. You can choose the method that works best for you, whether it’s using Settings, Command Prompt, a shortcut, or even a function key during startup. The sixth method requires restarting your devices.
The guide is useful for major laptops and PCs from manufacturers like HP, Lenovo, ASUS, MSI, Dell, Acer, etc.
Now, let’s move ahead and start to find out how to open BIOS on Windows 11 or 10 on your PC or laptop:
Quick Solution
BIOS is the first program that runs on your computer, initializing hardware and letting you boot your operating system. Here are a few quick and easy ways to access Windows 11 BIOS:
- Accessing BIOS through Settings: Windows + I > System > Recovery > Choose “Restart Now” > Troubleshoot > Advanced options > UEFI Firmware Settings > Restart.
- Getting into BIOS Using PowerShell: PowerShell > write “shutdown /r /o” > Troubleshoot > Advanced options > UEFI Firmware Settings > Restart.
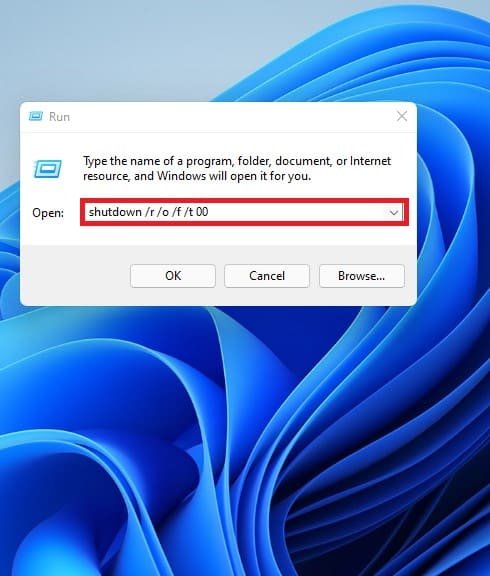
- Open BIOS Using Run Command: Win + R > type “shutdown /r /o /f /t 00” > Troubleshoot > Advanced options > UEFI Firmware Settings > Restart.
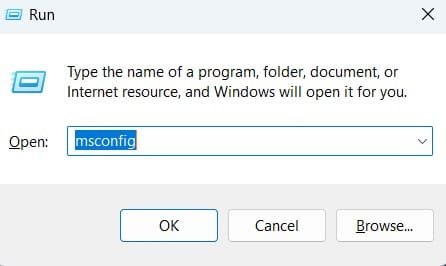
- Entering BIOS Using System Configuration: Win + R > type “msconfig” > Boot > Safe boot > Minimal > Apply > OK
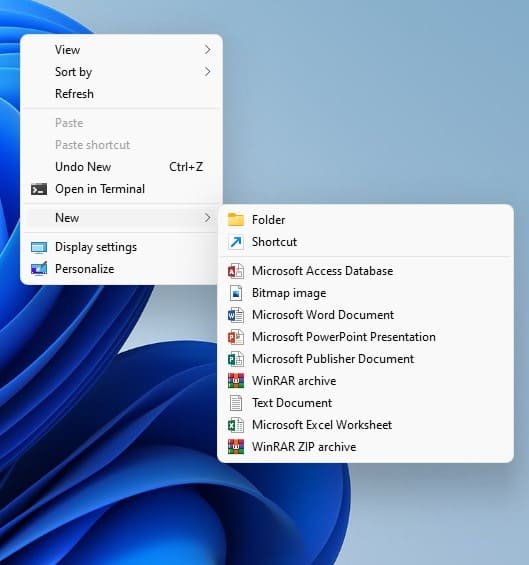
- Access BIOS Using Shortcut: New > Shortcut > Shutdown/r /o /f /t 00 Name the shortcut, then double-click the shortcut. Troubleshoot > Advanced options > UEFI Firmware Settings > Restart
- Launching BIOS with keys: F2, F10, F12, Delete, Esc, or a function key.
Here’s a table of contents for entering BIOS using 6 methods, with and without restarting your Windows 11 PC. You can click and jump to each section and method.
What is BIOS (Basic Input/Output System?)
The BIOS (Basic Input/Output System) is the firmware responsible for the initial startup and configuration of a computer. It runs before the operating system loads.
Entering the BIOS on a Windows 11 computer can be useful for a variety of reasons, such as:
- Configuring hardware settings
- Managing boot options
- Switching between UEFI and Legacy boot modes
- Adjusting power management preferences
- Accessing advanced overclocking settings
- Clock Adjustment
- Updating the BIOS firmware to fix bugs
- Improve compatibility
- Checking RAM and Resources
- And add new features.
- Game Bar Adjustment.
The BIOS is the fundamental firmware that enables your computer to start up and function properly. Accessing BIOS is necessary for various hardware, boot, and configuration tasks, as well as for maintaining and updating your system.
How to Access BIOS on Windows 11 without Restarting
These methods allow you to access the BIOS/UEFI settings without having to physically restart your computer and interrupt your current workflow. Keep in mind that the exact steps may vary slightly depending on your specific Windows 11 system and BIOS/UEFI implementation.
1. Open Windows 11/10 BIOS Using Settings
Now, follow these simple steps to open BIOS using settings in Windows 10 and 11:
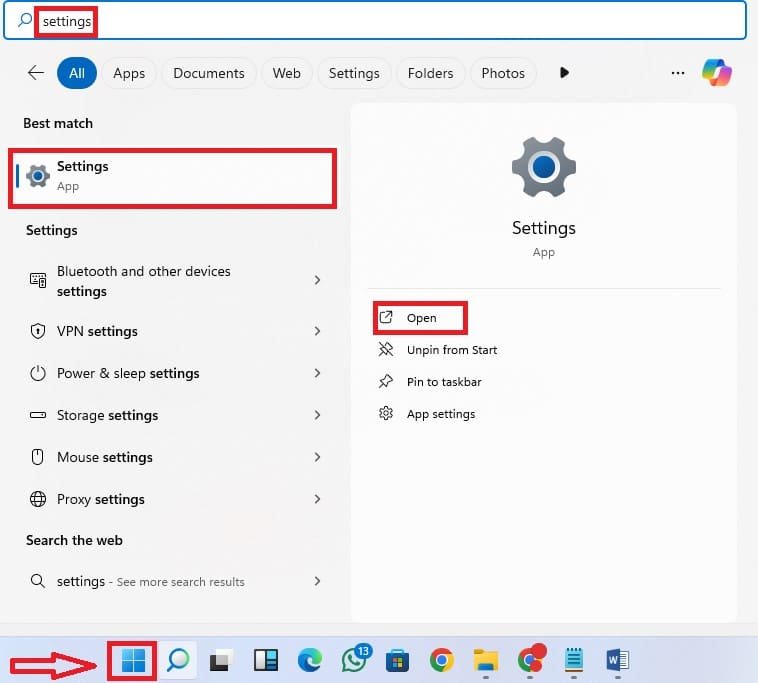
- Click the Windows icon, then type “settings” in the search bar and open it. Or you can use the shortcut key (Windows + i) altogether.
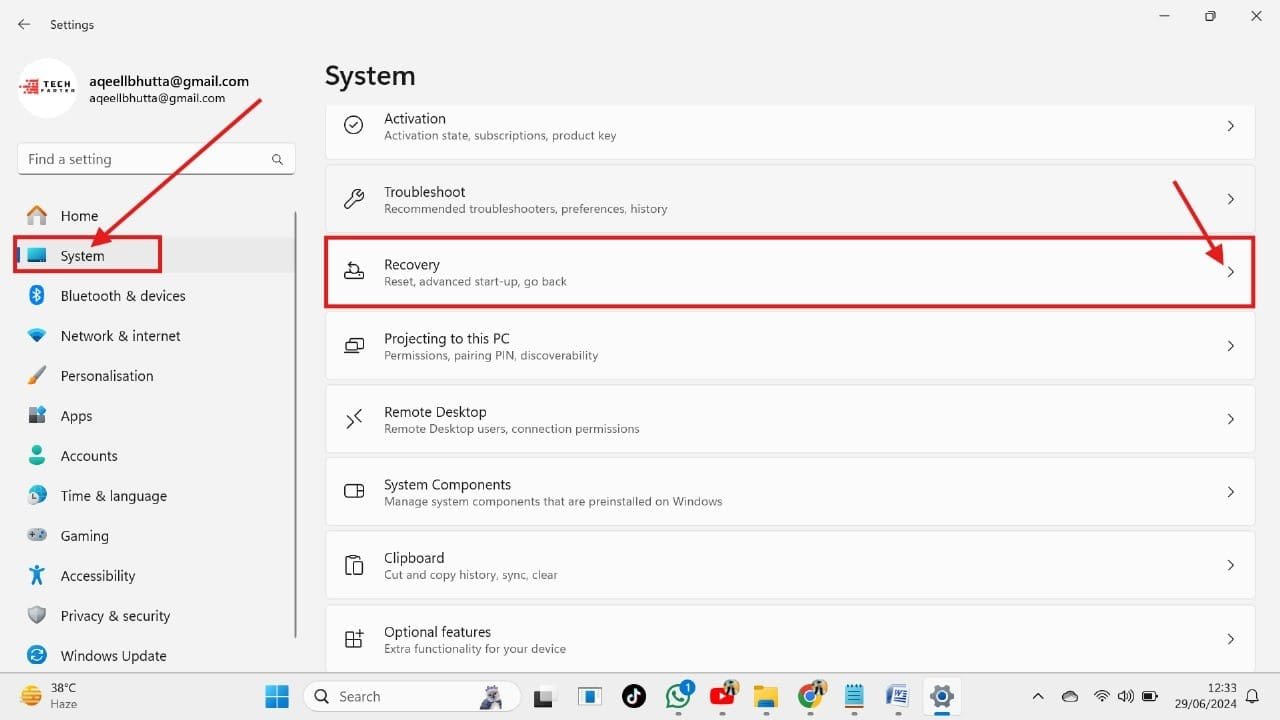
 Select “System” in the menu on the left side and click on “Recovery” on the right side.
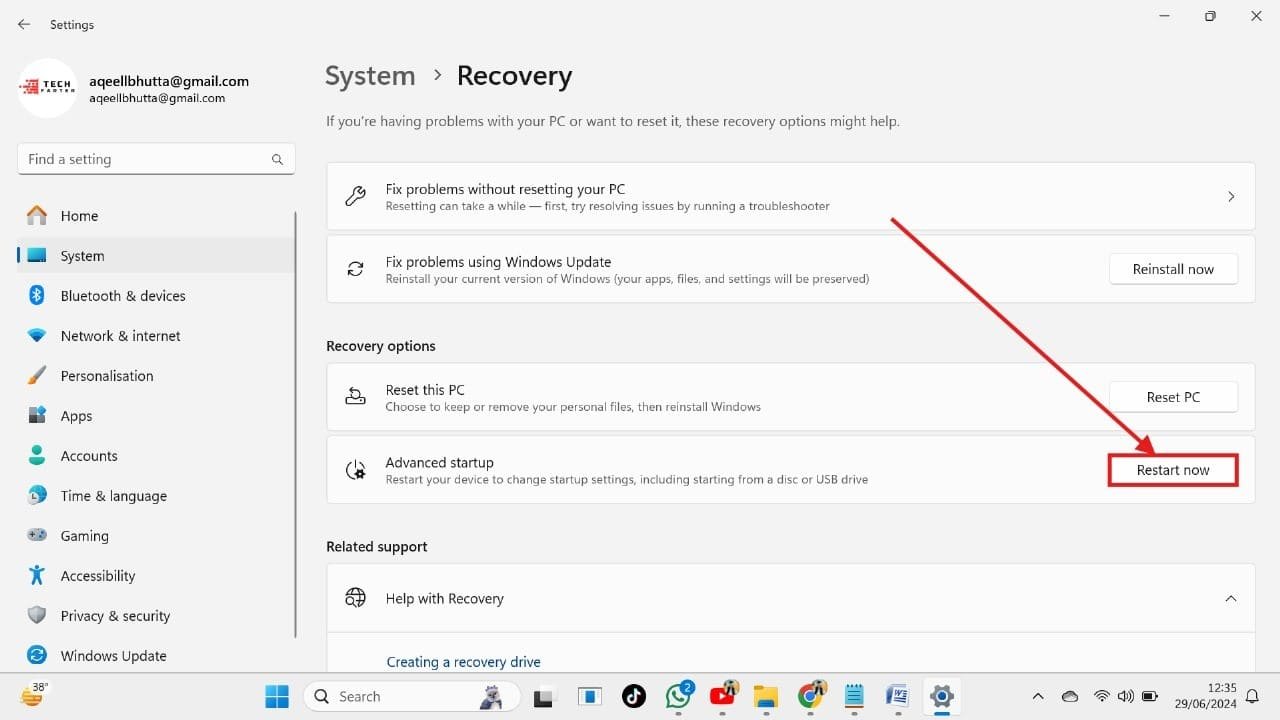
- Choose “Restart Now” in the advanced startup to start the troubleshooting. (Please save your work before restarting your PC.)

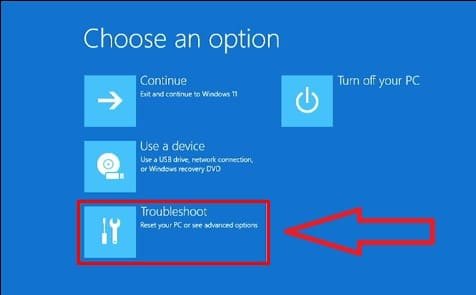
- Choose “Troubleshoot on the new menu.

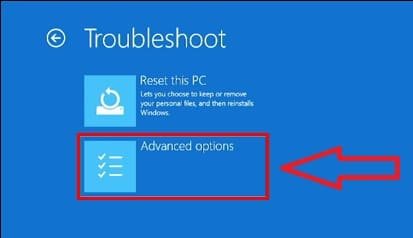
- Select “Advanced options.”.

- Select “UEFI Firmware Settings” and click on the “Restart” button to get into BIOS.
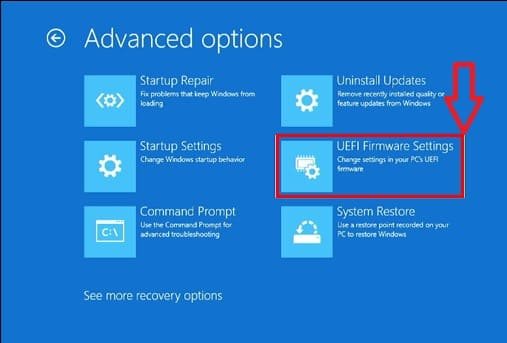
By following these steps, you will open the “BIOS setup.”
2. Get into BIOS using Command Prompt/Powershell or Windows Terminal (Windows 10/11)
Now, follow these easy steps to access BIOS using the Command Prompt in Windows 11 and 10.
Related: How to Make Windows 11 Look Like Windows 10?
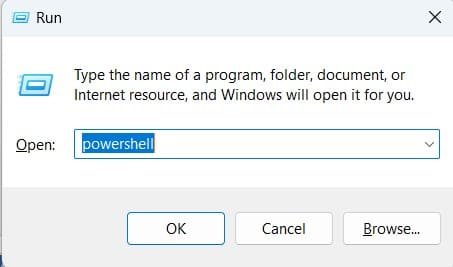
- In the start menu, search for PowerShell or Windows Terminal and click on “Run as Administrator.”. Or press “Win + R,” type “Powershell,” and hit “Shift + Ctrl + Enter” at the same time. Clicking “Yes” will open PowerShell as an administrator.
 Now, type shutdown /r /o /f /t 00 or shutdown /r /o and press enter.
- Once your computer restarts, you can find the BIOS settings by following these simple steps:
- Click on “Troubleshoot.”
- Then, choose “Advanced options.”
- Finally, select “UEFI Firmware Settings” and click “Restart.” This will take you directly to the BIOS.
3. Run Command for BIOS in Windows 10/11
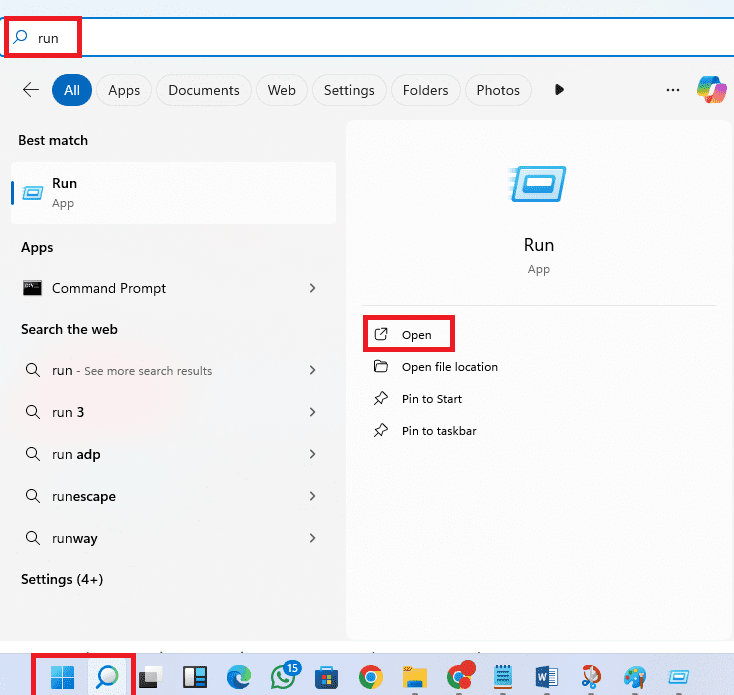
- Click on the Start Menu, type “Run” in the search bar, and open it.
- In the Run box, type the following command: shutdown /r /o /f /t 00 or shutdown /r /o, and press Enter. This restarts your computer with special settings.

- After restarting, click “Troubleshoot,” then “Advanced options,” and “UEFI Firmware Settings.” Finally, click “Restart” again to enter your computer’s BIOS settings
4. Using System Configuration to Enter the BIOS on Your Windows 11 PC
- Press the “Windows key + R” to open the Run dialog box.
- Type “msconfig” and hit Enter.

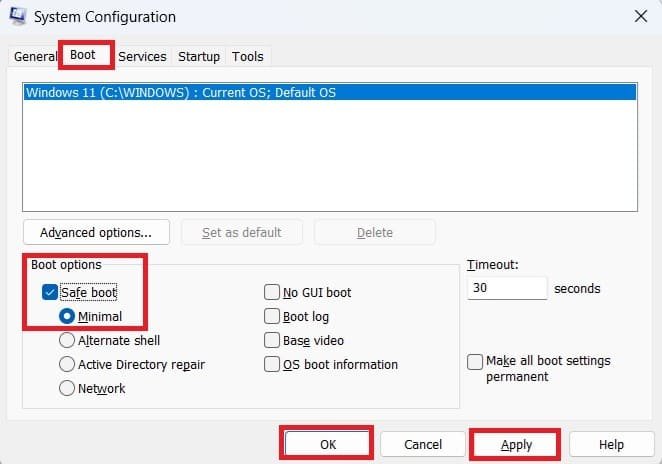
- In the System Configuration window, go to the “Boot” tab.
- Check the “Safe boot” option and select “Minimal.”.
- Click “Apply” and then “OK.”.

Restart your computer, and it will take you to the BIOS setup.
5. Enter BIOS with a Shortcut Windows 10/11
There’s a shortcut to access BIOS settings on Windows 10 and 11.
- Right-click anywhere on your desktop and choose “New,” then “Shortcut.”

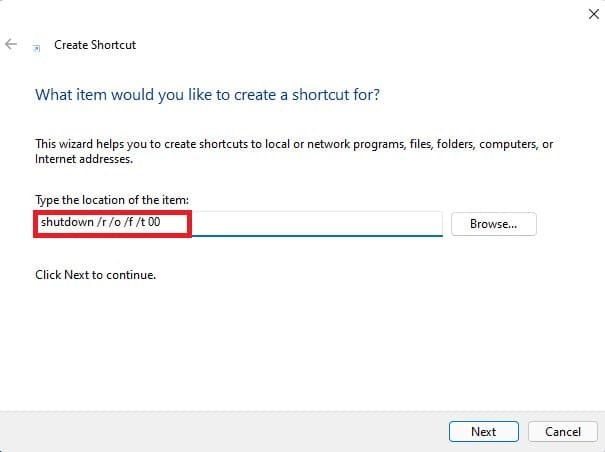
- In the Create Shortcut window, input shutdown /r /o /f /t 00 or shutdown /r /o for the location of the item.

- Name the shortcut “Shutdown” and then double-click the shortcut you just created. It will restart your computer. After restarting, follow the same steps as before: “Troubleshoot” > “Advanced options” > “UEFI Firmware Settings” and “Restart” to enter BIOS.
6. Enter BIOS with the Key in Windows 10/11
This method is used to physically restart your Windows 11/10 PC or laptop
When your computer is booting, you should see a message that informs you which key you need to press to access your computer or laptop BIOS.
Typically, BIOS entry keys are F2, F10, F12, Delete, Esc, or a function key.

As soon as your computer starts, you need to press and hold the right key for a short time.
The above screenshot is relevant to an HP laptop that requires an F10 key to enter into the BIOS setup. Pressing the required key will take you directly to the BIOS interface.
What is the BIOS hotkey for Windows 11?
The BIOS hotkey depends on the manufacturer of your PC or motherboard, not the operating system. Common BIOS hotkeys include:
- Dell:
F2orF12 - HP:
EscorF10 - Lenovo:
F2orFn + F2 - ASUS:
DelorF2 - Acer:
DelorF2 - MSI:
Del - Toshiba:
F2orEsc - Samsung:
F2
To access the BIOS:
- Restart your computer.
- Press the specific key repeatedly during the boot screen before Windows loads.
Conclusion
With this guide, you may have a clear idea about what BIOS is and how to access BIOS (or UEFI) on your Windows 10 or 11 PC or laptop without physically restarting them. Whether you prefer using Settings, the Shift key trick, Command Prompt, the Run command, or even creating a handy shortcut, we’ve covered all the methods. You just need to do the same steps and can successfully enter into BIOS with or without restarting your Windows 11 PC.
FAQs: How to Open BIOS on Windows 11 without Restarting Your PC
How do I Enter HP BIOS?
Try pressing a special key on your keyboard as your computer starts up. This key will usually bring you to the BIOS settings screen.
For instance, on HP computers like Pavilion, EliteBook, Stream, OMEN, and ENVY, pressing the F10 key right when you see the HP logo might take you to BIOS.
Some computers might need you to press the key a few times, or you might need to hold another key while pressing the special key. The best way to find out the exact key for your computer is to check its manual or look it up on the manufacturer’s website.
How to Reset BIOS without Opening the Computer?
This method works best if your computer isn’t turning on right. Just turn it off completely, unplug the power cord, and find the tiny BIOS reset button on your motherboard (check your manual if needed). Hold that button for a few seconds (listen for a beep or see a light blink to confirm) and then plug everything back in to restart your computer with the BIOS settings back to defaults.
How to change the name of your PC in Windows 11?
- Open Settings (
Win + I). - Go to System > About.
- Under Device specifications, click Rename this PC.
- Enter the new name for your PC and click Next.
- Restart your computer to apply the change.
Your PC will now have the new name.
Can I enter BIOS without restarting?
No, you cannot directly enter the BIOS without restarting the computer. The BIOS is accessed during the boot process, before the operating system loads. You must restart your PC and press the appropriate key (e.g., F2, F12, Del, or Esc) during startup to enter the BIOS.
On Windows 10 or 11, you can quickly restart into the BIOS:
- Go to Settings > System > Recovery.
- Under Advanced startup, click Restart now.
- Choose Troubleshoot > Advanced options > UEFI Firmware Settings > Restart.
This will reboot your system into the BIOS or UEFI.
How to enter BIOS without UEFI Firmware Settings?
If you cannot access the BIOS through UEFI Firmware Settings in Windows, you can use the traditional method:
- Shut down or restart your computer.
- Press the BIOS Hotkey During Boot:
- As soon as the system starts, repeatedly press the specific BIOS hotkey for your manufacturer (e.g.,
F2,Del,Esc, orF12). - You may need to press it quickly and repeatedly before the Windows logo appears.
- As soon as the system starts, repeatedly press the specific BIOS hotkey for your manufacturer (e.g.,
How to enter BIOS in Windows 10?
- Open Settings (
Win + I). - Navigate to Update & Security > Recovery.
- Under Advanced startup, click Restart now.
- After the reboot, go to Troubleshoot > Advanced options > UEFI Firmware Settings > Restart.
- Open Settings (
This will take you to the BIOS or UEFI settings.
How to shut down a PC in Windows 11?
- Start Menu: Click Start > Power icon > Shut down.
- Power Button: Press your PC's physical power button.
- Keyboard Shortcut: Press
Alt + F4on the desktop, select Shut down, and press Enter. - Run Command: Open,
Win + Rtype,shutdown /s /t 0and hit Enter.

 Select “System” in the menu on the left side and click on “Recovery” on the right side.
 Now, type shutdown /r /o /f /t 00 or shutdown /r /o and press enter.
