Installing the network adapter driver in Windows 11 without the internet is simple. In this article, we’ll learn how to identify your network adapter mode, download the best driver, and install it on your Windows 11 computer.
We will use a different computer to download the driver and transfer it to your computer using an external storage device or USB flash drive. After installation, we will also verify that the driver was installed successfully.
Quick Method:
Let’s get your computer connected to the internet.
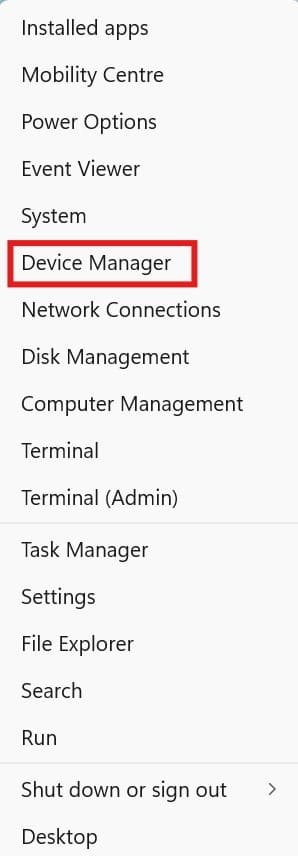
- Press the Windows and X keys together, then click “Device Manager.”
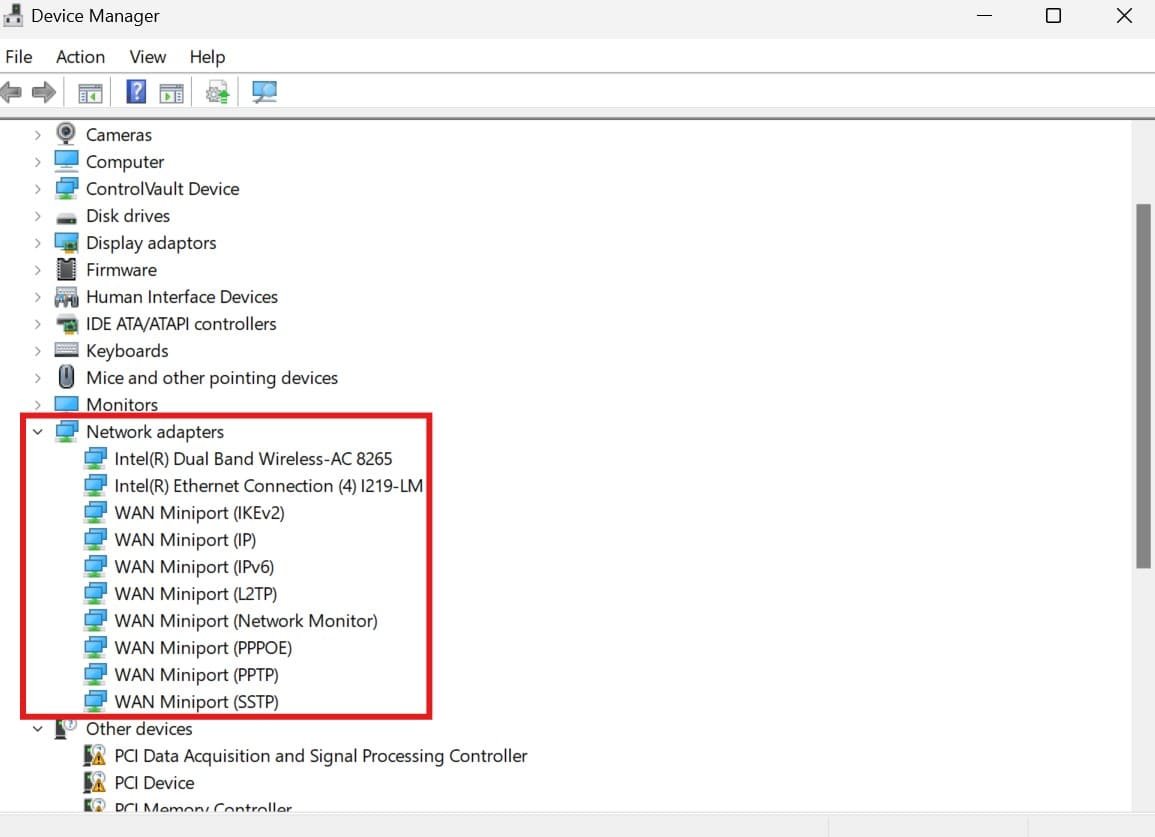
- In Device Manager, look for “Network Adapters” and open it.
- You’ll see a list of all your network adapter drivers. Find the one you are using and write down the name. Now you’re ready to update.
How to Install a Network Adapter Driver in Windows Without Internet?
Install or update a network adapter driver in Windows 11 without the internet on an old or new PC by downloading the driver on a secondary computer and transferring the files to your Windows 11 device.
Download the network adapter driver on a secondary computer
If your computer does not have internet access, you will need to use another device to download the driver.
Here’s how you can get the driver you need and get your computer connected again:
- Arrange a different computer with an internet connection to download the latest network adapter driver.
- Visit the official PC manufacturer’s website and download the most recent network adapter driver according to your model.
- To transfer the .exe driver files, save them to an external storage device or USB flash drive.
Transfer the Driver Files to the Windows 11 Computer
Now that you’ve downloaded the network adapter driver on another computer, it’s time to transfer the files to your Windows 11 system. This will allow you to install the driver and connect your computer to the Internet.
Follow these steps to transfer the files safely and efficiently:
- Insert the external storage device or USB flash drive holding the downloaded driver files into a USB port on your Windows 11 PC.
- To view the driver files, use File Explorer and navigate to the external storage device or USB flash drive.
- Installing the Network Adapter Driver.
- In the Start menu, search for and open the “Device Manager.”

- In the Start menu, search for and open the “Device Manager.”
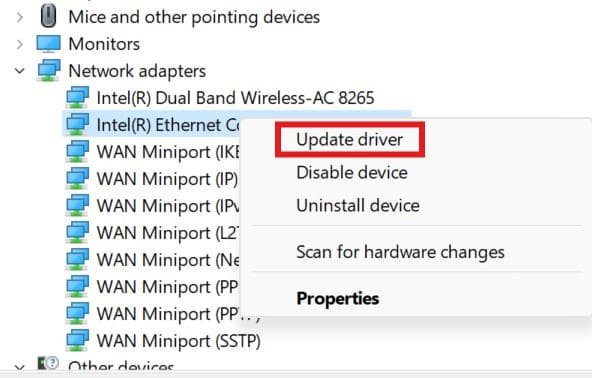
- In Device Manager, find the network adapter under “Network adapters” and right-click on it.

- Right-click on the network adapter you want to update. Select “Update driver” to launch the Update Driver Software wizard, and then click “Browse my PC for driver software.”

- Click on “Browse my computer for driver” and navigate to the location of the driver files on your USB flash drive or external storage device, select the folder, and click “OK.”
- Click “Next” to install the driver, and follow the on-screen prompts to complete the installation.
- Once installed, restart your PC to apply the changes.
After the restart, your computer will have the latest network adapter and you can use the the internet without any issue. Updating the graphics driver in Windows 11 also follows almost the same steps. So, if you need to update the graphics driver, just go to the Display Adapter and follow the prompts.
Install drivers without the internet, CD, or USB
- Preloaded Drivers: Check if Windows has basic drivers pre-installed. Open Device Manager and try to update drivers from available system files.
- Use Bluetooth Transfer: If Bluetooth is enabled, transfer the driver files from another device.
- Network Sharing: Share files via a local network from another PC. Use shared folders to access the driver files.
- Recovery Partition: Some PCs have recovery tools that include drivers. Check your manufacturer’s recovery software.
- Mobile Hotspot Tethering: Use a smartphone to connect the PC to the internet via USB tethering to download drivers.
These methods can help in unique cases without traditional options.
Verifying Network Connectivity
Once your computer is restarted, again go to the Device Manager and verify the successful driver installation. Check that the network adapter is listed without warning symbols. Which indicates a successful driver installation. Now, connect an Ethernet cable to your computer or connect it through a Wi-Fi device and test your internet connection. If you can connect, you have successfully installed the network adapter driver in Windows 11 without internet access.
Conclusion
By following the above simple steps, you can download and install a network adapter driver on Windows 11 without internet access using a different computer. You can successfully identify your network adapter mode, download the driver from the official website, and install it on your Windows 11 system.
You’ve also learned how to transfer the driver files from a secondary computer and verify the installation. With your network adapter driver installed, you should now have a stable internet connection. If you encounter any issues, refer to the network troubleshooting tips, like turning on or off network discovery and setting internet priority on your Windows 11 PC. If nothing works for you, then try factory resetting your laptop or PC.
Remember to always keep your drivers up to date to ensure optimal performance.
FAQs: How to Install the Network Adapter Driver in Windows 11 Without Internet?
Why do I need to install a network adapter driver?
A network adapter driver is necessary for your computer to connect to the internet. It allows your computer to communicate with your network adapter and enable internet access. Without a driver, your network adapter will not work properly. The driver provides the necessary instructions for your computer to recognize and use the network adapter. By installing a network adapter driver, you will be able to connect to the internet and access online resources.
Can I install a network adapter driver from a CD or DVD?
Yes, you can install a network adapter driver on a CD or DVD. Insert the CD or DVD into your computer’s disc drive. Follow the prompts to run the installation program. The driver will be installed on your computer. Make sure the disc is malware-free to avoid potential risks.
How do I install a missing Wi-Fi driver in Windows 11?
Open Device Manager and expand the Network Adapters section. Look for a wireless adapter with a yellow exclamation mark or an “unknown device” label. Right-click on it and select “Update driver” to search for automatic updates. If Windows 11 does not find any update, then click “Browse my computer for driver software.” Follow the prompts to complete the installation.
How to download a network adapter driver for Windows 11?
- From Manufacturer's Website: Visit your device or adapter manufacturer's website (e.g., Intel, Realtek, Dell, HP). Search for the driver compatible with your adapter and Windows 11.
- Using Device Manager:
- Open Device Manager (
Win + X> Device Manager). - Expand Network adapters, right-click your adapter, and select Update driver > Search automatically for drivers.
- Open Device Manager (
- Windows Update: Go to Settings > Windows Update > Check for updates to download and install the driver.
If no drivers are found, use another device to download the driver and transfer it via USB.
How to install Windows 11 without a network driver?
- Proceed Without Internet: During Windows 11 setup, choose I don’t have internet or Skip for now to bypass network setup.
- Use a USB Driver Installer:
- Download the network driver from another device via the manufacturer’s website.
- Transfer it to the Windows 11 PC using a USB drive and install it.
- Use a Driver Pack: Download a driver installation package (e.g., DriverPack Solution) on another device, transfer it to the PC, and install offline.
How to install a WiFi or Ethernet driver on Windows 11, 10 and 7 without internet?
Install WiFi or Ethernet drivers on Windows without the internet on a new PC or laptop with the following quick and hassle-free steps!
- Determine the model of the network adapter.
- Use a different PC to download the required driver.
- Copy the driver files to your Windows 11 computer.
- Install the driver for the network adapter.
- Check if the network connection is working properly.


