Managing your Wi-Fi networks efficiently is crucial. Whether you’ve recently changed your Wi-Fi password, moved to a new location, or simply want to clean up your list of saved Wi-Fi networks, knowing how to forget a network in Windows 11 can be very useful. This guide will walk you through the simple steps to remove a network from your saved networks list in Windows 11, ensuring your device no longer attempts to connect to outdated connections.
This guide goes beyond the basics! We’ll show you several ways to forget a Wi-Fi network on Windows 10, macOS, iPhone, and Android. By the following instructions, you can also turn on or off the network discovery in Windows 11. Whether you prefer using the Wi-Fi icon, the Settings app, or even Command Prompt/PowerShell (for tech-savvy users), we’ve got you covered. We’ll also explain how to easily reconnect to the network later.
Let’s take back control of your Wi-Fi network list! and forget those unwanted Wi-Fi networks and get your list looking clean and organized.
Quick Solutions
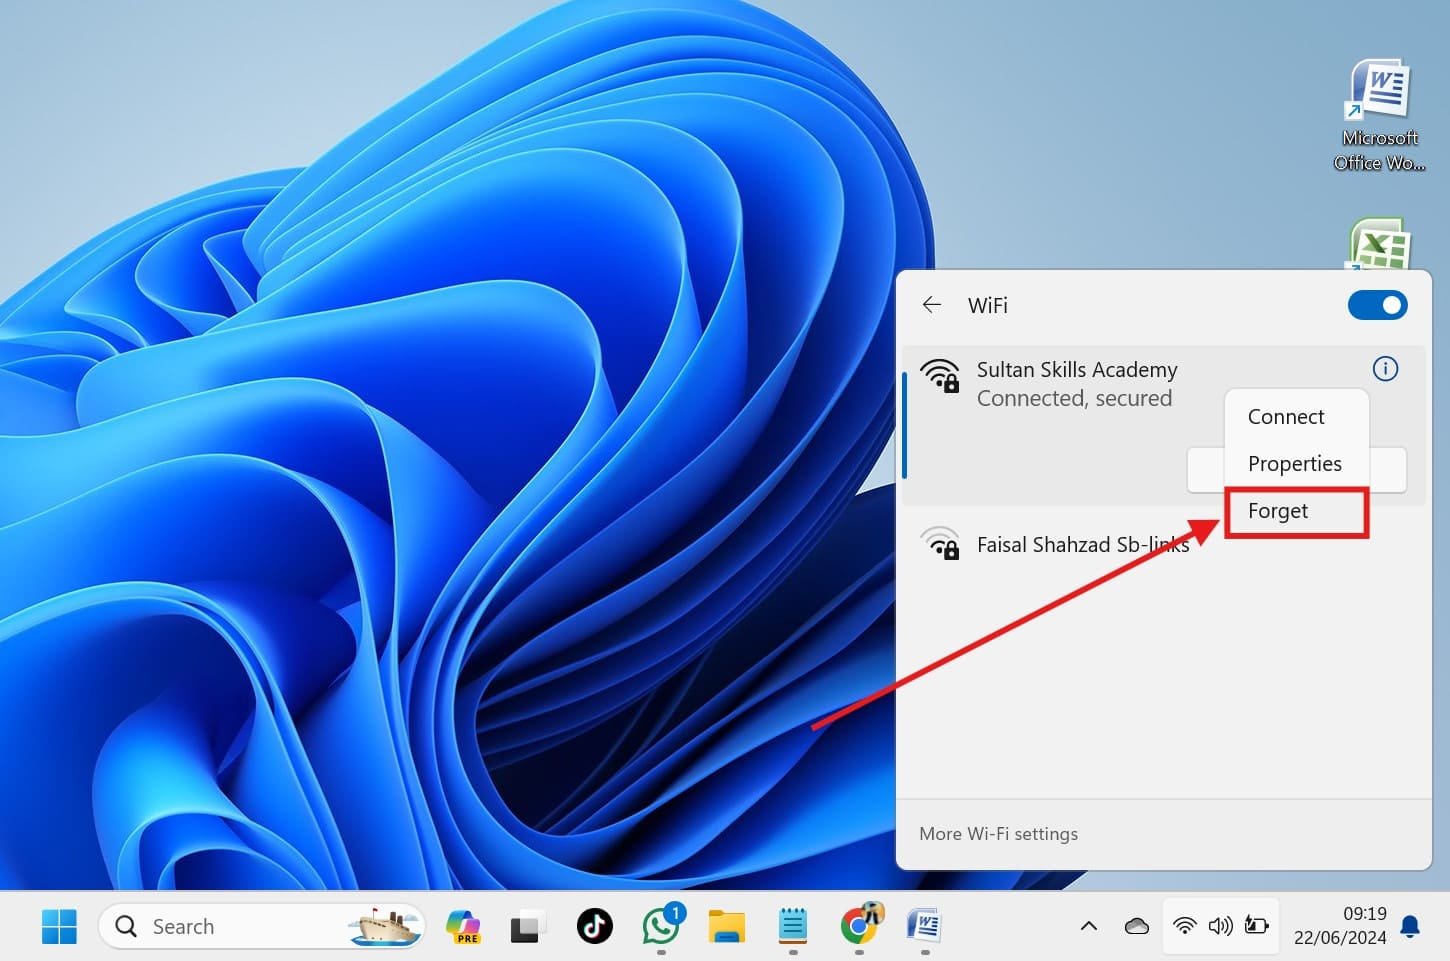
- From the Wi-Fi icon, forget the connected network: Click the Wi-Fi icon in the taskbar > Right-click on the Wi-Fi icon > Select “Forget.”
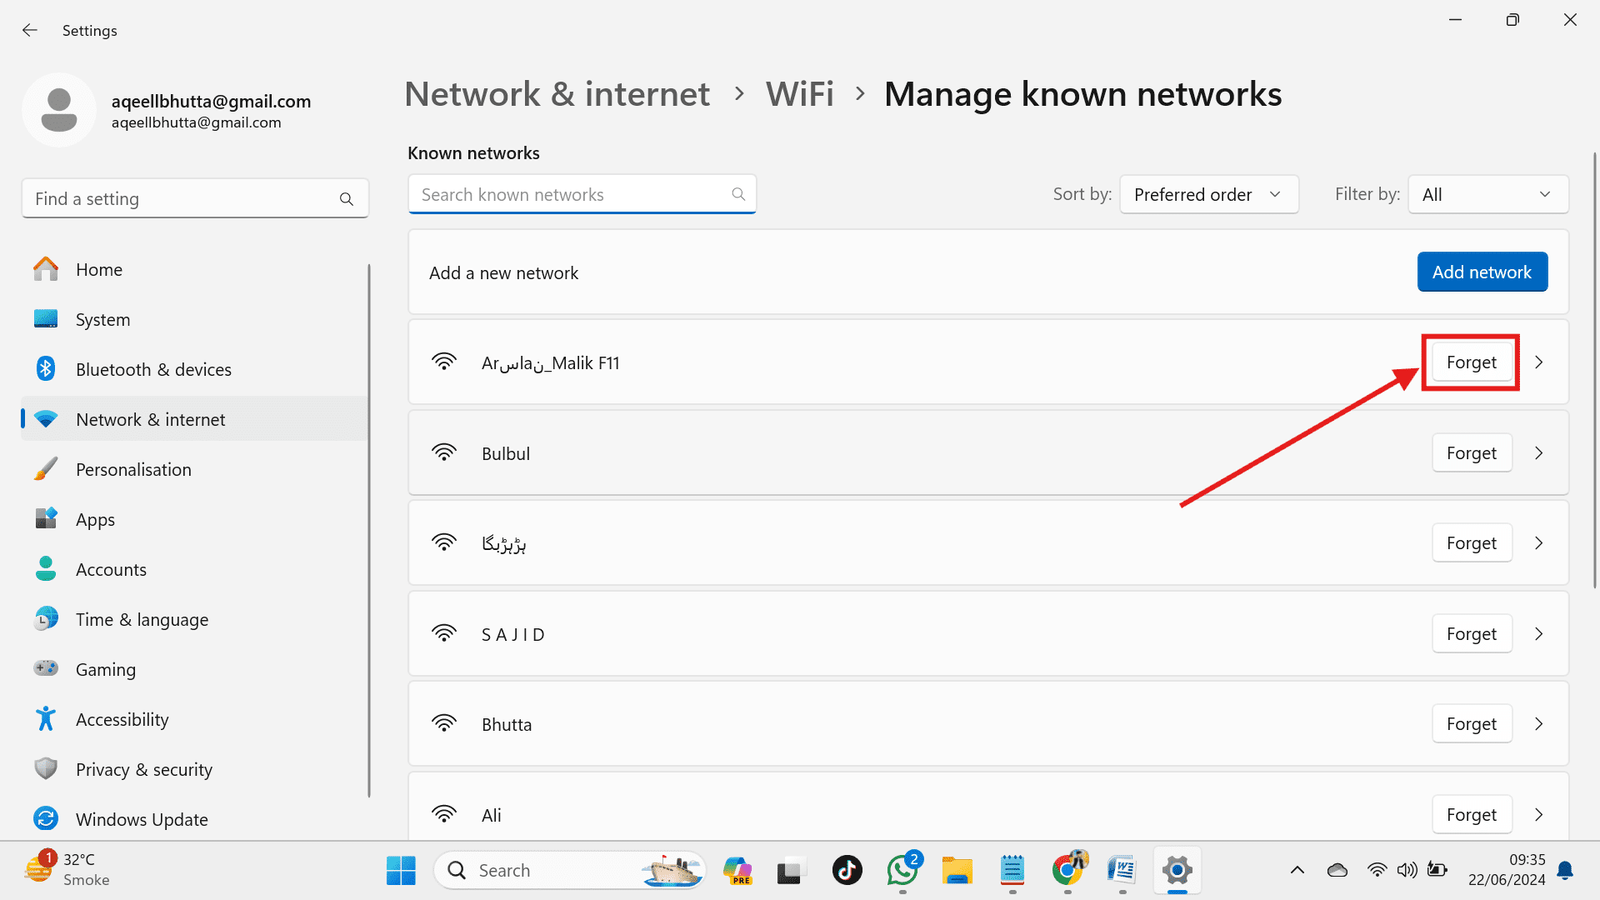
- Forget Wifi Network From Settings: Open Settings (press Windows + i) > Go to Network & Internet >> Wi-Fi > Click Manage Known Networks > Find the network you want to forget and click Forget next to it.
How Can I Forget or Remove a Wi-Fi Network?
Tired of seeing Wi-Fi networks you don’t use on your Windows 11 PC? This article offers you several ways to ignore those forgotten networks! We have more advanced options like Command Prompt and quick and simple methods like using the Wi-Fi icon. We even give you a helpful guideline to clear all of your saved networks.
Using Quick Settings to Forget a Network in Windows 11
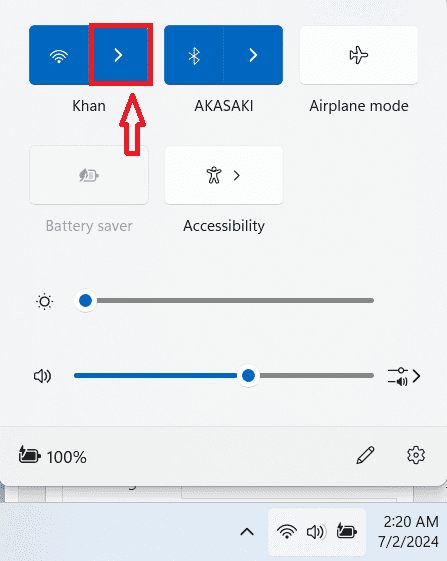
- Press Win + A on your keyboard to open the Quick Settings panel.
- In the Quick Settings panel look for the Wi-Fi icon and click on the arrow next to the Wi-Fi icon to see the list of available networks.

- Find the one that you want to forget. Right-click the network name and select the “Forget” option from the menu.
Using Settings App to Forget a Network in Windows 11
Here’s how to forget a WIFI network in Windows 11 using Settings Apps:
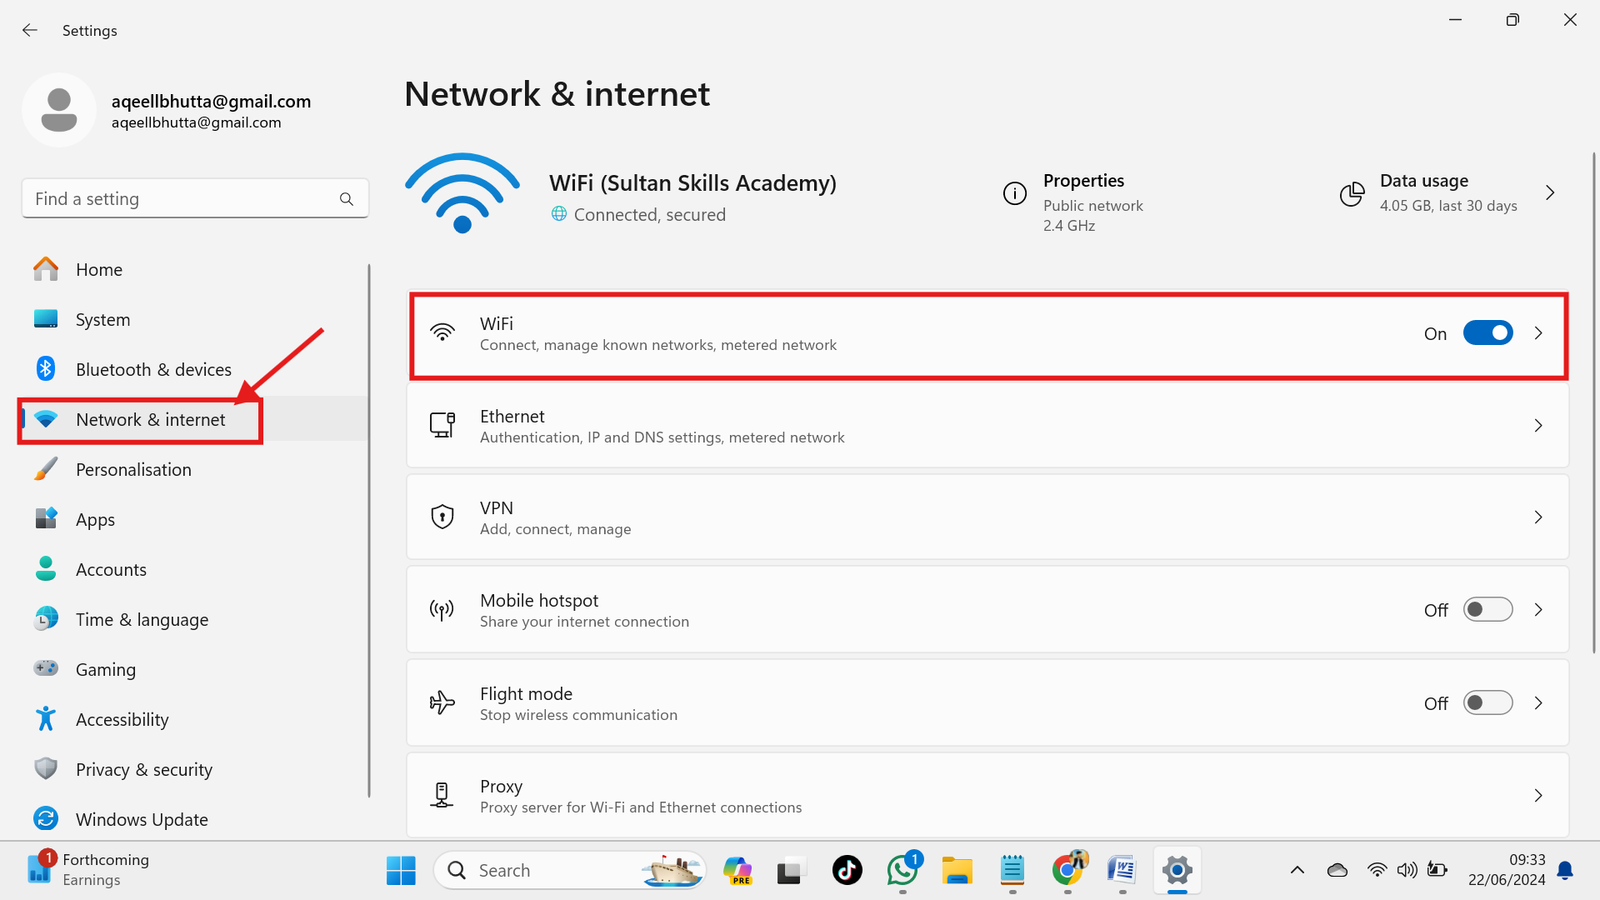
- Click the Start menu and select “Settings” (or press Windows + i).
- Go to “Network & Internet” and then click on “Wi-Fi” in the right-hand menu.

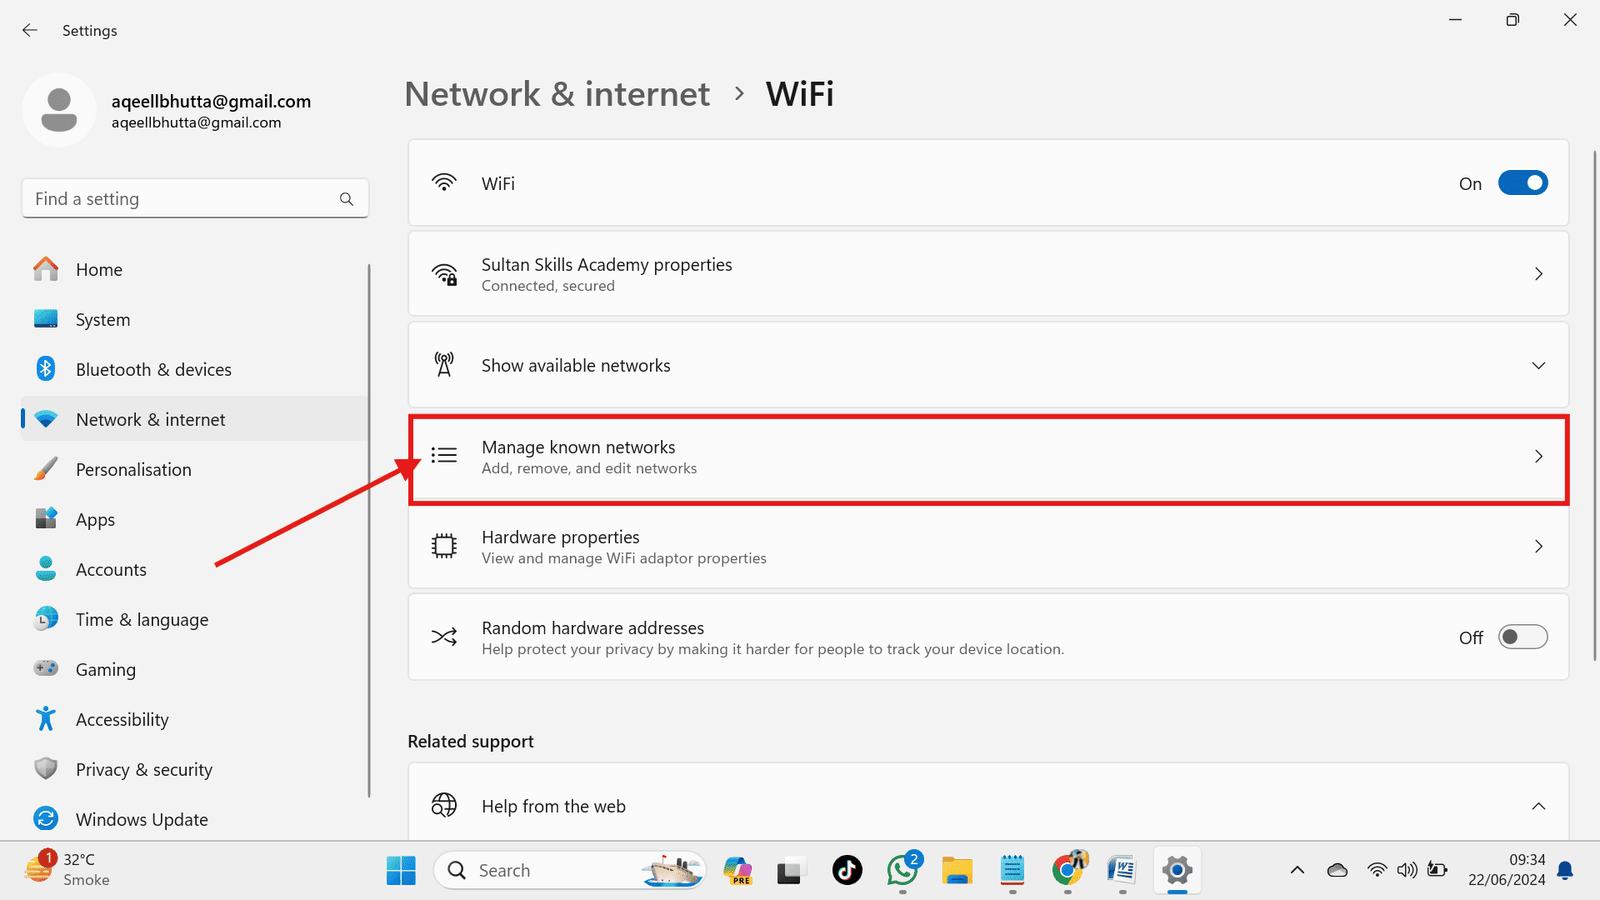
- Under “Manage known networks,” find the network you want to forget.

- Click the “Forget” button next to the network name.
Using Command Prompt (CMD) to Forget a Network in Windows 11
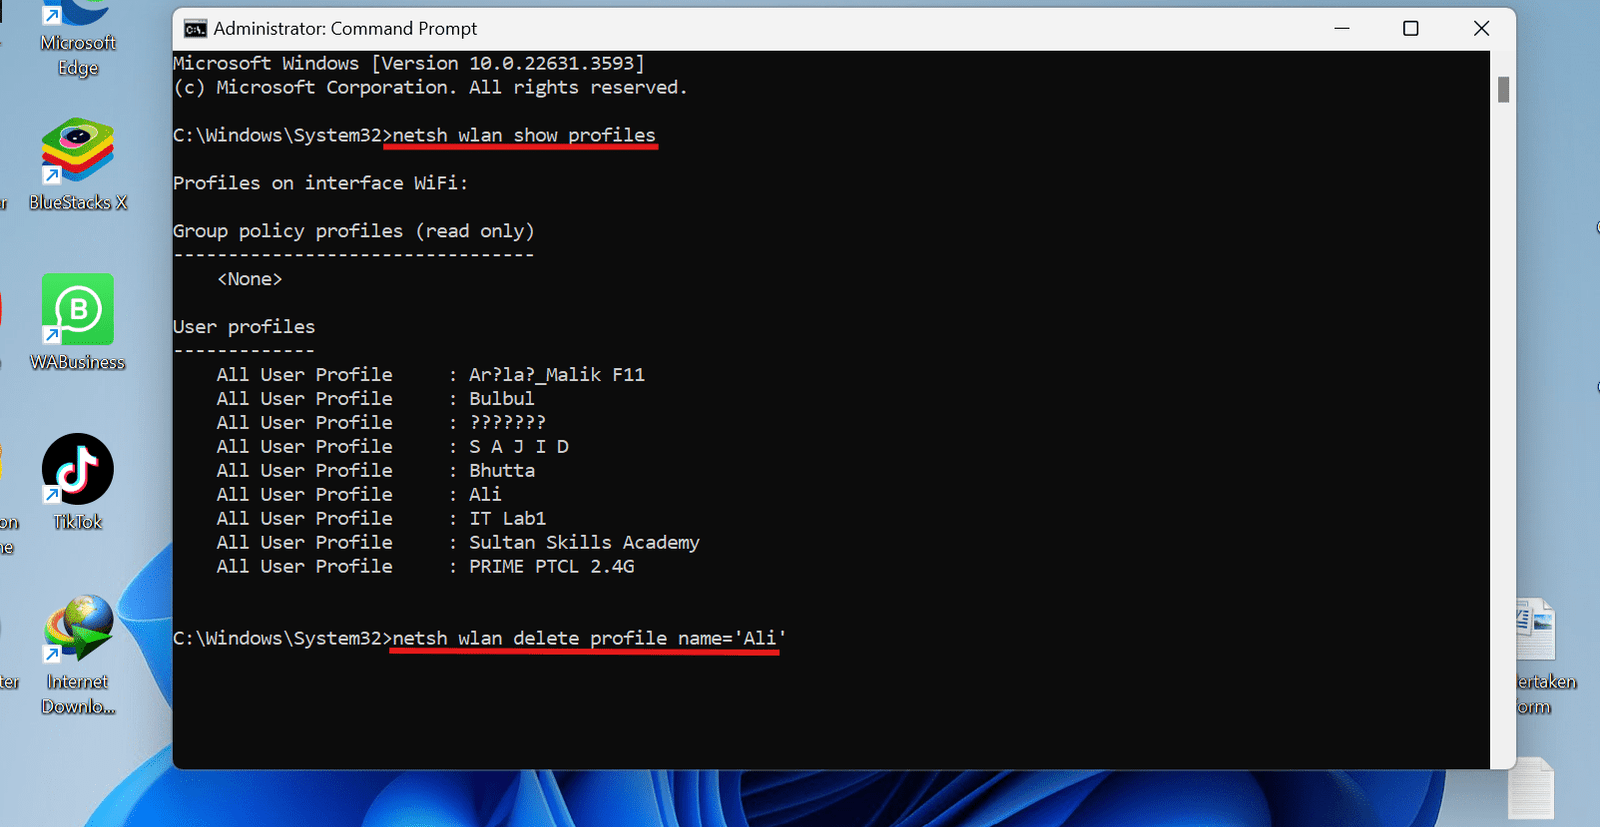
Here’s how to forget a Wi-Fi network in Windows 11 using CMD:
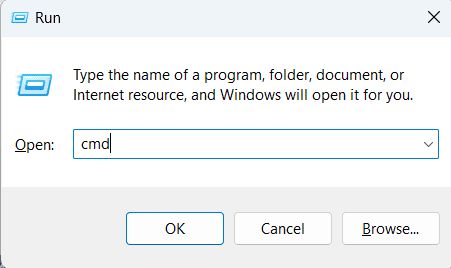
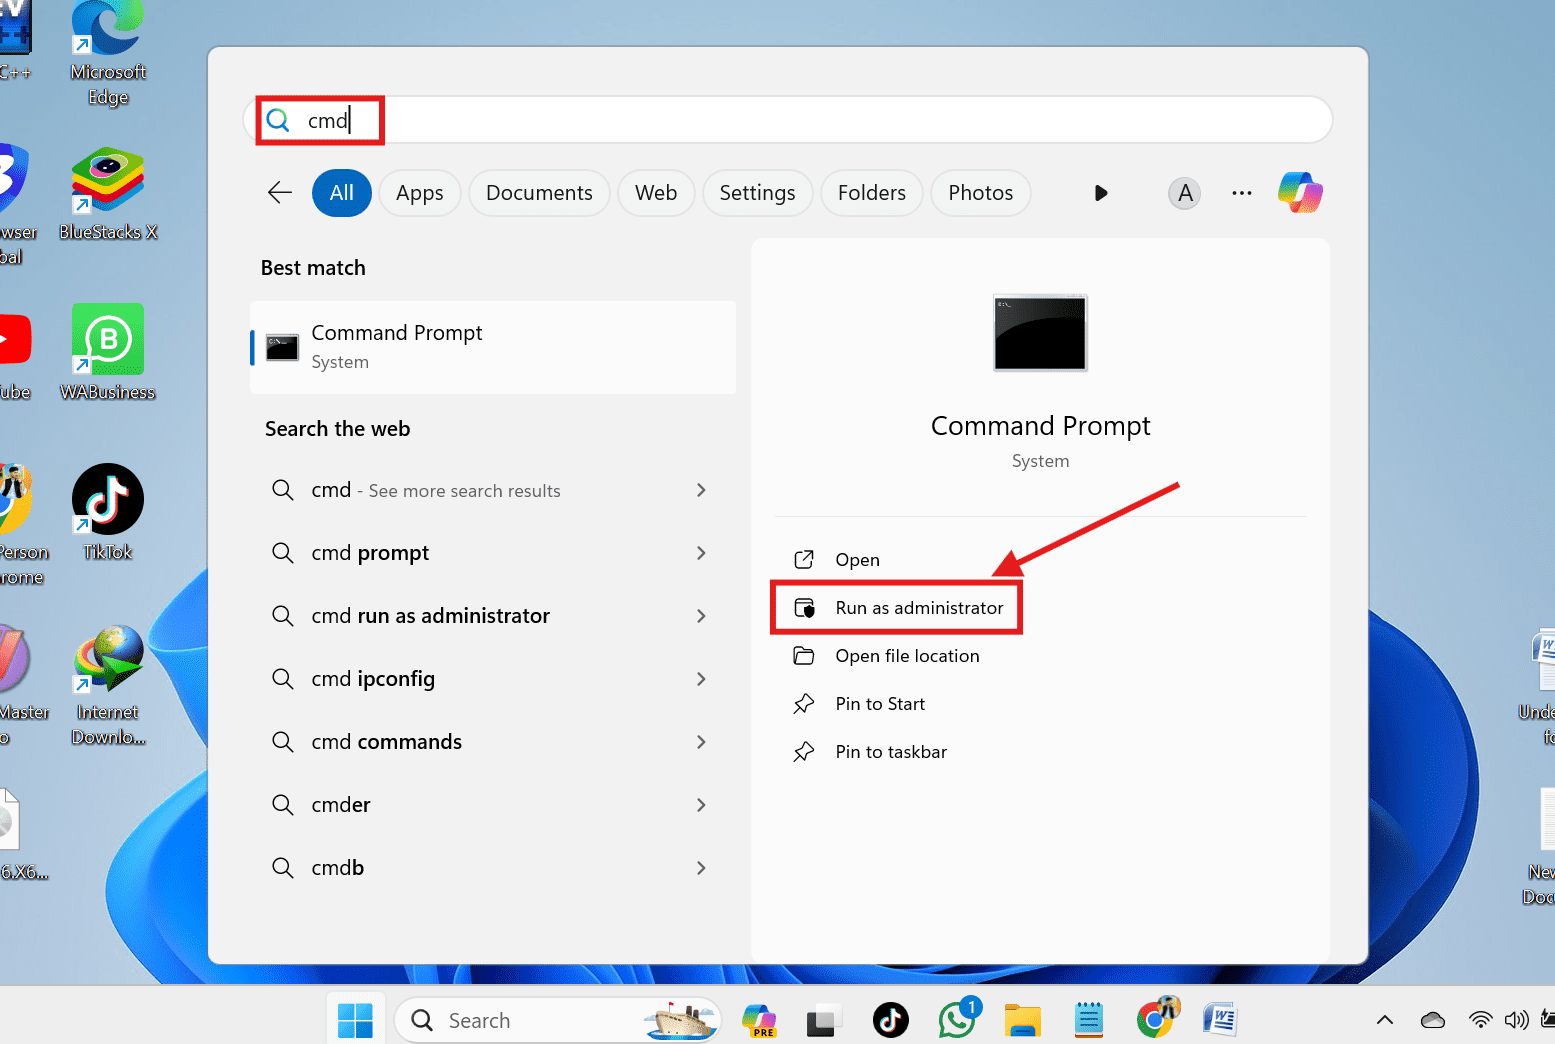
- Press Win + R, type CMD, and hit enter.

- Type netsh wlan show profiles and press Enter to see a list of saved networks.
- Identify the exact name of the network you want to forget (case-sensitive).
- Delete the Network: Type netsh wlan delete profile name=’NETWORK_NAME’ (replace NETWORK_NAME with the actual name) and press Enter. Command Prompt will confirm if successful.
Using PowerShell to Forget a Network in Windows 11
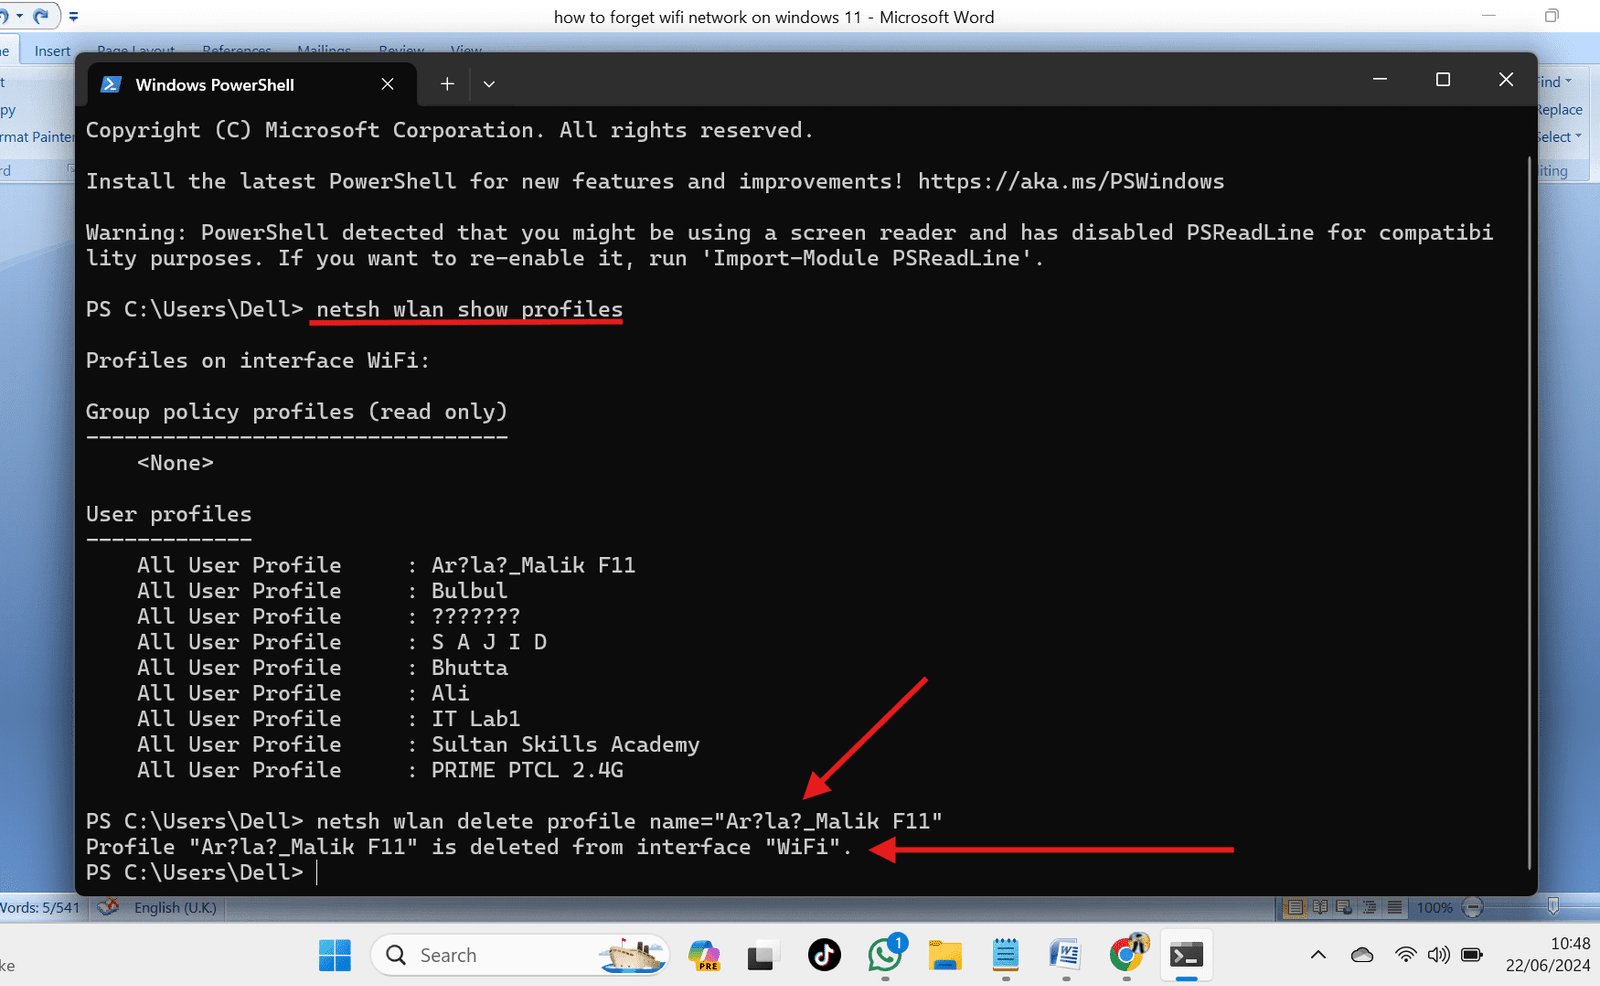
Here’s how to forget a Wi-Fi network in Windows 11 using PowerShell:
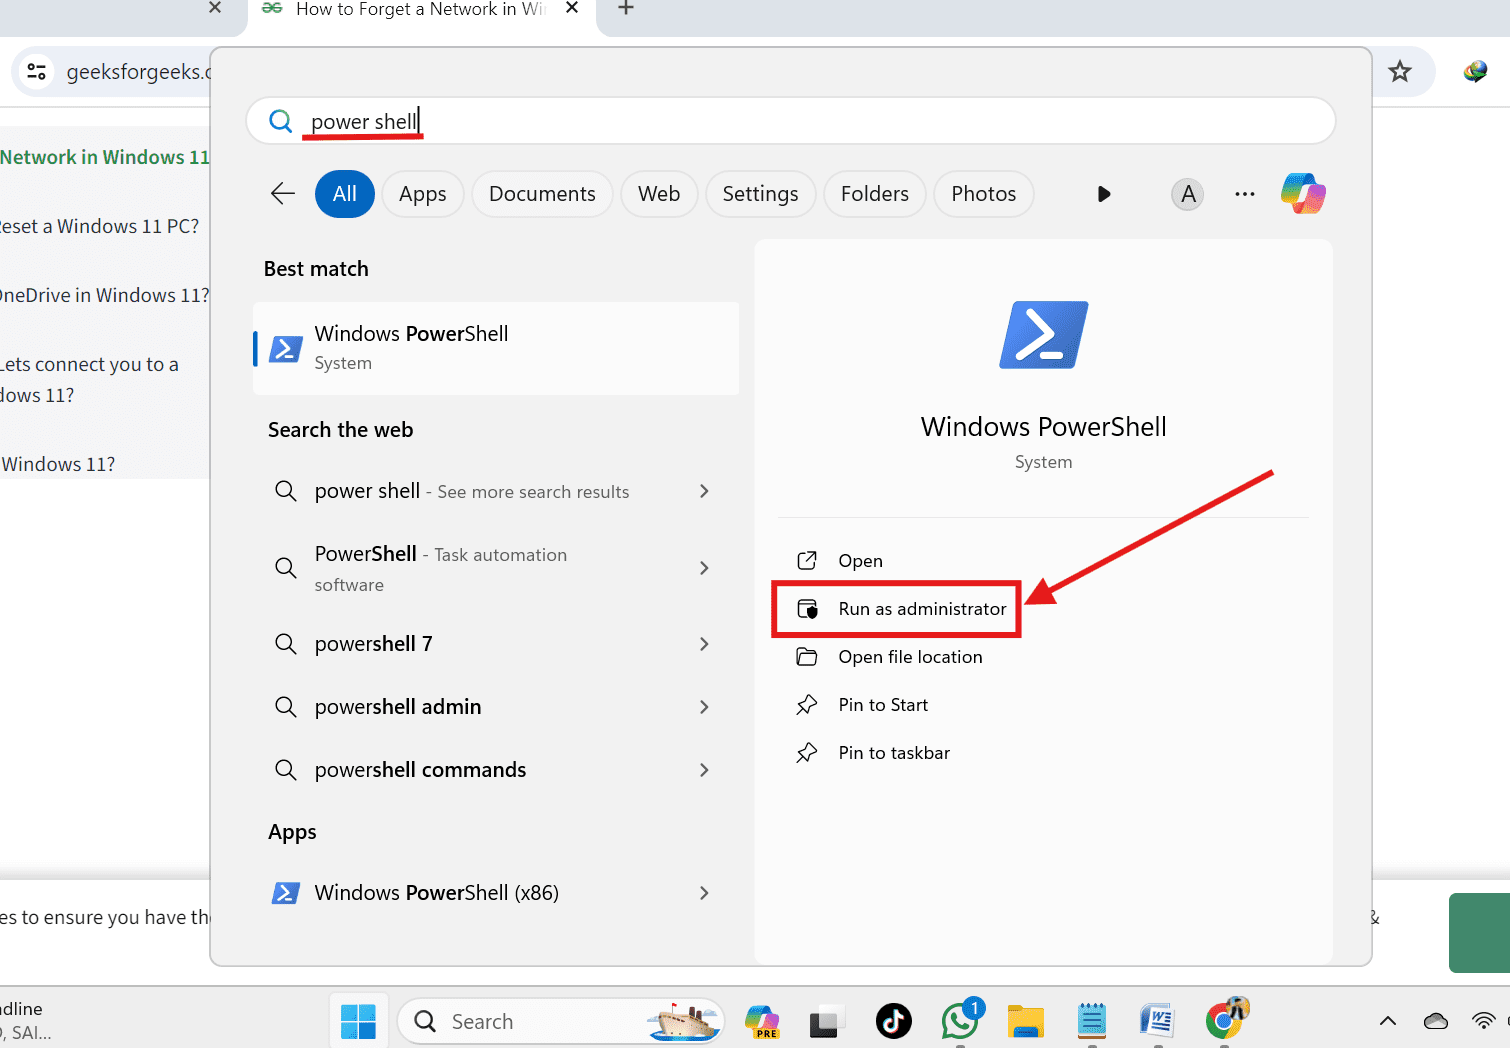
- Press Win + S, type PowerShell, right-click it, and select Run as administrator.

- Type netsh wlan show profiles and press Enter to list all saved networks.
- Identify the exact name of the network you want to forget (case-sensitive).
- Type netsh wlan delete profile name=”NETWORK_NAME” (replace NETWORK_NAME with the actual name) and press Enter. PowerShell will confirm if
How to Delete All Saved Wi-Fi Networks Using Command Prompt in Windows 11?
If you want to delete all known network profiles from your Windows PC,. Then open CMD and execute this simple command. Follow the detailed steps mentioned below.
- Press Win + S, type CMD, right-click it, and choose Run as administrator.

- Type this command and press Enter: netsh wlan delete profile name=* i=*

Forget a Wi-Fi Network on Other Operating Systems
Here’s how to forget a Wi-Fi network:
Windows 10:
- Click the Start menu (Windows icon) in the bottom left corner.
- Open “Settings” and then “Network & Internet.”
- Choose “Wi-Fi” on the left and then “Manage known networks.”
- Select the network you want to forget and click “Forget.”
Mac:
- Click the Apple icon in the top left corner and choose “System Preferences…”.
- Select “Network” and then “Wi-Fi.”
- Go to “Advanced…” and choose the network you want to remove.
- Click the minus sign (-) next to “Preferred Networks.”
iPhone:
- Open “Settings” and then “Wi-Fi.”
- Tap the information (i) icon next to the network you want to forget.
- Tap “Forget This Network” and confirm with “Forget.”
Android:
- Open “Settings” and then “Wi-Fi.”
- Tap and hold the network you want to remove and select “Forget network.”
Reconnecting to Wi-Fi:
Once you’ve forgotten the network, simply search for it again on your device and enter your username and password to connect.
Conclusion:
So, there you have it! We showed you five different ways to forget Wi-Fi networks on Windows 11. No more clutter in your list! Cleaning up your Wi-Fi networks can improve your security, performance, and privacy. You can also set internet priority in Windows 11. Just pick the method that works best for you!
FAQs: How to Forget Wi-fi Network On Windows 11 Quick solution!
I don’t remember the exact name of the Wi-Fi network. Can I still forget it?
You can try using the methods in Settings or Command Prompt. In Settings, you can sometimes identify the network by location. With Command Prompt, you can see a list of all your saved networks by typing netsh wlan show profiles and pressing Enter.
Is it safe to forget all my Wi-Fi networks at once?
A: It can be safe, but proceed with caution! This is useful if you’re starting fresh on a new computer or network. However, you’ll need to know the passwords for any networks you want to reconnect to later.
Recommended Article:

