Windows 11 can automatically choose the fastest internet connection between several networks. But you can manually set the internet priority in Windows 11.
If your Windows PC is using several internet connections (ethernet and Wi-Fi). You can prioritize Ethernet (physical connection) over Wi-Fi. Because it is faster and more reliable, or you’re trying to fix your Wi-Fi problem and want to see if it works better. You can easily change the network adapter to use Ethernet or any other Wi-Fi to identify the problem. Doing so will forget the Wi-Fi network and give preference to the wired network. But when Ethernet is down, it will automatically shift to Wi-Fi.
In this comprehensive guide, we will show you how to set Internet Priority Windows 11 using PowerShell and Control Panel. We will also talk about how you can set up apps and Programs priority using Task Manager, on the router via QoS, and Group Policy Editor.
Let’s dive in!
Quick Fixes
You can set internet priority on Windows 11 for smoother internet:
- Setting Internet Priority In PowerShell: type Set-NetIPInterface -InterfaceIndex XX -InterfaceMetric YY and replace the values of XX with ifIndex and YY with InterfaceMetric.
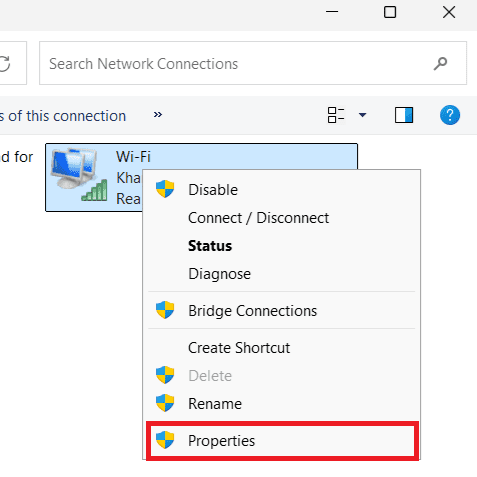
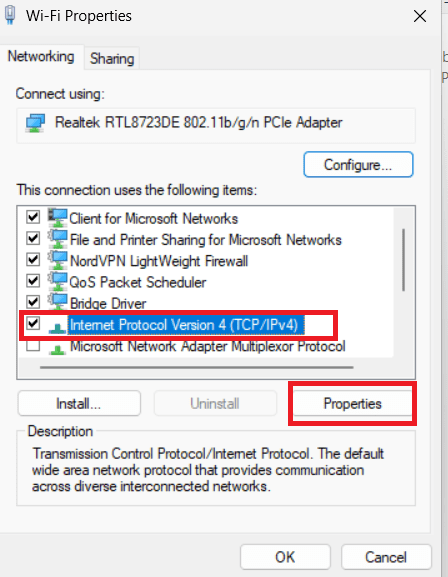
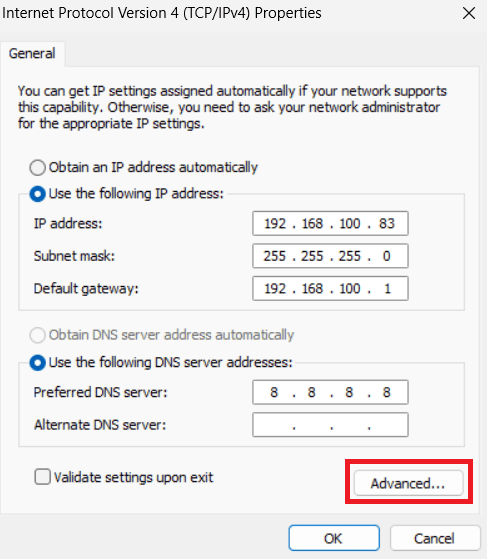
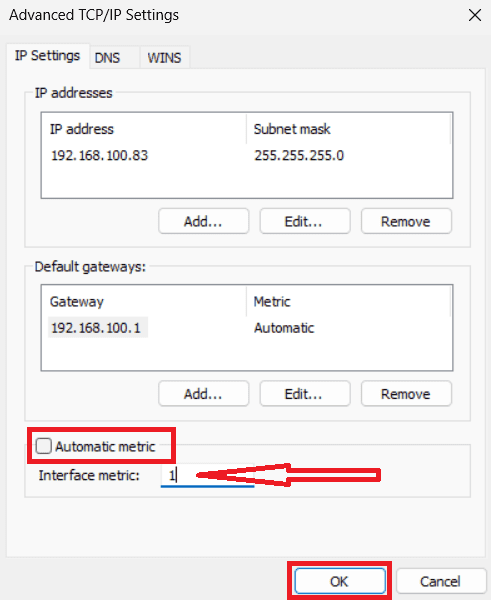
- Setting Internet Priority through Control Panel: Go to “Network Connections” > right click and select network adapter “Properties.” > Select “Internet Protocol Version (TCP/IPv4) or (TCP/IPv6) > “Properties.” > “Advanced” > uncheck “Automatic metric,” and enter desired priority value.
- Setting Network Priority (Router settings): Login to Router Dashboard > “Quality of Service” settings > Set priorities for computers and apps.
- Setup Priority (Group Policy Editor): (Win + R, type gpedit.msc) Create a new QoS policy.
- Using Task Manager: (Ctrl + Shift + Esc) > Right-click a programs > set priority.
1. How to Set Internet Priority on Windows 11/10 Using PowerShell?
If your computer is connected to both Wi-Fi and wired internet (ethernet), and slow down. You can troubleshoot network issues and easily control which connection it should use first. You can switch to the other connection to see if it fixes the problem.
Note: Your internet speed also slows down if you are using CyberGhost VPN or Hotspot Shield VPN or using any poor proxies on your computer or laptop. You might need to disable these VPNs to check if it resolve the network issues.
There are two main ways to change the network adapter priority in Windows 11/10:
Check Network Priorities Using PowerShell
- Open “PowerShell” from the start menu and run it as an administrator.
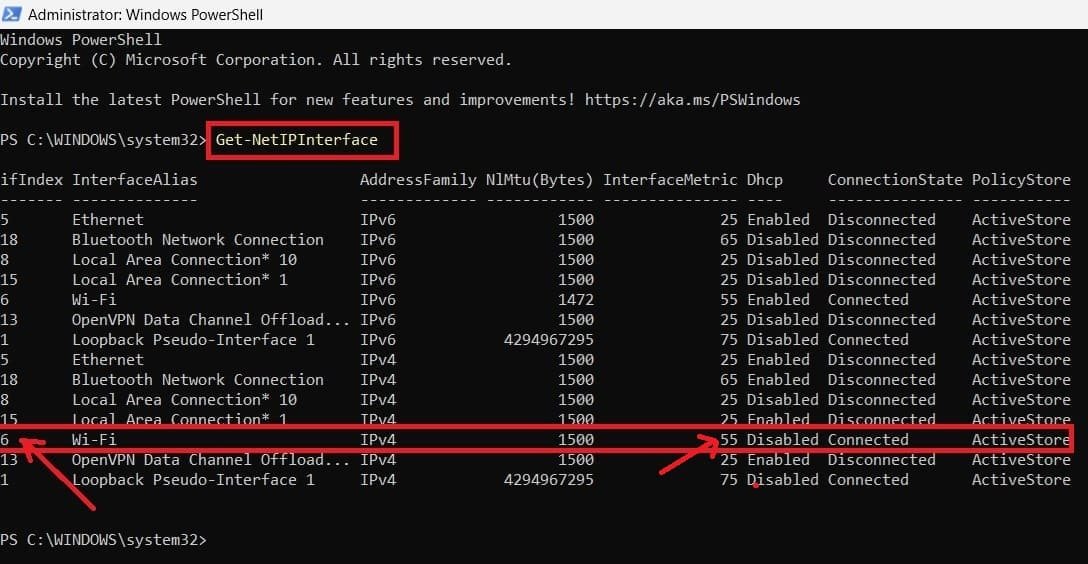
- Type the command Get-NetIPInterface to see the current priority of your network adapters under the column labeled InterfaceMetric. (Lower the number means higher priority for others).

Set Network Priorities Using PowerShell
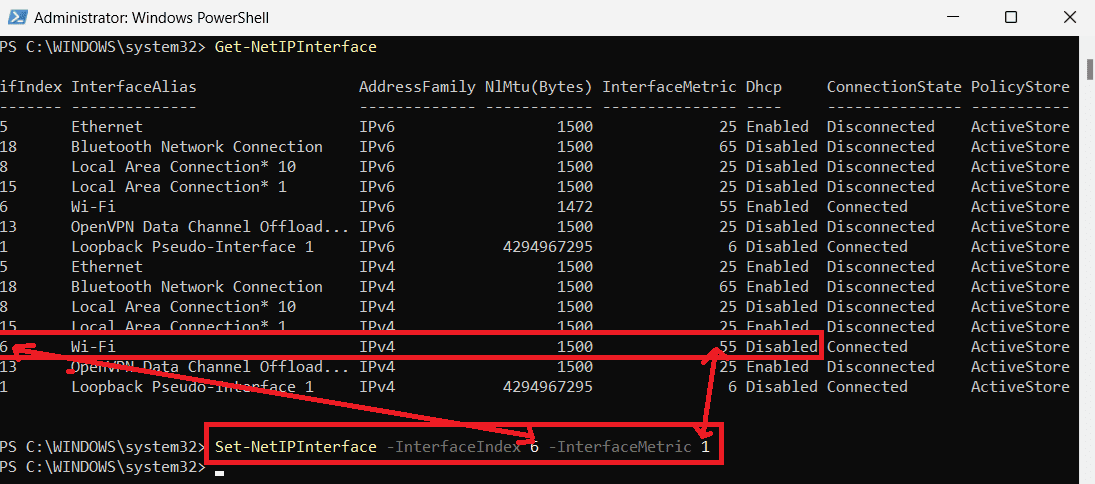
- To change the network priority, type the command Set-NetIPInterface -InterfaceIndex “XX” -InterfaceMetric “YY.”
- Replace “XX” with the current priority of ifIndex and “YY” with the new priority (for InterfaceMetric) you want to set. (Here, you will use the “ifIndex” values). I am currently using Wi-Fi adapter for internet so my command will be look like this:
Set-NetIPInterface -InterfaceIndex 6 -InterfaceMetric 1
Verify the New Internet Priority Using PowerShell?
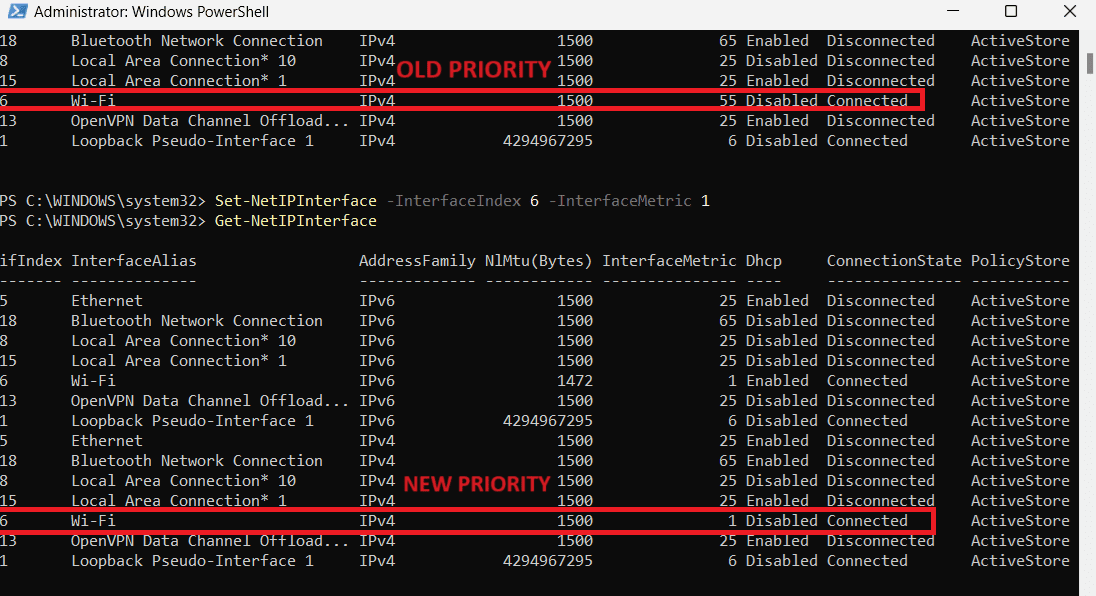
You will not receive any confirmation messages. So, to check the priority changes again, type the command
- Get-NetIPInterface

Now, type exit in PowerShell or simple close the button to exit from it.
2. How to Change Network Adapter Priority Using the Control Panel
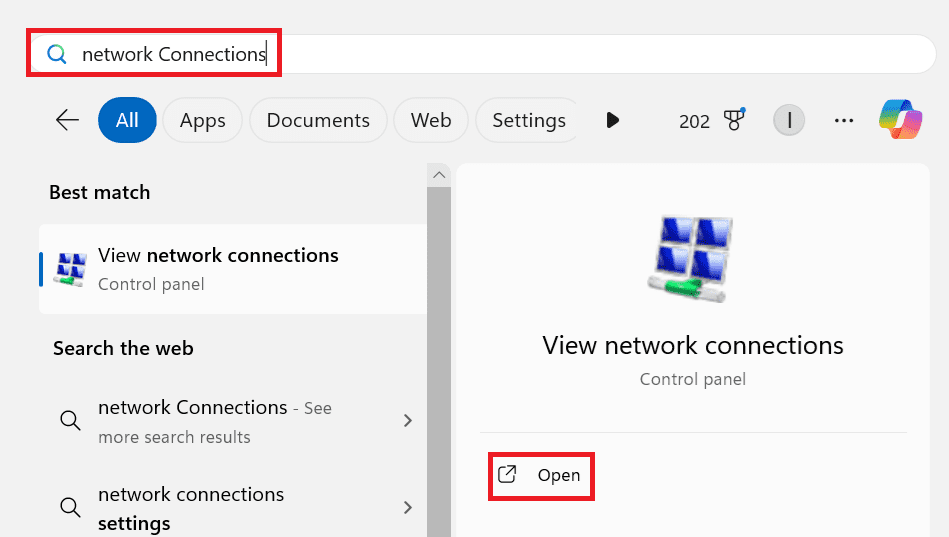
- Press the Windows key from your keyboard, type “Network Connections” (from the Control Panel), and open it.

- Prioritizing a network connection Right-click on that network adapter and choose “Properties.”

- Select “Internet Protocol Version 4 (TCP/IPv4)” or “Internet Protocol Version 6 (TCP/IPv6),” then click “Properties.”

- Go to the “Advanced” settings.

- uncheck “Automatic metric,” and write your desired priority value there.

- Click “OK” to save the changes.
Give it a lower priority number if you want a network adapter to be used first. Changing the priority is helpful in troubleshooting network issues and ensures that your preferred internet connection is used when multiple options are available.
3. Setting Up Apps and Programs Priority Using Task Manager
When a lot of devices are linked to the same network, you need a fast and reliable internet connection. So that each device and app should have sufficient bandwidth for their work. You can allow more bandwidth for certain apps in Windows 11 or devices attached to the network by setting their priorities.
Setting process priority can indirectly make important programs run faster, but Task Manager doesn’t directly change the internet priority.
Here’s how to set internet priority on Windows 11/10 so that you can better handle your network traffic.
- Press the short keys (Ctrl + Shift + Esc) and open the Task Manager.
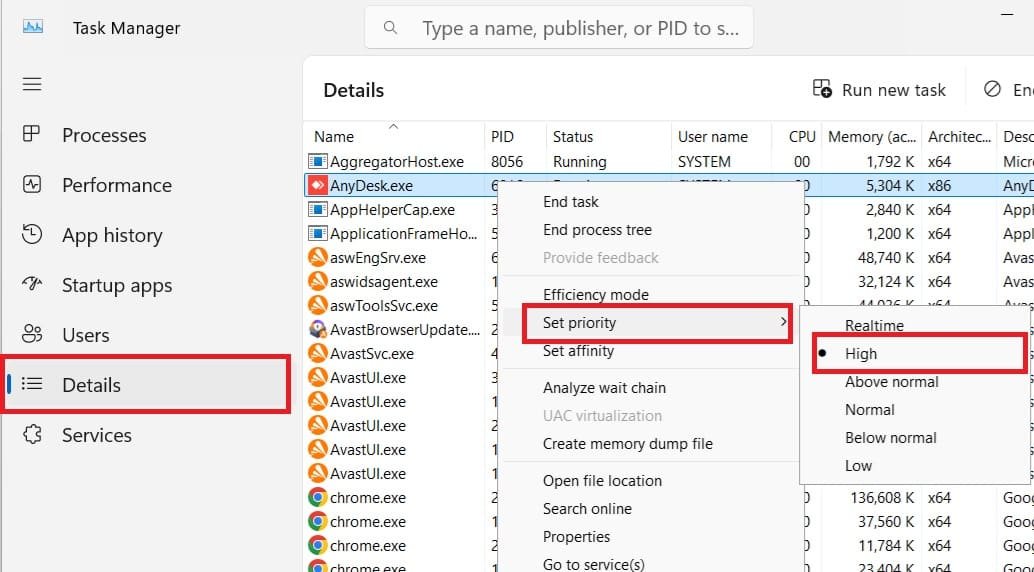
- Click on the Details tab and look for the process you want to put first.
- Right-click on the process, pick Set Priority, and then pick High. You can also set other priorities (Realtime, Above Normal, Normal, Below Normal and Low).

- Click on “Change Priority” and confirm to make the changes, then close Task Manager.
4. Setting Up Your Router to Apply Quality of Service (QoS)
Most modern routers have Quality of Service (QoS) settings, which you can efficiently implement on certain devices.
To apply the QoS on your router:
- Open the router’s settings by type the IP address of your router, like 192.168.1.1, in a web window.
- Log in as an administrator (with username and passwords).
- Go to the dashboard of your router and look for “Advanced Settings” or “Traffic Management.”
- To set priority, create a list of the devices or apps that are most important to you. Now, assign priority levels (e.g. high, medium, low) to these these nodes or apps.
- Save your changes and restart your router.
5. Setting Up Internet Priority Using Group Policy Editor
The Group Policy Editor can be used to change the preference of your internet bandwidth right from your Windows PC.
Keep in mind that this method works with Windows 11 Pro, Enterprise, and Education.
- Press Win + R and type gpedit.msc in the Run box, and hit Enter.
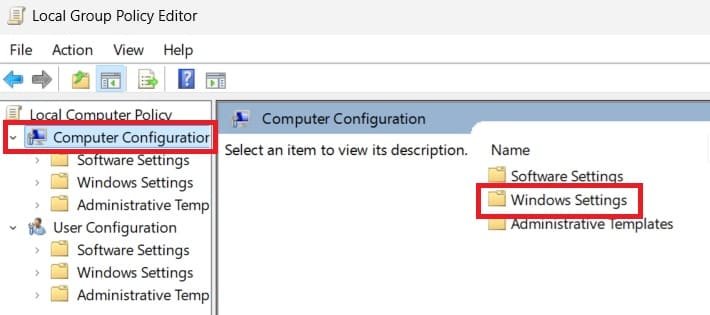
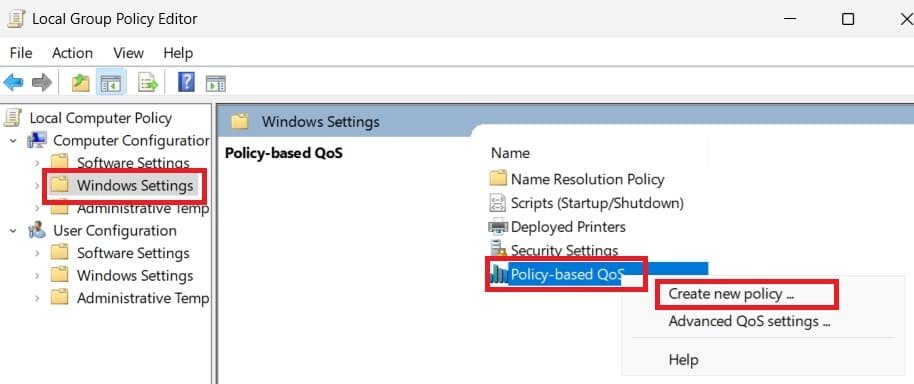
- Click on Computer Configuration, then double click on Windows Settings, and it will open Policy-based QoS.

- To make a new QoS policy, right-click on Policy-based QoS and choose “Make a New Policy.”

- Follow the rules, and restart your PC.
Conclusion
When you set internet priority in Windows 11 either using PowerShell or Control Panel, your fastest internet will be preferred and the most important apps and gadgets will get the exact amount of bandwidth they need. These tips can help you better control your network traffic, whether you are using the router settings, Group Policy Editor, or Task Manager. Making these changes can make your internet experience smoother and more effective, depending on your needs. For better performance, make sure you have the latest operating system and better system hardware. You can check the RAM type and processor using the command in the RUN box: msinfo32.
You can also find full instructions for both Get-NetworkIPInterface and Set-NetworkIPInterface on Microsoft’s website.
FAQs: How to Set Internet Priority Windows 11 (QoS, GPE, Task Manager)
Can I set internet priority for specific applications on Windows 11?
Yes, you can set internet priority for specific applications using QoS policies in the Group Policy Editor.
Do I need special software to set internet priority on Windows 11?
No, you can use built–in tools like QoS settings in your router, Group Policy Editor, and Task Manager.
Will setting process priority in Task Manager affect internet speed?
Setting process priority in Task Manager can indirectly improve performance by allocating more system resources to critical applications.

