In Windows 11, go to your network and internet settings and enable Network Discovery. If you need some privacy, turn off Network Discovery to hide your device from others.
If you’re having trouble finding other computers on your Windows 11 network, perhaps you have disabled network discovery. Network discovery allows your device to see other devices on the same network, which is useful when accessing shared folders.
In this comprehensive guide, I will explain how to turn on or off network discovery in Windows 11. We’ll cover using the Settings app, which is the simplest way. We’ll also touch on other methods for more advanced users, like turning on network discovery in Windows 11 using cmd, configuring group policies, and editing the registry.
Quick Solution
- Press Win+I >> Network & Internet >> Advanced network settings >> Advanced sharing settings
- This PC >> Network >> Turn on network discovery and file sharing.
What is network discovery?
Network discovery is a Windows feature enabling your computer to find and communicate with other devices on the same network, such as printers, shared folders, and PCs. When turned on, your device becomes visible to others on the network, allowing seamless resource sharing. It is typically enabled for Private networks for security reasons but disabled by default on Public networks to prevent unauthorized access.
Turn on Network Discovery in Windows 11 Via the Settings App
- Press the Windows key (WIN) and the letter i together (WIN+i), or look for “Settings” in the taskbar search bar.
- Click on “Network & Internet” in the left menu.
- Under “Network & Internet” settings, choose “Advanced Network Settings.”
- Look for “Advanced sharing settings” and click on it.
- Find “Network Discovery” and click the button next to it to turn it on or off.
Related: How to Disable IPv6 in Windows 11, 10, 8.1 or 7
Alternate Ways:
Using File Explorer: Enable Network Discovery and File Sharing in Windows 11
If the above method to turn on network discovery in Windows 11 doesn’t work for you, then you can use an alternative method.
While configuring a quick setting, you can access files on other computers on your network!
To allow you to share files and browse devices on your network, Windows uses two settings: network discovery and file sharing. While they work together, you can allow one without the other.
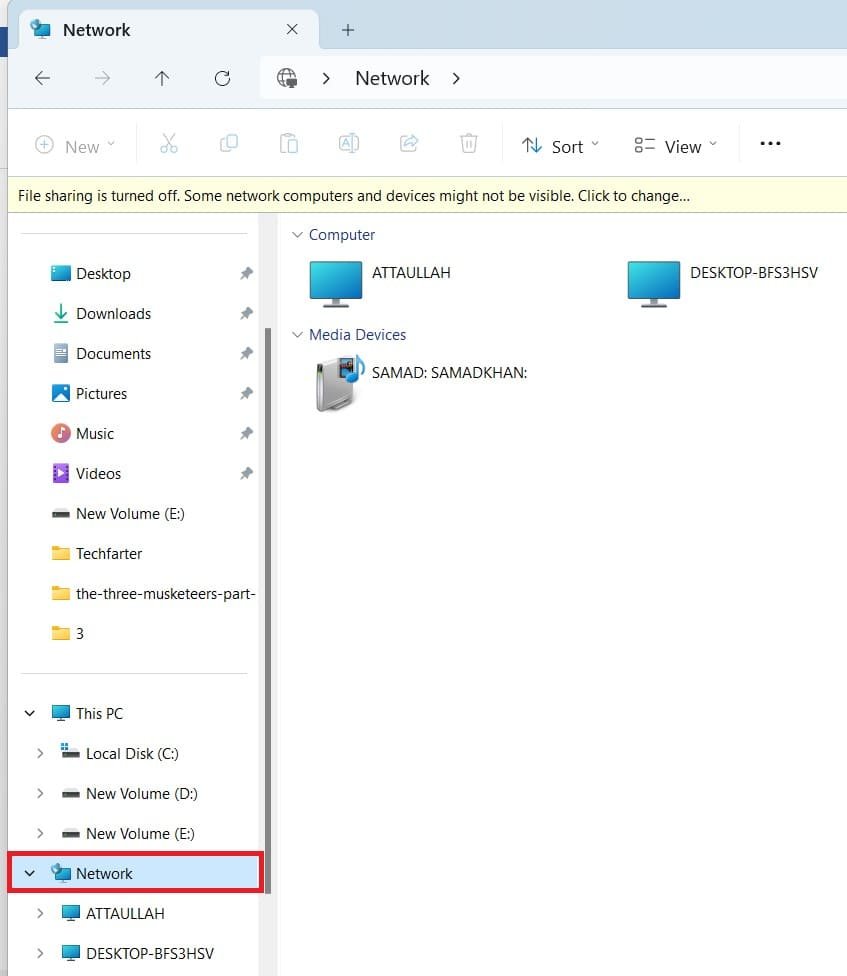
If you open “Network” in File Explorer and see an error message about “Network discovery being turned off,” that’s the culprit! This message will frequently appear as a banner at the window’s top.
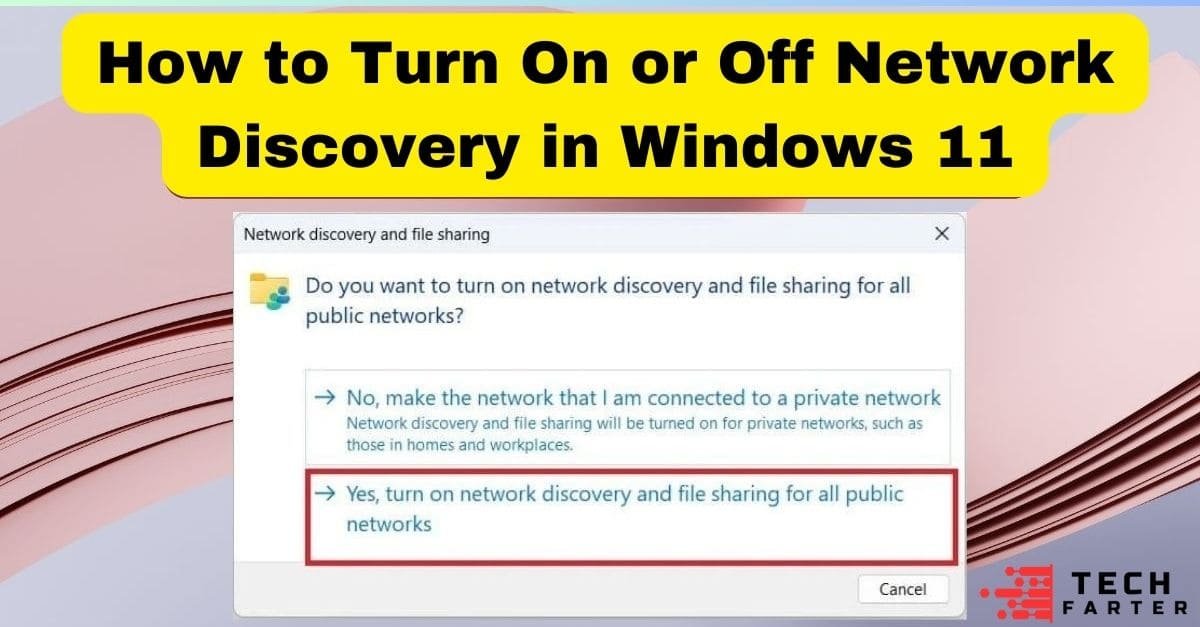
Clicking the banner will prompt you to turn on both network discovery and file sharing. Once enabled, your computer will be visible to other devices on your network, allowing you to share files and printers easily.
To do this:
- Use the desktop icon to go to “This PC” or “My Computer.”
- Click on the “Network” tab.

- Select “File sharing is off.” Some computers and devices might not be visible. To turn on network discovery, click “Change” and select “Turn on network discovery and file sharing.”

- Now, click on “Yes, turn on network discovery and file sharing for all public networks.“
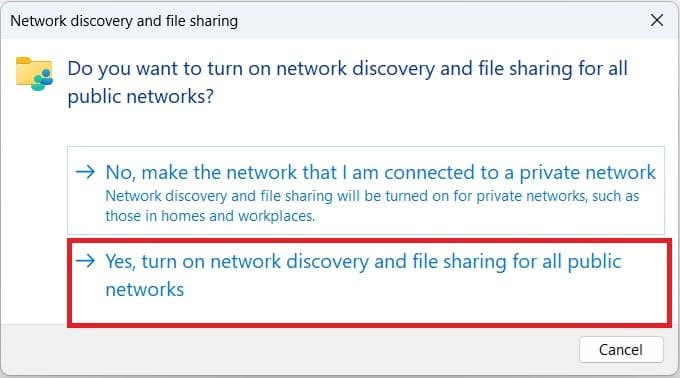
That’s it. Windows 11 will start discovering networks and will also open the option of file sharing between computer and device within the same local or Wi-Fi network.
Using Command Prompt (CMD): Turn On Network Discovery in Windows 11
While the Settings app is the easiest way to manage network discovery, Command Prompt (CMD) offers a more technical approach. Here’s how to enable network discovery using CMD:
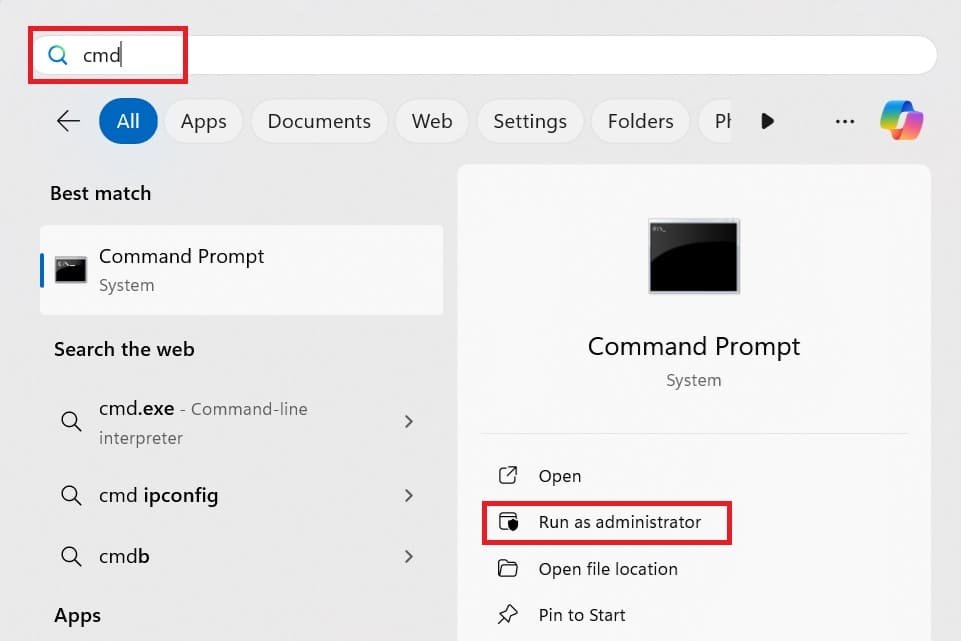
- Press the Windows key and type “cmd.” Right-click on “Command Prompt,” select “Run as administrator,” and then click “Yes.”

- In the Command Prompt window, type the following command and press Enter:
netsh advfirewall firewall set rule group=”Network Discovery” new enable=Yes

This command instructs the firewall to enable the “Network Discovery” rule group, which allows your computer to see other computers and devices on the network.
How Can I Verify Network Discovery After Enabling It in CMD?
Open the Settings app (Win+i) and navigate to “Network & Internet.” “Advanced network settings” >> “Advanced sharing settings” >> Under “Network Discovery,” you should see it turned on.

Important note: This method enables network discovery for all network profiles (public, private, etc.).
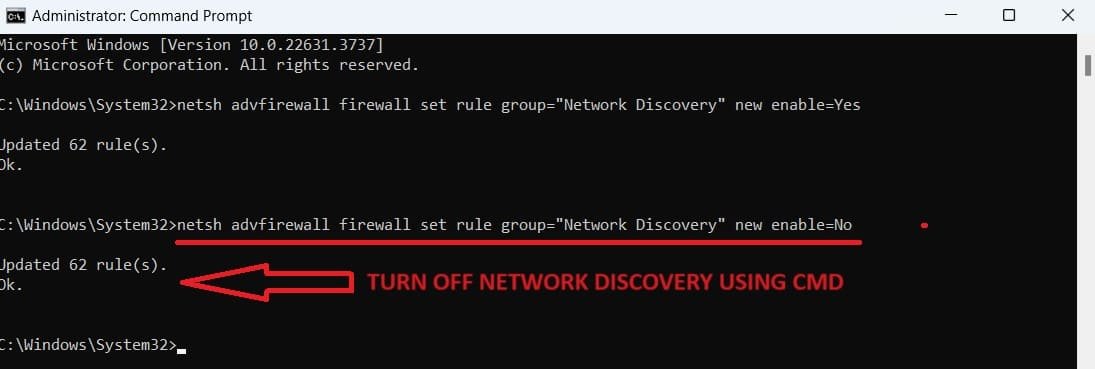
To turn off network discovery using CMD, simply replace “yes” with “no” in the above command. It will be like:
netsh advfirewall firewall set rule group=”Network Discovery” new enable=No
What is Windows 11 Network Discovery?
Ever wish your computer could easily see other devices like printers or game consoles? That’s where network discovery comes in! Network discovery is a helpful feature that allows your computer to find and connect with other devices sharing the same network. Think of it as a digital neighborhood watch. It helps devices recognize each other!
With network discovery enabled, you may see familiar devices on your network, such as your router, streaming stick, or even other computers. This makes it easier to share files, printers, and other resources between your devices.
When is It Appropriate to Turn Network Discovery ON or OFF?
Ever want to print from another computer on your network or access cool photos your friend shared? Network discovery is your secret weapon! It allows your computer to see other devices sharing the same Wi-Fi, much like looking around a digital neighborhood.
Here’s why Network Discovery is awesome:
Effortless File Sharing: Imagine having a printer downstairs that you can use from upstairs! With network discovery enabled, your computer can find shared resources on other devices, such as printers and folders. Just open “Network” in File Explorer and double-click the device to access the goodies.
Keeping Things Private: Maybe you brought your laptop on a trip and have some personal photos. Turning off network discovery hides your computer from others, making it harder to stumble upon your shared files. Think of it like putting a “Do Not Disturb” sign on your digital door.
So, network discovery: on or off? It depends! If you want to share resources or access files from others, turn it on for a simple connection. But if you prefer keeping things private, especially on unfamiliar networks, turn it off for extra security.
How to Turn Off File and Printer Sharing While Discovery is Turned On?
With this method, you can see your devices on a network but keep files and printers private.
It’s important to turn off file sharing on public Wi-Fi networks to protect your personal information. Let’s learn how to enable network discovery while keeping file and printer sharing disabled.
Why this matters: Network discovery shows you other computers on your connected network, which can be useful for browsing media or playing games together. But on public Wi-Fi, it’s best to keep file sharing off to prevent unauthorized access to your documents and printers.
Here’s how to easily stop sharing files and printers on your network in Windows
- Open Settings (press Windows + i).
- Navigate to “Network & Internet” and click on “Advanced network settings.”.
- Find the option for “File and printer sharing” and turn it off with the toggle switch.

How to turn on or off network discovery and file sharing in Windows 10 and 8
Here’s one correct method to turn on network discovery and file sharing in Windows 10 and 8:
- Open the Control Panel and go to Network and Sharing Center.
- Click on Change advanced sharing settings in the left-hand menu.
- Under your active network profile (Private or Public):
- Select Turn on network discovery.
- Check Turn on file and printer sharing.
- Click Save Changes and close the window.
Ensure your network is set to Private for seamless sharing.
Conclusion
The above guide helps you find other computers on your Windows 11 network. You might have disabled the network discovery option. Enabling this feature allows your device to see others on the same network, which is useful for sharing files and printers.
This guide walks you through enabling network discovery in Windows 11, both through the Settings app and using alternative methods for advanced users. We also cover when to turn network discovery on or off and how to disable file sharing while keeping discovery enabled for browsing devices on your network.
Frequently Asked Questions (FAQs)
How to enable network sharing in Windows 11?
To enable network sharing in Windows 11, follow these steps:
- Open Settings → Network & Internet → Advanced network settings.
- Under Related settings, click Advanced sharing settings.
- Under your active network profile (Private or Public), turn on:
- Network discovery
- File and printer sharing
- Click Save Changes to apply the settings.
Your computer will now be able to share files and devices on the network.
Should network discovery be on or off?
You should generally leave network discovery off unless you specifically need to see other devices on your network.
Here’s the key takeaway:
- Turning on network discovery on a public Wi-Fi network can be a security risk.
- It’s safer to keep it off unless you’re on a private network where you trust the other devices.
- Network discovery enables your device to see and detect other devices in your local area and Wi-Fi network.
You can turn in:
- ON: Sharing files and printers with other computers allows for resource sharing.
- OFF: It will add a layer of security by making your device invisible on untrusted networks.
Is network discovery safe?
Network discovery is safe when used on trusted networks, such as private home or work networks, as it allows devices to find and communicate with each other. However, it can pose a security risk on public networks, as it makes your device visible to others. To enhance security on public networks, using a VPN (Virtual Private Network) is recommended, as it encrypts your connection and helps protect your data from unauthorized access.
How do I disable SSDP Network Discovery?
To disable SSDP Network Discovery, do the following:
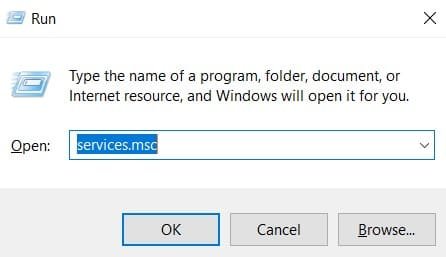
- Press Windows+R, type “services.msc,” and click OK.

- Scroll down and locate “SSDP Discovery Service.”

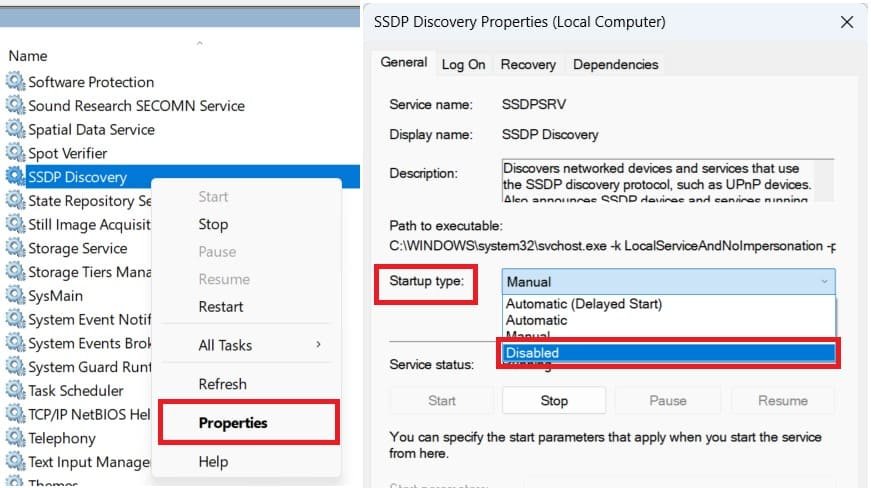
- Right-click on “SSDP Discovery” and then click on the “Stop” or “Stop the service” button.

- Right-click on SSDP Discovery and click on “Properties,” then go to “Startup Type” and select “Disable” from the drop-down menu.
How do I disable network discovery via group policy?
Disabling network discovery entirely through Group Policy in Windows 11 involves a two-pronged approach:
Blocking Network Discovery with Firewall Rules:
- Press “Windows + I” and type “gpmc.msc” to open the Group Policy Management Console (GPMC).
- Next, navigate to Computer Configuration >> Policies >> Windows Settings >> Security Settings >> Windows Firewall with Advanced Security.
- Search for “Inbound Rules,” right-click on it, and click “New Rule.”
- For Rule Type, choose “Predefined” and “Network Discovery.” Click “Next.”
- From the list, select only the following rules (regardless of profile):
- File and Printer Sharing (Discovery)
- Network Discovery
- SSDP Discovery
- Click “Next” and choose “Block the connection.” Then, click “Finish.”
Disabling related services:
- Go to the following locations in the same Group Policy Management Console:
Computer Configuration, Policies, Windows Settings, Security Settings, and System Services. - Locate and right-click on each of these services:
- Function Discovery Provider Host
- SSDP Discovery
- UPnP Device Host
- Select “Properties” for each service.
- Under “Startup type,” choose “Disabled.”
- Click “Apply” and “OK” to save the changes.
Why does network discovery keep turning off in Windows 11, and how can I fix it?
If network discovery will not stay on in Windows 11, here are a few troubleshooting steps you can follow to resolve the issue:
1. Check Windows Firewall Settings
- Open the Control Panel and go to Windows Defender Firewall → Allow an app or feature through Windows Defender Firewall.
- Make sure that Network Discovery and File and Printer Sharing are enabled for both private and public networks.
2. Ensure Required Services Are Running
- Press
Win + R, typeservices.msc, and press Enter. - In the Services window, ensure the following services are running:
- DNS Client
- Function Discovery Resource Publication
- SSDP Discovery
- UPnP Device Host
- If any of these are not running, right-click and select Start.
3. Check Network Profile Settings
- Open Settings → Network & Internet → Status → Advanced network settings → Network and Sharing Center.
- In Change advanced sharing settings, make sure Turn on Network Discovery is selected under your network profile (Private).
4. Run the Network Troubleshooter
- Go to Settings → System → Troubleshoot → Other troubleshooters → Network Adapter.
- Run the troubleshooter to detect and fix any issues with network settings.
5. Reset Network Settings
- Open Settings → Network & Internet → Status → Network reset.
- Click Reset now to reset all network adapters and settings to their default state.
Recommended Article:

